Friday, September 25, 2009

Just Like Mama's Nilla Banana Pudding Muffins


I grew up in the 50s and 60s and what these eras saw was an increase in packaged foods. I will admit, I love Nilla Wafers and couldn't wait until my mother made the infamous Nilla Banana Pudding for dessert. Keeping this in mind, these muffins are my interpretation of that dessert. I've added some unique twists, but the result is worth giving this recipe a try.
Preheat oven to 400F-degrees
Start by mashing 2 ripe bananas in a large bowl. Then, add:
1 cup granulated sugar
3 eggs
1/2 cup sour cream
1/2 tsp. Banana flavoring
Whisk these ingredients until thoroughly combined. Next, add:
1/2 cup (1 stick) unsalted butter, melted and slightly cooled
Whisk again.
In a processor: Measure out 2 cups of Nilla Wafers and 1/2 cup Banana Chips
Process until you have fine crumbs. Add this to the batter along with:
1 pkg. (3.4ounces) Jell-O Instant Pudding & Pie Filling (use Vanilla or Banana Cream)

Mix dry ingredients: 2 cups All-purpose Flour, 2 tsp. baking powder, 1 tsp. baking soda, 1/2 tsp. salt. Add to the batter, alternating with 1 cup milk. Use a spatula to mix up the ingredients at this point and make sure you do not overmix. Line muffin pans with tulip muffins papers or muffin papers. Use a scoop to put batter into the papers. Top the muffin batter with a Nilla Wafer. Bake at 400F-degrees for 5 minutes, then, lower temperature to 375F-degrees and continue baking 15 minutes or until golden brown and muffins are firm to the touch. Let cool in the pan 10 minutes before removing.

My trick to start the muffins at a higher temperature results in a nice high center. Serve warm with butter, but honestly, they're so moist you don't need it (sorry Julia!). Enjoy
Posted by Picasa

Thursday, September 24, 2009

Pumpkin Butter

Making jams, jellies, and butters doesn't necessarily come under baking, but they sure enhance a lot of baked goods. Muffins, scones, homemade bread and rolls always taste better slathered in them. Feeling fallish and having some leftover pumpkin made the choice for today's blog. I hope you try it because it's easy and will make wonderful gifts for the holidays.
The first thing you want to do is prepare the jars. I buy Ball jars (8-ounce size). When you wash them, make sure you run your finger around the rim to check for any cracks or irregularities. This is important for sealing properly. I fill the jars with water and place 3 at a time in the microwave on HIGH for 3 mins/45 secs. This step easily sterilizes the jars. Use canning tongs (or a hot pad) to remove them. Pour out the water and turn them upside down on paper towel-lined baking sheet. Cover the jars with a towel. Repeat until you have prepared 7 jars. Also, place the jar rings into a saucepan, covered with water and bring them to a boil. Reduce the heat to low and add the lids. In an enamel-lined Dutch oven(I use LeCreuset) combine:
5 cups canned pumpkin (not pie mix!)
1 box (1 3/4 ounce) packaged powdered fruit pectin
1 1/2 T. pumpkin pie spice
Cook and stir over medium-high till mixture is very hot (the mixture is too thick to boil)
Stir in 5 1/2 cups of sugar and continue stirring until mixture comes to a boil.
At this point, I like to cover the top with a silcone lid to prevent the mixture from
popping up on me.

Boil hard for 1 minute, stirring constantly, but keep the lid on or use aluminum foil to protect yourself.
Don't go away and answer the phone. I did that once and came back to find pumpkin butter on my ceiling!
Turn the jars over and ladle the mixture into them to 1/4-inch from the top.
Wipe the rims with a wet paper towel and then, add the lid and ring. Close tightly and turn the jars upside down. When you have all the jars filled, set timer for 10 minutes. Turn the jars upright and you should hear a "popping" to signal they have sealed. Test by pressing in on the top. If you can still press and feel it go down, it isn't sealed. Turn it upside down and wait another 5 to 10 minutes to test. Any jar that doesn't seal should be placed in the refrigerator, but I've never had that happen. I can't wait to try the crumpets and spoon Pumpkin Butter on top. Hope you'll try this. Enjoy!

Posted by Picasa

Wednesday, September 23, 2009

Crumpets

I haven't made these yet, but thought if anyone who had tried English muffins wanted to try another version of a breakfast bread, here a recipe for Crumpets.

Tuesday, September 22, 2009

Three More Flavors Come Together...

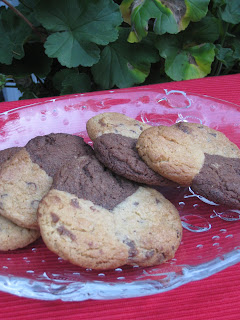
My daughters loved these cookies. The original recipe came from a Pillsbury's "Chocolate Lovers" cookbook, but since it was copyrighted in 1985, it may not be available, so I decided to play around and make up a new one. I call them Trifecta Cookies because of the three winning flavours; Chocolate Chip, Chocolate, and Peanut Butter. My girls liked to break the sections apart and eat the "flavours" one at a
time. Heck, I like to eat them that way too!
TRIFECTA COOKIES
Preheat oven to 375F-degrees. Line cookie sheet with parchment paper. In the bowl of your KitchenAid, using the paddle, cream:
3/4 cup (12 T) unsalted butter
3/4 cup Crisco shortening (I used the sticks for easy measuring)
1 1/4 cups firmly packed golden brown sugar
3/4 cup granulated sugar
Blend until light and fluffy. Add:
2 eggs
1 1/2 tsp. vanilla
and beat to incorporate, scraping down the sides in between.
Add:
3 cups All-purpose flour
1/2 tsp. baking powder
1 1/4 tsp. baking soda
1/2 tsp. salt
Mix only to incorporate. Divide dough into 3 parts (14 1/2-ounces each)
Add: 3/4 cup mini chocolate chips to first dough; 2 ounces of bittersweet chocolate (melted), 1/2 tsp. chocolate extract, and 1 tsp. espresso powder to the second dough; 1/2 cup chunky-style peanut butter, 1/2 tsp. peanut butter flavoring (optional) to the third dough. Refrigerate doughs for 30 minutes for ease in handling. I used a 1 1/2 tsp. scoop to form the three doughs. Alternatively, you can use a teaspoon of each dough and shape into a ball. Place the doughs next to one another. Bake for 10 to 12 minutes or until set. Let cool a couple of minutes on the cookie sheet before removing to a cooling rack. Enjoy!
Posted by Picasa

Monday, September 21, 2009

When life gives you lemons...make Luscious Lemon Bars

During a telephone conversation this past weekend with my sister, Barbara, we started reminising about Mom's lemon meringue pie and her wonderful Lemon-glazed cheesecake. You see, next to chocolate, lemon was Mom's next favorite flavoring and ours too! Since I had just bought a bag of lemons, my baking today tries to capture that memory.
Luscious Lemon Bars
Preheat oven 350F-degrees. For the crust: Measure 1 cup All-purpose flour, 1/2 cup finely ground Almonds, 1/3 cup sugar, a pinch of salt, and 1/4 tsp. freshly ground nutmeg. In the food processor, process briefly to blend. Then, add through the feed tube, 10 T cold unsalted butter, one tablespoon at a time. Pulse until the dough forms moist crumbs. Press the dough into the bottom and approximately one-inch of the sides of a glass baking dish. I used a 7" x 12" one, but you could also use a 8" (or 9") square. Bake 18-20 minutes until golden brown. Let the crust cool on a wire rack while you mix up your lemon filling. Lower oven temperature to 325F-degrees
For the filling: In a bowl, whisk together 1 cup of granulated sugar, 2T Instant ClearJel , pinch of salt, 1 T lemon zest, 3 large eggs and 1 large egg yolk, 2/3 cup freshly squeezed lemon juice, 3 T. heavy cream. Carefully pour the filling over the crust and return to the oven. Bake 16-18 minutes or until the filling is set, but still jiggles slightly when the dish is shaken. (If you have used an 8" square dish, you may have to increase the time to 18-20 minutes.)
Let the bars cool for 20 to 30 minutes before cutting. I ran a small metal spatula around the dish to loosen the edges, then, cut them in bars.
Traditionally, the bars are dusted with confectioners' sugar and you can do that with a fine-mesh sieve or a shaker. Because I was craving lemon meringue pie, I chose to make a meringue from the left-over egg white. I used my hand-held mixer with the whisk attachment and whipped the egg white and a pinch of cream of tartar to soft peaks. Next, I sprinkle sugar, while whipping, 1 T. at a time until I had incorporated 3 T. of sugar and had glossy peaks. I piped the meringue on top of the bar and then used my kitchen torch to brown the peaks. I closed my eyes when I took a bite and imagined I was in my mother's kitchen having a slice of her lemon meringue pie. It was certainly close enough to brings tears to my eyes! Enjoy!
*Note: If you don't have Instant ClearJel, you can substitute the same measure of all-purpose flour.  The difference will be that flour tends to give a "cloudy" look to fruit fillings, whereas, the ClearJel doesn't.
Posted by Picasa

Saturday, September 19, 2009

New Book and Things to Come...


One last post...when we go to Portland, we always head for Powell's Bookstore.  It a wonderful place to spend the day and, although I was on a mission to find a book on "Colors" for our grandson Ari, I did happen across a new cookbook.  It's filled with great recipes, but it also has a complete chapter on equipment and technique that any baker would love.  I can't wait to try some of these mouth-watering recipes and share them with you.

Yes, another roll

Here's yet another roll in my recipe repertoire that I love to make. It's a softer roll, bordering almost on being a brioche, but the dough is much easier to handle. These rolls make great sandwiches, but if done in half the size, really makes a great dinner roll for all those holiday feasts coming up. I use the KichenAid to make these up, so you will start with the paddle attachment, but later switch to the dough hook.
In the bowl, add:
1 large egg
1/2 cup sugar
1 tsp. salt
Mix to blend well. In a 2-cup glass measuring cup, add:
1/2 cup whole (or 2%) milk. (I buy milk that I'm using for baking, since we drink non-fat, in 8-ounce cartons that store on the shelf)
4 T. unsalted butter
Microwave for 25 seconds and check to see if the butter has melted. If not, do 20 seconds more. Add warm water to the measuring cup to bring it up to 2 cups of liquid.
While the mixer is running, pour the milk/butter/water mixture over the above ingredients. Then add: 2 T. dry yeast and mix just until incorporated. Let this sit for 5 to 10 minutes. The mixture should be frothy if your yeast is good; if not start over! Next, add 1 cup Bread flour while the mixer is running and incorporate well. You will do this two more times (for a total of 3 cups of flour). Change to the dough hook and add 2 to 2 1/2 more cups of flour, one cup at a time, until dough comes away from the sides of the bowl. Turn dough out on a very lightly floured board. Meantime, heat 1 T butter in a large glass bowl in the microwave for 40 seconds. Take bowl out and brush sides with the melted butter. Knead the dough until it's smooth, then, place it right-side down into the bowl. Turn it right-side up (you'll see the top has been coated with the melted butter). Place plastic wrap over the opening, making sure it pulls tightly to make a seal. Let dough rise for 40 to 45 minutes. Punch down risen dough and divide into 12 pieces (or if making dinner size rolls, 24 pieces). Roll and flatten each piece and place on a baking sheet that has been brushed with melted butter. When you've done all the rolls, brush the tops with melted butter and place a piece of plastic wrap overtop. You do not have to stretch it tightly because you will next place a cotton dish towel over the pan to protect from drafts. While the rolls are rising a second time, preheat over to 375F-degrees. Let rise, about 20 minutes, then uncover and place in the over. Bake 15 minutes. These rolls have a lot of flavor and really make good sandwiches! Enjoy!
Posted by Picasa

Pocket Pies

First, I apologize for not posting the last few days. We drove to Portland, Oregon for our anniversay and I didn't bake! Today, is another game day and I was, once again, up early making the tailgate picnic for my husband and our friend. It's also rainy, so in addition to baking, I made a pot of chili to pack up as well.
The first thing I made up was pie dough to make these cute Pocket Pies. I found these molds at Williams-Sonoma this summer and have had fun making blueberry and cherry pies with the Star and Heart shapes. In Portland, I bought the Apple and Pumpkin molds to continue with the fruits of fall. My pie crust is easy and makes four disks that will easily freeze for up to six months. A good idea to make dough up now for Thanksgiving and Christmas (which is just around the corner!)


PERFECT PIE DOUGH
4 cups All-purpose Flour
1 tsp. salt
1 tsp. sugar
1 tsp. baking powder
Place all the dry ingredients into the KitchenAid with the paddle attachment. Turn on low and mix up the dry ingredients. Then, add 1 3/4 cup butter-flavored Crisco,(I use the sticks for ease in measuring,) Cut in cubes and add to the dry ingredients, while the mixer is running. Incorporate the Crisco, but don't overmix; it should still see some clumps of shortening through the dough at this point.
In a 2-cup glass measuring cup, add: 1/2 cold water, 1 egg, and 1 tsp. apple cider vinegar. Use a small fork and mix up well. While the mixer is running on low, pour the wet ingredients over the dry. Mix only until the dough comes together and no dry ingredients showing. Turn out onto a board, very lightly dusted with flour, and knead together. I form the dough into a large log and use my dough scrapper to cut it into fourths. Then I flattened them into disks. Wrap in plastic wrap and refrigerate one hour. If you're freezing the dough for later use, place the wrapped disks into a freezer bag. (Make sure you mark the bag with the date). This pie dough rolls out beautifully and no matter how much you work with it, it never gets tough!
Posted by Picasa

Monday, September 14, 2009

Pumpkin done differently

My baking takes a turn with the seasons. Now that fall is coming up, I love baking with apples and pumpkins and infusing them with spices of ginger, cinnamon, cardamon, nutmeg, and cloves. Today was one of those overcast days we have in Seattle, but I can't complain since out weekend was warm and beautiful. This is a Pumpkin Bread for all intense and purposes, however, I've added a few surprise ingredients you wouldn't expect and instead of baking in a loaf pan, I chose my wonderful mini bundt pan to create these little breads!
Preheat oven 350F-degrees/Convection
In a large bowl mix:
1 1/2 cups sugar
1 cup canned pumpkin
1 large banana--mashed
2 eggs
1/2 cup of oil (I used peanut, but walnut or almond oil would be great too). Use a whisk to blend all of these ingredients.
In a separate bowl add:
2 cups All-Purpose flour, 1 1/2 tsp. baking soda, 1/2 tsp. baking powder, 1/2 tsp. Kosher salt, and 2 tsp. Pumpkin Pie Spice. Whisk to incorporate all the dry ingredients. Then, add to the "wet" ingredients and blend with a spatula. (Don't use a mixer) Add 1 cup chopped dates and 3/4 cup toasted walnuts, roughly chopped. Prepare mini bundt pan by spraying with Crisco with flour spray. Use a one-half cup scoop for measuring the batter for the mini bundt pan. Bake 16-18 minutes.
These mini bundt cakes are so moist you can eat them plain, or dusted with confectioners' sugar, or make a glaze.
Glaze: 1 cup confectioner's sugar, 1 tsp. light Karo syrup, 2 to 3 T. warm water.

As an alternative to the mashed banana, I have used a small can of crushed pineapple, drained; or 2 cups of grated zucchini. Also, you could use pecans or even macadamia nuts (if you did the pineapple) instead of the walnuts and try mini chocolate chips. Somehow, chocolate and pumpkin is a great combination. Lastly, if you would rather bake this recipe as a loaf, use a 9" x 5" loaf pan and increase time to 50-60 minutes.  Enjoy!
Posted by Picasa

Saturday, September 12, 2009

Eerie Phenomenon...

I know this has nothing to do with baking...but yesterday, I was out on our deck knitting and the most eerie phenomenon happen.  I got up to go inside and answer the telephone, when I returned, I saw this yarn coming out of my knitting bag, suspended at a right angle.  I tried to push it down, but it just went out again.  What's even weirder is that it's from a ball of yarn I wasn't even using!  Believe it or not!!

Game Day Lunch

On the menu for the football game today is meatball subs, Confetti Pasta Salad, and a slice of the Easy Apple Cake in the cast-iron skillet.
The bread recipe I made for the baguettes is simple and done in the Cuisinart, as my previous recipes. The added ingredient to the recipe was a cup of sourdough starter. I keep a crock in the refrigerator with it to add to bread, rolls, even pancakes batter, to give that oh, so familar tang distinctive of sour dough. Here's my recipe:
Proof 1 1/2 T. yeast in 1/2 cup very warm water with 1/2 tsp. sugar. Whisk to combine and let set 5-10 minutes until foamy. To the bowl of the Cuisnart add 5 cups Bread flour, 1 T. Kosher salt, 2 T. sugar; pulse several times to incorporate completely. Add 1 cup of sourdough starter and pulse again. Finally, add the yeast mixture and with the motor ON, adding more water through the feed tube as necessary to form the dough. Turn out onto a bread board and knead until smooth. I let my dough rise in a 10 qt. plastic tub, spray with a vegetable oil spray, for 45 minutes. When doubled in size, punch down the dough and turn it out onto the bread board to form loaves. At this point, preheat your oven to 425F-degrees (Convection)with a cast-iron skillet and lava rocks in the bottom of the oven. The baguette pan I have will do five (5) 12-inch loaves. Divide the dough (I did 5 pieces) and with your hands, pat them out flat. Next, roll the dough, tightly, towards you, pinching down as you go. When just about an inch of dough is left, bring up the side closest to you and pinch the seam.


Place loaves on the pan, sprayed with vegetable oil. I used a lame' to slice the tops in a diagonal motion, to allow for expansion. Then, I sprayed with Quick Shine, covered them lightly with plastic wrap, and finally, with a towel to rise for 30 minutes.
Pour 1/2 to 3/4 cup water over the lava stones to start the "steaming" and place the tray of baguettes in the oven.


The loaves browned nicely in about 25 minutes, but watch your oven. I usually go by the aroma to know when the bread is done...something you will pick up the more you bake!
These baguettes are great, not just for sandwiches, but sliced diagonally and grilled to hold your favorite appetizer. In the summer, I love to make bruschetta with fresh tomatoes, basil, & minced garlic or spread baguettes with goat cheese and squeezed roasted garlic on top. Yum...yum!
Posted by Picasa

Friday, September 11, 2009

An Apple Cake in Mom's Cast Iron Skillet...

After running this morning, I got to thinking..."what shall I bake today?" I decided to check my email before scouring through my many cookbooks to come up with something new. Lo and behold, there was an email from King Arthur Flour with a recipe "Easy Fresh Apple Cake" baked in a 2-inch deep cast-iron skillet. My Mom gave me my cast-iron skillet when I got married. (It will be 41 years old on September 16!) This recipe is easy, makes up quickly and baking in a cast-iron skillet is healthy.
Posted by Picasa

Thursday, September 10, 2009

Homemade English Muffins

A bit chilly here in the Pacific Northwest with fall just around the corner. I decided English Muffins would be good; Chuck likes my version of "MacMuffin", but I like fresh jam or peanut butter on mine. The dough is easy to do in the Cuisinart or KitchenAid (use a dough hook), just like bagels, but you cook these on top of the stove in a griddle pan. Here's the recipe:
In the workbowl, add:
 4 1/2 - 5 cups Bread flour
1T salt
4 T sugar. Pulse mixture to blend. Pour 1 2/3 cups buttermilk in a 2-cup glass measure and heat in the microwave 1 minute. Set aside.
Proof your yeast:  To: 1/2 cup warm water add 2 T. dry yeast and a 1/2 tsp. sugar.
Add the proofed yeast to the workbowl and pulse, then, add the warmed buttermilk. Turn motor on (if using the Cuisnart) and if more liquid is needed, add warm water through the feed tube until the mixture comes together. Remember dough overwork because the heat of the motor would kill your yeast.
I use a 10 quart plastic tub, spray with an oil spray, to let the dough rise. This will take about 40 minutes. Then, turn dough out onto a work board and roll to 1/2 thick. Cut out 4-inch round shapes and place on a baking sheet that you've sprinkled with Cream of Wheat (alternatively, you can use a fine cornmeal). Cover with a towel and let the rounds rest 15 minutes. In the meantime, preheat griddle. I have a gas cooktop, so I use the Med/Low setting. It's very important to cook the muffins slowly so the inside is cooked and the outsides are a golden brown as shown.
I lightly brush the griddle with butter before placing the muffins on it. If you don't own a griddle, you can you a frying pan; you just won't be able to do more than two or three at a time. When one side is done, turn them over and continue to cook approximately 7 minutes more. Watch the bottoms closely and turn your heat down if they're browning faster than that.


Once they're done, transfer the muffins to a cooling rack. I found this wonderful tool at King Arthur Flour, called an English Muffin Splitter. You poke the "tines" half way and press to open up. It gives you those great "nooks and crannies" that make English Muffins so delectable.

As a special treat for my husband, I made him his egg and MorningFarms bacon muffin with his coffee. Our family loves these and they're always on the menu when they come to visit.
If you've tried the bagels and realized how good homemade is, I urge you to try these. There is truly nothing like a hot, homemade English Muffin to start the day! Enjoy!!
Posted by Picasa

Wednesday, September 9, 2009

Back to School Treats...for kids and moms

I know some children may already be back at school, but in our area, Tuesday marked the day. I have a couple of selections to share, one for kids and the other...well, for Mom when they're in bed! I found these Circus Cookie Cutters at Williams-Sonoma over a year ago. I've made them one other time when our grandson, Ari Isaiah, was born last June. I decided to make them again and yes, I sent him some because he's old enough to eat them now. The recipe, on the back of the box, is a simple "sugar cookie" and it makes easily 3-4 dozen cookies, depending on the shapes you cut out. Paired with a glass of milk, it's the perfect after-school-snack before they have to start their homework. I used a Silpat on my baking sheet, but you can easily use parchment as an alternative. No icing is needed on this crunchy cookies. These easy to make cookies bring back such fond memories...biting the heads off first or sometimes the legs. Surprise the kids and try these; I'll bet they're a big hit!

Now, for the grown-up cookies. This is my own recipe, that I put together after seeing the musical play, "Wicked" for the second time this past Sunday, I've named these: Wicked Awesome Fudge Cookies! As you can see, a glass of Cabernet or Shiraz goes oh so well with dark chocolate, but I had mine with a Diet Lime Coke and it was just as good. Enjoy!

Preheat oven 325F-degrees/Convection
In a double boiler, or microwave safe bowl, melt 4T unsalted with one package (9.7-ounces) Scharffen Berger Bittersweet Chocolate, chopped.

In a KitchenAid mixer, using the paddle, beat 3 large eggs and 1 1/4 cups sugar on high for 3-5 minutes. Add 1 1/2 tsp. vanilla and 1/4 tsp. coconut extract. Mix into sugar/eggs. Add the slightly cooled chocolate/butter mixture and blend well.

Fold in: 1/4 cup coconut milk powder, 1 cup All-purpose flour, 3/8 tsp. baking powder, 1/4 tsp. salt, 1/2 cup unsweetened coconut (if you use sweetened coconut, decrease sugar to 3/4 cup) and 3/4 cup semi-sweet mini chocolate chips. Let the dough rest on the counter top for 7-10 minutes to firm up. Use a scoop equivalent to a tablespoon and drop the cookies onto the prepared baking sheet, allowing about 2 inches between cookies. Bake 10-12 minutes. Tops
should be shiny; don't overbake because you want that fudgy center. Remove from the oven and place a chocolate wafer (E. Guittard Semi-sweet), nonpareil, or Kiss in the center and allow to set 3-5 minutes before removing them to a cooling rack.
If you're not a coconut fan like me, and these honestly do taste like an "Mounds bar", then, substitute the coconut extract with 1 1/2 tsps. espresso powder, increase the flour to 1 1/4 cups, and increase the chocolate chips to 1 cup.

I have great memories of coming home from school and having homemade cookies. My favorite were Snickerdoodles and I loved helping my Mom by rolling the tops into the cinnamon/sugar before putting them on the baking sheet. Take the time to bake with your kids and make some great memories.
Posted by Picasa

Saturday, September 5, 2009

My Mother's Vegetable Soup -- Updated

It amazes me that vegetable soup isn't at the top of everyone's menu for summer meals. Just look at the harvest of fresh vegetables we have to choose from. My Mother's vegetable was comforting, full of vitamins and anti-oxidants that kept us healthy and so easy to make. Today is a rainy day and my husband is going to the first University of Washington football game, so I thought I'd prepare this soup along with baking Kaiser rolls and Giant Gingerbread Cookies for him to "tailgate" with. Here's my recipe for the soup: (I recommend you chop all your vegetables before getting started with cooking.)

In a large Dutch oven or saucepan, heat 1/4 c olive oil
Add 1 large yellow onion
3 Leeks (make sure you clean them well)
1 1/2 cups carrots
1 cup celery
Saute these first four ingredients on medium heat, then put a lid on the pan and cook 5 to 7 minutes. This step helps "sweat" the vegetables without burning them. Then, add:
6-8 new Yukon Gold potatoes, unpeeled, but cut into 1/2 pieces (if you use a more mature potato, peel first)
1 small head of cabbage, rough chopped
1 turnip (optional)
4 cloves of garlic, minced
Cover the pan and "sweat" another 5-7 minutes.
Add:
1 29-ounce can "Fire-roasted" chopped tomatoes
6-8 cups water
4 Knorr Vegetable Bouillon Cubes (Instead of the water and bouillon, you can substitute your favorite vegetable stock)
1 1/2 cups green beans, cut into 1-inch pieces
1 cup fresh corn, cut off the cob
Cook the mixture for 20-30 minutes, covered, on low heat.

Add: 1 15-ounce can Cannellini Beans (white kidney beans)
2 zucchini, chopped
1 cup chopped spinach (I used frozen)
1 cup petite peas (again, frozen)
1/2 cup chopped parsley
1/2 tsp. red pepper flakes
1 tsp. dried basil
Salt & Pepper to taste
Cook for another 20 minutes, covered
When ready to serve...ladle in bowls and add shaved Parmesan cheese on top.

For my dinner, I added a salad of greens, clemantine oranges, gala apples, sliced almonds, and feta cheese. The Kaiser rolls I made was the basic recipe I gave earlier except I added 2/3 cup "Harvest Grains Blend" ,instead of the sundried tomatoes and onions, to the dough. When I finished my meal, I had a wonderfully scented ginger cookie as a treat.

I hope you try this soup. It really is satisfying and with the expected flu season we're hearing about, it could be just the thing to keep your family healthy, not to mention it's inexpensive to make when you use vegetables that are in season. Enjoy!
Posted by Picasa

Friday, September 4, 2009

BLUEBERRY Muffins, anyone?

I classify muffins as I do scones...something great to have in the morning and takes very little effort to make. However, deciding on what kind, well, that can take awhile, but with our berries being so plentiful this season, I froze quite a few bags (not to mention, made jam), the process this morning went rather quickly.
This recipe comes from the Williams-Sonoma Baking Book I just bought, but I have so many blueberry muffin recipes I could have chosen from. I like the recipes for muffins that call for butter, rather than oil or shortening, because they're more flavorful. Muffins, like quick breads, should not be overmixed, but that's not to say before you add the flour, beating the butter, sugar, and eggs until fluffy truly makes a difference. I added half of the flour with the milk and used the paddle attachment of my KitchenAid to mix the batter just until incorporated. Finally, I used a spatula to fold in the remaining flour. This recipe called for 1 1/2 cups of blueberries, fresh or frozen, which I folded in, but I also added 1/2 cup of dried blueberries. This step always works well with fresh or frozen. It gives the muffin a stability so it doesn't fall apart...very scientific!

There was also a "crumb" topping added, which gave a nice crunch to the top (the part we all know is saved until last to eat.)

I've been making my own muffin/cupcake papers lately and love the ease of removing them without destroying the baked goods. I buy sheets of parchment paper and use a paper trimmer to cut 5-inch squares (remember, I'm a paper artist and have just as many tools for that craft as I do for baking). Next, I center the square over the muffin tin opening and use a small glass to press down. The parchment forms beautifully in the opening, overlapping slightly. I'm telling you this technique of using the squares allows the dough to "climb" up the sides and give a more fuller muffin or cupcake. Try it and see the results for yourself. Enjoy!
Posted by Picasa

Thursday, September 3, 2009

The Best Blondies!

I love chocolate as much as the next person and brownies are one of my favorite things to bake. However, a few months ago, I tried this recipe for Blondies from "The Sweeter Side of Amy's Bread" and I completely fell in love with this wonderfully moist bar topped with roasted walnuts and semi-sweet chocolate morsels.
The recipe makes 25 large bars, baked in a 12 x 17-inch baking sheet and you might think that's a big bar for one person, but honestly, after one bite, you will end up finishing it and not feel guilty at all. The bars pack up well to give as a gift (if you can stand to part with them) and stay fresh, air tight, for several days.
A last note from this baker...I've convinced myself because the bars have walnuts suspended on top and throughout the bar, it makes them good for you! Even if you're a brownie lover, I bet you will love these just as much. Enjoy!
Posted by Picasa

Wednesday, September 2, 2009

Happy Birthday, Grandpa

One more thing I have to add...our grandson, Ari , who is an aspiring chef, had his Mom send this photo of his latest "accomplishment!" It certainly put smiles on our faces; I hope it does for you.
Posted by Picasa

Tuesday, September 1, 2009

Ode to Julia

Today is my husband's birthday. It's been a "sucky" year; our youngest daughter Kelly was diagnosed with breast cancer and had a double mastectomy in March, my husband left is job the end of July and a relocation is in our future, and our oldest daughter and her husband have had a set back in adopting their daughter, Maddie, from Taiwan. My mother would say, "God never gives you more than you can handle..." but, come on!! So today had to be special and the start of good things to come. Kelly is cancer-free and Erin and Michael heard today that their case has been appealed. After seeing the movie "Julie & Julia" for the second time on Sunday, I realized both those women dealt with disappointments and heartache, but cooking got them through it. I decided to turn to Julia to make this day memorable. I've had "Mastering the Art of French Cooking" since the early 80s, but had only made "Le Potiron Tout Rond", translated, Pumpkin Soup, which by the way is delicious. In the movie, Julie Powell makes the "Reine de Saba" [Chocolate and Almond Cake] and she and her husband dig in with their forks and literally go into esctasy. The cake is so easy to make, with few ingredients, but the result, well...unbelieveable to say the least. I don't think I've ever tasted anything like it and with every bite, we all kept saying, "Oh my God!"
Feeling quite pleased with my accomplishment, I also made the "Beurre Blanc" [White Butter Sauce] to accompany fish I made for my husband; his favorite. Butter does make everything better and it certainly made this day a great one; from the entree to the dessert. But, moreover, realizing all the blessings we do have in our lives: family and friends who care about us, is what made this day special.
I have to add, that the directions in "Mastering the Art of French Cooking" are so easy to follow. Julia Child was a genius in writing a cookbook "for the servantless American cook who can be unconcerned on occasion with budgets, waistlines, time schedules..." This cake took less than 20 minutes to prepare and baked in 25 minutes and would be a grand finale to any dinner.
Posted by Picasa