Thursday, September 29, 2011

Nutella Butter Cookies

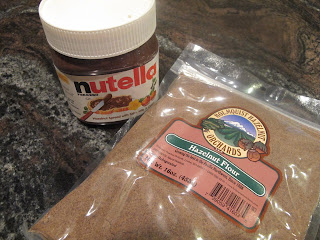
I'm calling this recipe a change-up, in honor of the upcoming playoffs and eminent World Series in baseball; a sport my DH and Sis are addicted to.  My inspiration was a jar of Nutella and some hazelnut flour I purchased from Holmquist Hazelnut Orchards at our farmer's market this past Saturday.  Instead of the usual peanut butter cookies, I made a substitution to the line-up with these two hazelnut products.

Peanut butter cookies first showed up when George Washington Carver convinced farmers that peanuts could be a replacement crop for cotton, that was being infested with boll weevils.  The cookies were usually rolled and cut into pieces.  It wasn't until the 1930s when Pillsbury Flour Company started using a fork to make the recognized criss-cross pattern that we know today is a Peanut Butter cookie.  The reasoning behind this technique was because peanut butter cookies are dense and the criss-cross allowed the middle to cook through thoroughly.  I like the criss-cross pattern and kept it with my substitution of these beloved cookie.

Nutella Butter Cookies

1 cup (2 sticks) unsalted butter, softened to room temperature
1 cup light brown sugar, packed
2 large eggs
2 tsp. Vanilla extract
1-13oz jar of Nutella spread
3 1/2 cups King Arthur all-purpose flour
2/3 cups hazelnut flour
1 tsp. baking soda
1/2 tsp. Kosher salt

granulated sugar 

Preheat oven to 350F-degrees.  Line a cookie sheet with parchment paper and set aside.
In a stand mixer, using the paddle attachment, cream the butter and sugar together thoroughly.  Scrape down the sides of the bowl and with the mixer on medium speed, add the eggs, one at a time, beating well between additions.  Add the Nutella and vanilla extract and beat again to combine.  Add 3 cups of flour, hazelnut flour, baking soda and salt and mix on medium to combine.  Remove bowl from the stand and stir in the final 1/2-cup of flour.  
Using a 2-Tablespoon scoop, measure out the dough and drop into a bowl of granulated sugar to coat the tops.  

Place on the baking sheet.  Using a dinner fork, make the tradition criss-cross pattern on the tops.  


Bake in the preheated oven for 9 minutes.  Remove from the oven and let cool 5 minutes before transferring to a baking rack to cool completely.
Makes 4 to 5 dozen

These cookies, with their familiar look, but unusual taste, go well with a tall glass of milk or on a cool Fall day, a mug of cider or hot cocoa.  I love the taste of hazelnuts--so sophisticated, and after taking a  bite, I realized these would also make great holiday cookies.  I would substitute the criss-cross technique with the "thumb-print" indentation and add a dab of raspberry jam.  Now, doesn't that sound yummy?  
ENJOY!


Tuesday, September 27, 2011

Banana Creme Brulee Cakelets

I was just telling my sister, the other day, I love making Swiss Butter Cream, Macarons, and even the Seven-Minute Frosting for the Candy Corn Cupcakes, but I'm always perplexed what to do with so many egg yolks leftover.  Sure, I can make lemon curd or ice cream or even, sponge cake, however, the Seven Minute Frosting alone, took six egg whites and Macarons, eight.  See my problem.  So, with egg yolks and ripened bananas, again :(, it came to me to try a recipe where I started with a Creme Brulee base and turned it into a really wonderful dessert.

Growing up I had never heard of Creme Brulee; although, my mother made the best egg custard, which is its "country" cousin.  Other desserts in this category are Creme Caramel and Flan,  The earliest date that Creme Brulee showed up was in a 1691 French cookbook.  Great Britain followed, except the name changed to Creme Anglaise.  Whatever you call it, it made for a great inspiration.  What has inspired you to bake?

Banana Creme Brulee Cakelets
Creme Brulee Base:
2 cups heavy cream
1/3 cup granulated sugar
pinch of salt
2 vanilla beans, split and scraped
6 egg yolks
1 1/2 bananas, mashed
In a small sauce pan, heat the heavy cream, sugar, salt, and vanilla beans--don't boil, just cook until the sugar has dissolved.

In a medium bowl, whisk the egg yolks.  When "bubbles" have appeared around the edges of the cream, remove from the heat.  Add a couple of tablespoons of cream to the egg yolks, whisking immediately to start "tempering."  Keep adding a couple of tablespoons, whisking each time, until you've added about half of the cream.  Return everything to the sauce pan and heat until slightly thickened on med/low heat, whisking continuously.  Remove from the heat and cool.  Stir in the mashed bananas.

Preheat oven 350F-degrees.  Spray a mini-Bundt pan with a non-stick baking spray.
Banana Batter:
1/2 cup (1 stick) unsalted butter, softened to room temperature
1 cup light brown sugar, packed
3 cups King Arthur all-purpose flour
1 T baking powder
1/2 tsp. baking soda
1/2 tsp. Kosher salt
1 1/2 banana, sliced


In a stand mixer, using the paddle attachment, beat the butter and brown sugar until light and fluffy, about 3-5 minutes on medium speed.  Add the cooled Banana Creme Brulee base, mixing on low speed to combine.  Scrape down the sides of the bowl and mix again.

Remove the bowl from the mixer stand and stir in the dry ingredients.  Stirring the mixture will prevent over beating!  Cut the bananas.
Yes, I have a banana slicer!

Perfect, even sliced bananas!

Place 4 slices of banana in the bottom of the pan, then, scoop up the batter and place on top.  Bake in preheated oven for 18 to 20 minutes.

Let cakelets cool about 5 minutes before inverting on a parchment-lined baking rack.  Sprinkle with Turbinado or Raw Cane Sugar and using a Kitchen torch, caramelize the tops.
The moist cakelet and the crunchy, caramelized tops makes a perfect dessert for a cool, Fall evening.  
Enjoy!


Thursday, September 22, 2011

Ode to Candy Corn Cupcakes

Fun Fact #10 about Me--I'm a Candy Corn addict!  I love this time of year when the bags appear in the supermarkets before autumn and Halloween.
The candy, originally made by hand, was created in the 1880s by George Renninger of the Wunderle Candy Company.  It was made from sugar, corn syrup and water to form a slurry, and later, fondant was added for texture, then marshmallow for a soft bite.  The three colors--yellow, orange and white are meant to mimic the appearance of kernels of corn and this confection's production has reached over 20 million pounds annually.  The top selling company is Brach's, who sells enough to circle the earth 4.25 times when the candy kernels are laid end to end!

The idea to create a cupcake to honor this confection just came to me and since baking always makes me happy, I decided not to wait until Halloween to unveil these little cakes.  I used one of my favorite cake recipes and divided it into two-thirds orange, with orange zest and orange flavoring, and one-third yellow, with lemon zest and lemon flavoring.  The moist cake, beautifully colored is topped off with a fluffy, marshmallowy white frosting...known as Seven-minute Frosting and is sure to be a hit with your family.
Candy Corn Cupcakes
3/4 cup  (1 1/2 sticks) unsalted butter, at room temperature
2 1/2 cups sugar
6 large eggs
2 tsp. Vanilla extract
3 cups King Arthur all-purpose flour
1 1/2 tsp. baking powder
3/4 tsp. baking soda
1/2 tsp. Kosher salt
2 cups buttermilk

Zest of 1 medium orange
1 tsp. Orange flavoring
5-6 drops of Yellow food color + 2-3 drops of Red food color (or use Orange)


Zest of 1 lemon
1 tsp. Yellow flavoring (if using extract, cut back 1/2 tsp.)
6-7 drops of Yellow food color

Preheat oven to 350F-degrees.  Line 2 12-cup muffin pans with paper liners.
In the bowl of a stand mixer, using the paddle attachment, cream the butter until fluffy.  Gradually all the sugar and beat to combine.  Scrape down the sides of the bowl.  Add the eggs, one at a time, until thoroughly combined, scraping down the sides of the bowl as necessary.  

Mix the dry ingredients together, then, add to the batter alternatively with the buttermilk, starting and ending with the dry ingredients.  Beat on med/high for 1 minute until thoroughly combined.

Divide the batter: 2/3 batter colored and flavored Orange and 1/3 batter colored and flavored Yellow
Use a two-tablespoon scoop and place some yellow batter in the bottom of the lined muffin cups.

Using the larger scoop, add the orange batter on top.
Bake in preheated oven for 20 to 22 minutes.  Let cool completely before frosting.
Seven-Minute Frosting
1 1/2 cups of granulated sugar
2 T Light Karo syrup
2/3 cup cold water
6 egg whites
2 T granulated sugar
In a small sauce pan, measure the sugar, syrup and water and stir.  Attach a candy thermometer to the side and cook on med/low heat until the temperature reaches 230F-degrees.
 Meanwhile, in a stand mixer, using the whisk attachment, beat the egg whites until soft peaks form.  Gradually add the additional 2 tablespoons of sugar, beating well after each addition.  

When the sugar syrup has reached 230F-degrees, remove from the stove top.  With the mixer running on low (so you don't splash hot syrup) gradually add the sugar syrup down the sides of the bowl.  When you have added all the syrup, turn speed up to medium high and set a timer for 7 minutes.  Beat until the frosting is cooled and forms stiff peaks.
 I used a large freezer bag, which I cut off a small part of a corner and inserted a plain tip.  Fill the bag with the frosting and with even pressure, pipe a swirl of the fluffy white frosting.

 My sister asked me if I also loved the "Indian Corn" candy (with it's brown, orange and white kernels) but,  even though it tastes the same, there's something about the original that has me hooked.  If the Betty Ford Center had a program, I'd probably be checking myself in. LOL But, for now, I'm going to enjoy my candies while they're still in the stores! Enjoy!

Monday, September 19, 2011

Autumn Vegetable/Barley Soup

Cool, crisp days and I think of soup!  To me it's the ultimate comfort food and I loved when I came home from school and my mother would have a pot of soup on the stove.  Vegetable and Bean soups were the two she made the most and the ones I loved, but in the summer, she'd also do a "She-Crab Bisque" that my father loved--me, not so much since even back then, I was somewhat of a vegetarian.

The idea behind the soup I made today was inspired by a recipe in the October 2011, Clean Eating magazine--Kale Barley Soup, but I made a few changes.  It's been a hectic Monday and I've got lots of projects going in addition to a friend is returning home tomorrow after being away a month in Guam with family. She's "nursing" a cold she caught in the last week and bringing some soup to her house is a gift I know she'll like.   I also KNOW from past experiences--jet-lag will set in with the time change and she really won't feel like making meals: )

Simple ingredients, full of flavor and low in calories and fat is what this recipe has to offer.  The addition of barley, which is part of the grass-family and used as a base malt for beer, is a great addition in soups and stews and in many cultures, breads.  Barley does contain gluten, so if you need this to be gluten-free, you should try another grain, (i.e. Quinoa).


Autumn Vegetable Soup
3 T Extra Virgin Olive Oil
1 yellow onion, chopped
2 leeks, cut just above the white, slice in half and clean well
4 carrots, halved lengthwise and sliced
3 cloves of garlic, minced
1 bunch kale, vein removed and chopped (about 6 cups)

1 can (28oz) Fire-roasted diced tomatoes
2 cups cooked barley
6 cups vegetable stock
1/4 tsp. seasalt and 1/2 tsp. black pepper
1 tsp. ground cumin
1/4 tsp. ground tumeric
In a large stock pot or Dutch oven, heat oil on medium.  Add the onion, leeks, carrots, and garlic and saute, stirring occasionally, for about 3 minutes.  Lower heat to med/low and cover pot.  Heat about 3 minutes more.  Add the can of tomatoes, vegetable stock and seasonings.  Cover and simmer for 10 minutes.  Add kale, cover and cook until kale turns bright green, about 5 minutes.
  Add the cooked barley and stir to combine.

 Heat through, about 5-10 minutes more.  I serve the soup with homemade rolls and a new jam combination I made from bosc pears and raspberries I got at the farmer's market on Saturday.
Your palette will enjoy the combination of these veggies and I bet, like me, memories of Mom's kitchen filled the air with comfort. Enjoy!


Sunday, September 18, 2011

A Quick Mix for Homemade Baking

What better way to warm the stomachs of your loved ones on these wet Fall days, than with a hot breakfast...from scratch.  Sounds impossible?  Looks too good to be true?
Oh, come on, you know me--would I lead you on and have you spend all morning slaving over a stove!  This morning's pancakes comes from a mix; NO, not the kind you buy in the store, but a Quick Mix thanks to the bakers at King Arthur Flour.

Two years ago, when I left for Kentucky to help Kelly while she went through 12 weeks of chemo, I wanted to make sure my husband could still have his "Sunday breakfast" he'd come to rely on.  This recipe was actually featured in one of their catalogues and it was the answer to my prayers. LOL!  Not only did this recipe make this morning's breakfast, but I have 5 more recipes I can make.

Quick Mix
9 cups King Arthur all-purpose flour*
1/3 cup double acting baking powder
5 tsp. salt--I used an extra-fine sea salt
1 1/2 cups Baker's Special Dry Milk, nonfat dry milk or dried butter milk powder (I used 3/4 cup each of the dry milk and buttermilk powder)
1/3 cup granulated sugar
1 1/2 cups vegetable shortening (I used butter-flavored Crisco in sticks)


*Substitute 100% white whole wheat flour for up to half of the unbleached all-purpose flour.


Use a large bowl...I use my trusty wooden bowl my mother gave me, and measure all the dry ingredients into it, whisk them together to blend.
Using a pastry knife, your fingers, a food processor, or mixer, mix in the shortening until the mixture looks like coarse crumbs.  I like to use the food processor, even if it means I do it in batches, but a pastry knife works well too.
Store in freezer-use plastic bags or if you happen to have a "Seal-a-Meal" that works perfect!  The mix makes about 12 cups and besides this morning's pancakes, I was able to measure out 3 bags of pancake mix and 2 of muffin mix.  These will go into the freezer for those mornings when I need something quick or when I'm traveling and the hubby can make up his own breakfast!

 Label and Date each bag you fill with the mix.
Quick Blueberry Pancakes
In a large bowl, measure out: 
2 cups of Quick Mix
1 large egg
1 - 1/3 cups water
1 tsp. vanilla extract
(I also added 2 T malted powder, so I used 1 1/2 cups of water)
Fresh or Frozen blueberries
I used a dough whisk to mix all the ingredients together, but a large spoon or spatula will also work. Heat a griddle on medium and after about 3 minutes, test if it's hot enough by dipping your fingers into water and splashing the surface.  If the water "sizzles," it's hot enough.
I have a batter dispenser (teehee, of course, I do) and I used it to measure out the pancake mix.  Alternatively, you could put it into a glass measure and pour the batter onto the hot griddle.

Sprinkle the tops with blueberries or you could use raspberries, blackberries, or strawberries--whatever is in season.  I warmed maple syrup but these pancakes could also have just fresh fruit over them or a warm compote of apples or pears.


Today, I added malted powder to flavor the pancakes, but you could also add in 1/4 cup of cornmeal or old-fashioned oats (pulsed in a food processor or blender to break down to a meal).

Here are some other recipes you can make with this Quick Mix:
Quick Mix Muffins
Quick Mix Scones 
Quick Mix No-Knead Cinnamon Rolls
Quick Mix Biscuits
Quick Mix Waffles


I have to say, if my DH can make these, any 12-year old or older can--LOL!  He would telephone me after his Sunday breakfast and tell me what a "chef" he had become : )  


Coincidentally,  the movie, "How Does She Do It" came out on Friday, exemplifying how a woman, juggling work, home and family does it, so what better than to have a recipe to help you DO IT.
As I sit at my computer, devouring these wonderful warm pancakes, I hope I have given you inspiration to bake homemade...with the help of this very valuable King Arthur Flour recipe.  Enjoy!


Thursday, September 15, 2011

Lunch Box~My Best Chocolate Chip Cookies!

I hear, all the time from my daughter and friends, "I don't have enough time to bake...especially during the week."  I know all too well the demands of a family, especially when both parents, or even single parents work outside the home.  I've tried through the years to pass on any quick techniques to my girls, in baking and cooking, and now I'm going to let you in on some secrets and recipes, over the next few posts, that can be made in a large quantity, frozen and baked another day.

Today, I'm sharing one of my "best" cookie recipes I've come up with, which if you'd bake up all the dough at one time, you'd have 7-8 dozen cookies--easily enough to divide the dough to freeze for another day of baking.  At first glance, you'll say this is just another chocolate chip cookie, but  with a few changes, it may just fool you.  I've up the ratio of butter to sugars and lowered the amount of chocolate chips (which by the way, I prefer the bittersweet variety) and toasted the pecans.
If you're not a pecan fan, try walnuts, macadamia, or even pistachios.  Moreover, if an allergy prevents you from adding nuts, try Heath bits to give a crunch.  Surprisingly, you'll find these cookies chewy and filled with flavor.

If I've learned anything from Kelly's illness over the last few years, we have to be aware of what we are eating (and being exposed to).  I'm tired of reading ingredients on labels that I can't even pronounce and knowing their "shelf-life" is 3 to 6 months!

My Best Chocolate Chip Cookies
1 1/2 cups (3 sticks) unsalted butter, at room temperature
2 1/2 cups Dark brown sugar, packed
1 cup granulated sugar
1 T. Vanilla extract
1/4 tsp. Vanilla powder (optional, but really boosts the flavor)
4 large eggs
3 1/2 cups King Arthur all-purpose flour
1 tsp. baking soda
3/4 tsp. Kosher salt
2 1/2 cups pecans, toasted and coarse chopped
2 cups Bittersweet Chocolate Chips

Preheat oven to 350F-degrees.  Measure the pecans and place on a baking sheet.  Bake for 6 minutes.  Remove from the oven and allow to cool. Chopped cooled nuts.  Turn off the oven for now because this dough will need to chill for 1 hour.

In the bowl of a stand mixer, using the paddle attachment, cream the butter until smooth.  Add the sugars and vanilla extract (and powder, if using).  Beat thoroughly, scraping down the bowl occasionally.  Add the eggs, one at a time, beating thoroughly between additions and scraping down the bowl.  Measure the flour, baking soda and salt and add to the dough.  Beat on medium speed just until the flour is combined.  Remove paddle attachment and stir in the nuts then, the chocolate chips.  
You will notice how light and fluffy the dough is before you stir in the nuts and chocolate bits.  

Cover the bowl with aluminum foil and place in the refrigerator for 1 hour or more.  (I actually had a Skype call with our 3 year old grandson for almost 1 1/2 hours before I could go on to the next step.)


Preheat oven to 350F-degrees.  Place several spoonfuls of the dough on parchment paper--probably about 2-3 cups.
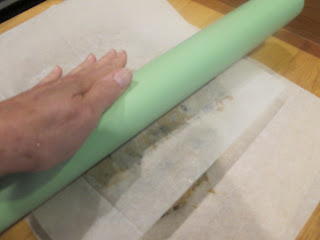
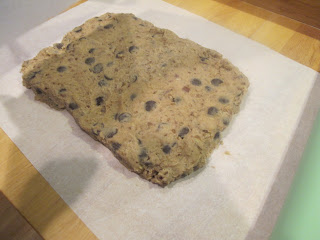
Place a second sheet of parchment or wax paper over the dough and roll it to a rectangle about 3/4-inch thick and a width and length that will easily slide into a gallon-size freezer bad.  Alternatively, you can place the dough in a large plastic tub, squeezing out the air to seal.
I wrapped up the sides of the parchment and slid it into a bag and labeled it with the contents and added the date.
Typically, I like to bake the dough within 3 months, but you can go as long as 6 months.
When you remove the dough from the freezer, it's already flat so you can just cut it into 1 1/2-inch squares to bake on parchment-lined baking sheets.
Bake for 8-9 minutes.  Remove from the oven and let cool on the baking sheet 5 minutes, before transferring to a rack to cool completely.


Prep time is about 30 minutes.  Chilling-1 hour and baking time 8-9 minutes.  Certainly that's doable for homemade goodness.


I've always baked from "scratch" because my mother did...I've just learned to do some short cuts to make it easier without sacrificing what I was taught.  Enjoy!