Thursday, January 27, 2011

Pop Tarts...revisited

Chocolate anything is good, but Chocolate/Chocolate Pop Tarts are great: )  Keeping with the fact that Valentine's Day is just around the corner, I decided to make my favorite Pop Tarts with a chocolate  filling and surprisingly, they reminded me so much of chocolate croissants, which makes them really worthwhile trying.

As you can see, the pastry is just so flaky and it literally melts in your mouth, without all the steps (and waiting) with making croissant dough.  The pate brisee is from Joanne Chang's new cookbook Flour: Spectacular Recipes from Boston's Flour Bakery + Cafe.  
And, actually the Pop Tart original recipe is in there, but I decided to change the filling this morning.  After seeing the snowfall that the Northeast got yesterday, I thought these would be wonderfully comforting after digging out driveways and sidewalks.  I think with a lovely cup of hot cocoa these treats would put a smile on anyone's face after the latest (of many) storms they've had.

Chocolate/Chocolate Pop Tarts
Pate Brisee:
1 3/4 cup all purpose flour
1 T granulated sugar
1 tsp. kosher salt
1 cup (2 sticks) unsalted cold butter, cut into 1/2" pieces
2 egg yolks
2 T cold milk

Filling:
1 cup Bittersweet chocolate chips 
2 T golden brown sugar, packed
2 T unsalted butter, softened
1 Vanilla bean, split and scraped

1 egg, lightly beaten (to seal the pastries)

Begin making the Pate Brisee: In a KitchenAid, using a paddle attachment, add the dry ingredients and mix to on low speed.  Add the cold butter pieces and mix on low until the flour is no longer bright white and holds together.  There will be clumps of floured-coated butter the size of pecans.
Whisk the egg yokes and milk together, then add all at once to the dough, mixing on low speed just to combine.
Dump the "shaggy" dough onto a wooden board to work.
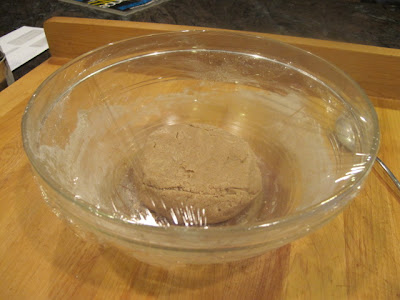
 With the "heel" of your hand, press and push the butter through the dough.  Repeat this technique several times until the dough comes together.  Shape into a disk and wrap in plastic wrap.  Refrigerate for at least 4 hours or up to 4 days.
  When you're ready to make the Pop Tarts, mix up the filling--all ingredients go in a small bowl and mix to combine.
TIP:  With the leftover vanilla bean, make up a small cannister of granulated sugar and add the bean to it.  In a week, you'll have wonderfully fragrant sugar to sprinkle onto of cookies, muffins, or even just toast.
Divide the pate brisee in half and roll each half into a 11"x16" rectangle.  Cut in half, horizontally, then divide each of those halves into 4 rectangles.
Divide the filling between the eight pop tarts.  Roll out the other half of the dough in the same size, cutting it into 8 pieces.  Brush around the edges with the egg wash.
Then, top with another rectangle of dough, pressing the edges slightly.  Use a fork to go around the edges to seal and give a decorative look.
Bake in a preheated 350F-degree oven on a parchment lined baking sheet for 20 to 25 minutes, or until golden brown.
Let cool while you make up the Chocolate Glaze.
Chocolate Glaze:
1 cup confectioners' sugar
1 tsp. light Karo syrup
2-3 tablespoons of hot water
1/4 cup melted bittersweet chocolate

Spread the Pop Tarts with the Chocolate Glaze and serve warm.  If you want a vanilla glaze, eliminate the melted bittersweet chocolate and add 1 tsp. vanilla extract.
The combination of the chocolate filling, flaky pastry, and the chocolate glaze make these a wonderful Valentine's Day treat, snow and all.
YUMMY!
That's what Ari says when I bake with him...it just seems to fit.  Enjoy!

Wednesday, January 26, 2011

Pineapple~Mango~Strawberry (PMS) Jam

I've been thinking a lot lately of about making a jam with pineapple.  It's one of my favorite fruits, just like my mom, and I often buy fresh pineapple to accompanied meals.  Keep in mind, though, even though I used fresh mango and strawberries in the jam, you have to use canned pineapple because of an enzyme in fresh that would prevent the jam from setting.

I thought PMS jam might just give you all a little chuckle, but honestly, it's blend of flavors, not to mention the beautiful rosy pink color will make any snow bound inhabitants cheery!  It's so simple to make and the recipe easily makes 8 half-pint jars, which should last you through this long, cold winter.

Pineapple~Mango~Strawberry (PMS) Jam
1 quart Strawberries
1 Mango
1 can (20 oz) Crushed Pineapple in natural juice
1/2 tsp. unsalted butter
1 box SureJell powdered pectin
5 1/2 cups granulated sugar
8 half-pint jars with lids and seals

Prepare jars as previously directed. 

In a food processor, place washed and drained strawberries and one mango.  Pulse several time until pureed.  Pour into a large Dutch Oven and add the crushed pineapple, including the juice.  Stir in the box of powdered pectin and add 1/2 tsp. unsalted butter (it keeps the jam mixture from producing too much foam).
Bring the mixture to a low boil, stirring constantly.  Add the sugar all at once and bring back to a boil.
When the mixture comes to a boil, set the timer for one minute.  Stirring constantly, boil mixture.  Turn off the heat.  Ladle into sterilized jars, wipe the edges with a damp cloth, then, place a seal and a ring over opening.  Turn to seal tightly and turn upside down.  Once all the jars are filled and turned upside down, set timer for 10 minutes and cover the jars with a towel.  After the time is up, you should hear the "popping" of sealed jars.  If any of the jars don't seal the first time, turn upside down again for another 10 minutes.

Jam keeps one year, if it lasts that long.  I have a little buddy who loves my jam and I'm sure he's going to love a jar or two of this PMS Jam.  Enjoy!

Tuesday, January 25, 2011

Bejeweled Thumbprint Cookies


Grandchildren certainly can wrap you around their little finger...and for me, there's no place I'd rather be with mine.  Yesterday, when we were SKYPING with Ari, he asked his PopPop, "Can you get me a new glove?"  Last week, he and his Dad had ventured outside to start practicing their pitching and catching since spring training is just about a little over a month away.  Ari apparently can't wait : )
Last Summer having fun in his backyard.

So, when I said, "would you like some cookies in the box with your new glove?"  He said, "yes, blueberry!"  I had to laugh because that's what he always asks for.  I said, "how about another kind?" and he said, "Strawberry!" This was my dilemma.  The answer I came up with was a thumbprint cookie that I could feature the many flavors of my homemade jams I made last summer.

The cookies have an intriguing flavor, using ground toasted pecans and vanilla in the dough, then topped with blueberry, strawberry, peach/mango, and raspberry jam.  I've made several versions of these cookies, sometimes, rolling them in flaked coconut or additional nuts at the holidays; those varieties were a favorite of Kelly's and Matt's.  Ari is definitely a fruit lover and I know when he opens his box he'll be just as thrilled with the cookies as he is with his new glove. 

Bejeweled Thumbprint Cookies
1 cup unsalted butter, room temperature
1 1/2 cups granulated sugar
3/4 cups ground toasted pecans
2 large eggs
2 tsp. Vanilla extract + 1 vanilla bean, split and scraped
3/4 tsp. baking powder
1/2 tsp. salt
3 1/2 cups all-purpose flour
About 1 cup of your favorite jam (I used 1/4 cup of 4 different kinds)

Preheat oven to 350F-degrees.  Toast pecans for approximately 7 or 8 minutes.  Let cool and grind in a nut grinder or use a food processor.  If using a food processor, add 2 tablespoons of sugar with the nuts and be careful not to go too far and make pecan butter!
In the bowl of a KitchenAid, using the paddle attachment, beat the butter and sugar together until fluffy.  Add the nuts, vanilla extract and vanilla bean seeds and blend well.    Mix the dry ingredients and add to the dough, combining until well incorporated.  Divide dough into half and wrap in plastic wrap.
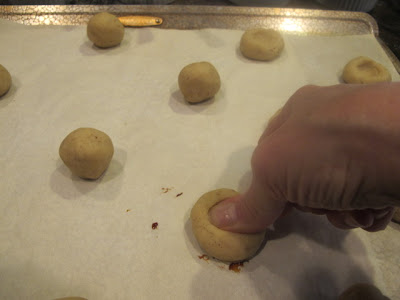
Refrigerate 30 minutes or up to 3 days.  Meanwhile, prepare a baking sheet lined with parchment paper.  Preheat oven to 350F-degrees and remove dough from the refrigerator.  Roll dough into 1 1/2 - inch balls.  Press your thumb into the center to make a "well" for the jam.
Fill the centers with 1/2 tsp. jam and bake for 12 minutes or until golden brown.
Remove from oven and let cool a few minutes before removing the cookies to a rack to cool completely.
These cookies are really delightful and would be perfect with a cup of tea on a cold, snowy day.  I hope the fruit filled centers will be just what Ari ordered!  Enjoy!

Saturday, January 22, 2011

Old Fashioned Doughnuts

I attribute my craving for a doughnut this morning to the stress of an upcoming craft trade show next week!  I've been knee-deep in creating projects for this show with my paper flowers and turning to comfort food brings me down to earth again.


I love old-fashioned doughnuts, better than the popular raised yeast ones, and this recipe was very easy to make. Even better the recipe only makes about 6--2 1/2 or 3-inch doughnuts, so the chance of me eating a dozen doughnuts is not a factor!  This recipe comes from a new book I have by Lara Ferroni, Doughnuts: Simple and Delicious Recipes to Make at Home.
When I'm in Kentucky, Kelly's guys take me to Magee's, a wonderful bakery in Chevy Chase.  Ari always gets a pumpkin muffin, Matt a breakfast sandwich, and me...a doughnut.  The last time I went, we ordered an extra doughnut because invariably Ari wants bites of mine on top of his muffin!  In fact, he likes to "taste" everyone's selection : )

Old Fashioned Sour Cream Doughnuts
Makes 6 to 10 doughnuts (if you don't cook the holes!)
1 1/4 cups all-purpose flour
1 tsp. baking soda
1 tsp. ground cinnamon
Pinch of salt
1/3 cup superfine sugar
1/4 cup sour cream
1 large egg
1 T unsalted butter, softened, or vegetable shortening

Vegetable oil for frying
Sift together the dry ingredients.  Stir in the salt and set aside.

In a medium bowl, whisk together the sugar, sour cream, egg and butter until smooth.
 Add the flour mixture, a little at a time, stirring until a smooth dough forms.  Cover the bowl with plastic wrap and refrigerate the batter for 15 to 20 minutes.
  Roll out the dough on a lightly floured surface to about 1/2-inch thick, then, cut out the doughnuts using a 2 1/2-inch diameter cutter.  You can reroll any scrap dough.
Heat at least 2-inches of oil in a heavy-bottomed pot or use a deep fryer.  The thermometer should register 360F-degrees.
With a metal spatula, carefully place the doughnuts in the oil.  Fry for 1 to 2 minutes per side, or until light golden brown.  Remove with a slotted spoon and drain on a paper towel.  Let cool slightly before glazing.

Glaze:
1 1/2 cups confectioners' sugar
3 to 4 T milk
1 tsp. vanilla


There are some real interesting doughnuts to try in this new book: German's Chocolate, Red Velvet, and even S'mores.  However, this morning, the old-fashioned, simple doughnut did the trick and I'm off to do some more flowers.  Enjoy!

Thursday, January 20, 2011

Homemade Gnocchi

Gnocchi are wonderful "little pillows" of pasta served as a main dish with marinara sauce or as a side dish with a browned butter/sage sauce.  Since I was on the browned butter kick today, I made it as a side dish.  The rich, nutty flavor of browned butter, that enhanced the brownies, made these gnocchi melt-in-your-mouth delicious.  All that was needed was a sprinkling of fresh Parmesan cheese.
The word gnocchi may have derived its name from the Italian word "nocchio" meaning knot in wood or "nocca" meaning knuckle.   I actually think they more resemble a knuckle rather than a knot in wood.
Typically, gnocchi is made with semolina, wheat flour or potato, which was introduced to Europe in the 16th century.  I have always made my version with potato; must be the Irish in me!  These are true Italian comfort food and so satisfying.  If you've shied away from making gnocchi because you thought it was too hard, I know you won't anymore when you see how easy they really are.

Homemade Gnocchi
3 large baking potatoes
1 large egg
2 T heavy cream
1 1/2 tsp. salt
1/4 tsp. freshly grated nutmeg
1 1/2 cups all-purpose flour


Preheat oven 425F-degrees.  Wash and scrub the baking potatoes.  Use a fork to pierce the skin in several places. I use a baking stone, but you can also wrap the potatoes in aluminum foil.  On the baking stone, it took 1 hour 15 minutes.  Pierce the skin with a tip of a paring knife to check for doneness.   Remove from oven and let rest.
Use a paring knife to remove the skin.  Cut potato in half and place it in a ricer (alternatively you can use a masher).  Rice all the potatoes into a large bowl.
Add the egg, heavy cream, salt and nutmeg.  Stir to combine.  Add the flour--it's easier to use your hands to knead the dough, adding a tablespoon of flour at a time, if needed to get to a smooth ball.
I divided the dough into quarters, then eighths for ease of rolling it into a rope.
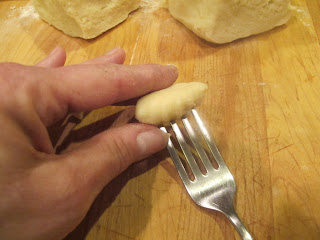
Use a dough blade or knife to cut the rope into approximately 1-inch pieces.  To achieve the "ridged" look of gnocchi, you can use a fork to roll the 1-inch piece off or if you're lucky enough to find a gnocchi maker, roll your dough off that.


Either technique provides the necessary ridges to hold on to the sauce!  Place the gnocchi on a lightly floured (with all-purpose flour or semolina) pan until you've completely finished making all of them.
Meanwhile, bring a 6 quart sauce pan with two-thirds full of water to a boil, adding 1 tablespoon of Kosher salt to the water.  Drop about 15 gnocchi into the boiling water at a time.
As the gnocchi cooks it will rise to the surface when they're done.  Use a slotted spoon to remove them.
The gnocchi can go into your favorite marinara sauce or into the Browned Butter/Sage sauce at this point.


Browned Butter/Sage Sauce:
1/2 cup (1 stick) unsalted butter, cut into 1-inch pieces
1/2 tsp. dried sage

In a sauce pan, heat the butter over medium heat, stirring occasionally.  When the butter stops foaming and browned bits appear, add the dried sage.  Stir to combine.
Add the freshly grated Parmesan cheese on top and put into a 350F-degree oven for 15 minutes to toast the cheese.  
Homemade gnocchi will surely impress your family and friends, not to mention it's a wonderful addition to any meal as a main entree or side dish.  Enjoy!

Valentine Brownies


February 14th is just around the corner.  How do I know this?  Well, cards and candy have been in the stores since after Christmas and once again, we seem to be steered towards holidays early by the retail sector.  I'm not complaining because Valentine's Day is one of those special days I looked forward to because my grandparents made us our special heart-shaped iced sugar cookies and it didn't get much better than that!

This year I thought I'd add chocolate to my treats.  My mother was a chocoholic and I've proudly inherited those genes.  However, some of her combinations (i.e., Cheese doodles and chocolate) I have not : )  but I can certainly see why something salty and chocolaty was an obsession for her.   Erin is my big chocoholic; edging Kelly out slightly, but nonetheless, they both loved to make and eat brownies.  We're "nutty" brownie lovers, but certainly you can leave them out and we seem to love the fudgier brownies instead of cake-like.

This recipe, from Bon Appetit's current February issue, inspired me this morning.  Under the "Cocoa Power" section are these brownies--Cocoa Brownies with Browned Butter and Walnuts.  I love melting butter to a "browned" consistency for recipes; it adds a rich, nutty flavor.   I first used browned butter in sugar cookies I made for Christmas one year and I love to make a browned butter sage sauce to go with my homemade gnocchi.  The flavor is so enhanced by this extra process and it's what attracted me to try this recipe.

Cocoa Brownies with Browned Butter and Walnuts

10 T (1 1/4 sticks) unsalted butter, but into 1-inch cubes
1 1/2 cups granulated sugar
3/4 cups natural unsweetened cocoa powder, (spooned into the cup to measure, then leveled)
2 tsp. water
1 tsp. vanilla
2 large eggs, chilled
1/3 cup plus 1T unbleached all-purpose flour
1 cup walnut pieces
I toasted the walnuts, slightly, for 5 minutes and then, just broke them with my hands.


Position rack in the bottom third of oven: Preheat oven 325F-degrees.  Line a 8x8x2-inch metal baking pan with foil, pressing foil firmly against pan sides and leaving 2-inch overhang.  Coat foil with nonstick spray.  *Since I have a a springform square pan, I did not use the foil.  Also, I brushed my pan with melted butter, which I'd rather use than spray.

Melt butter in a medium saucepan over medium heat.  Continue cooking until butter stops foaming and browned bits form at the bottom of the pan, stirring often--about 5 minutes.


Remove from heat; immediately add sugar, cocoa, water, vanilla, and a generous 1/4 tsp. salt.  Stir to blend.  Let cool 5 minutes (mixture will still be hot).

Add eggs, one at a time, beating vigorously to blend after each addition.  When the mixture looks thick and shiny, add flour and stir until blended.  

Beat again, vigorously 60 strokes.  Stir in nuts.  Transfer to prepared pan.


Bake brownies until toothpick inserted into center comes out almost clean (with a few moist crumbs attached).  About 25 minutes.  (I checked them after 20 minutes) Cool in a pan on a rack.  Divide into 16 brownies.   

Do Ahead Can be made 2 days ahead.  Store airtight at room temperature.

These brownies are actually getting packed up and sent to Erin, Maddie and Michael.  They've had a rough week with weather and colds and I thought brownies would be the perfect pick-me-up!  There are more cocoa recipes to try in this issue, but this is a good start.  And, I thought I'd give you a new technique to try and maybe you'll add browned butter to one of your favorite recipes to change up the flavor.  Enjoy!

Sunday, January 16, 2011

Jumbo Buttermilk Blueberry Pancake...Muffins


As Gru would say from "Despicable Me"...LIGHT BULB!  The idea for this recipe came about from Ari's love of blueberry pancakes, but with the ease of eating a muffin, which is what Maddie (and Ari) really love. 
Maddie eating Mimi's Pumpkin Muffins that her Mommy made yesterday!

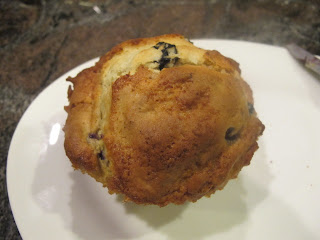
Less messy (toddler-wise) with the maple syrup incorporated into and on top of the muffin.  The texture is light, like a pancake and the maple flavor, combined with the blueberries makes this muffin hard to resist.  I also had a jar of Pure Maple Cream by Stonewall Kitchen to slather on the muffin, but you could make your own by mixing soften butter with maple syrup. 

I used Jumbo Silicone Muffin Cups (a Christmas gift from a dear friend) but I also baked them in regular muffin papers to test the baking time.

The inspiration of the maple syrup, also a gift, reminded me of our trip to Vermont before moving to Seattle.  Watching how the trees are tapped, sap collected, and the extensive process of making syrup, gave us a real appreciation for this wonderful product. 
Buttermilk Blueberry Pancake Muffins
 4 cups King Arthur All-purpose Flour
1/2 cup Queen Guinevere Cake Flour
3/4 cup granulated sugar
2 1/4 tsp. (1 pkg.) Instant Yeast
2 1/2 tsp. baking powder
1 tsp. baking soda
1/3 cup Pure Maple Syrup
1 cup (2 sticks) unsalted butter, melted
1 1/2 cups buttermilk
3 large eggs
1 cup fresh or frozen blueberries
1/2 cup dried blueberries
1/2 cup Maple Fav-R bites
1 tsp. vanilla extract


Addition Maple Syrup for drizzling


Preheat oven 400F-degrees.  Line muffin pan with papers or use Silcone muffin cups.
In a large bowl, add all the dry ingredients and whisk to incorporate.  In a large glass measuring cup, measure the buttermilk, then, add the eggs.  Use a fork to whisk together.  To that mixture, add the Pure Maple Syrup and vanilla.  Make a well in the dry ingredients and add the liquid ingredients (including the melted butter), all at once.
Stir to combine.  Fold in the blueberries (frozen and dried) and the Maple Flav-R bites (if using).  Scoop into the muffin cups.  If you're using the Silicone Muffin Cups, make sure you place them on a baking sheet--never directly on the rack of the oven!
Drizzle an addition tablespoon of Pure Maple Syrup on top of the batter.  Bake for 5 minutes, then, lower oven temperature to 350F-degrees and continue to bake another 20 minutes or until golden brown.

Let muffins cool about 5-10 minutes before removing from the cups.  The regular sized muffins baked an additional 15-20 minutes after lowering the temperature, as well.


Remembering pancake breakfasts that my mother would fix on the weekend came back with the first bite.
And I know Ari and Maddie will just love these the next time Mimi comes to visit.  Enjoy!