Friday, December 31, 2010

Cheesey Herb Biscuits

Of all the memories I have of baking with my mother, one of the best was making biscuits.  A lot of times, biscuits were an impromptu decision because she either didn't have any bread or didn't have enough to feed all of us, so she whipped up biscuits.  Which, by the way, I loved almost as much as scones.  Now, I could have made bread, bagels, or English muffins when I got up at 4:30 a.m., but I chose to play with my cat, start a load of wash, and catch up on emails.  So, when my husband said he wanted poached eggs for breakfast, when he got up, I needed to "whip" up something quick to satisfy his hunger.  The memory of biscuits popped into my head!

Biscuits, here in America, refer to a leavened bread item, however in European countries, the term biscuits is associated with a somewhat sweeter treat that was baked, cooled, then, kept warm in the oven until eaten.  This is where the term biscotti (twice baked) came from.  However, it's cold outside and we had our second snowfall a few days ago (not as bad as the east coast, though) and baking something quick would do the trick.
My daffodils had started to come up, but got a reality-check that Spring is still a few months away!
Warm biscuits, like Mom made, came to mind to support poached eggs or smear with jam as I did.  They're easy to make and in a hot oven (450F-degrees) bake in 8 minutes.  That would calm any hungry body in your house.  In addition, I made up some grits to go with my biscuit-breakfast.  If you've never had grits, you're missing out on something really satisfying.

I was born in Tennessee and grits have always been a staple in our home.  When I would visit Kelly in Kentucky, our breakfast selection always included grits.  She got hooked on them when she attended the North Carolina School of Performing Arts/Summer 1990.  So much so, that when she attended school in New England, my Dad would send her care packages with Instant Grits in it so she could just microwave a bowl before classes (although, I think she also made them for dinner too!)  Ari is no different from his mama and he started to "share" my bowl of grits when he was just over a year old.

Cheesy Herb Biscuits
1 3/4 cups All-purpose flour (I use King Arthur)
1 T granulated sugar
2 1/2 tsp. baking powder
1/4 tsp. baking soda
1 tsp. salt
1 T dried Chives (if you have fresh, you 1/4 cup--mine are under snow!)
1/4 tsp. black pepper
1/2 cup (1 stick) cold unsalted butter
3/4 cup cold buttermilk
3/4 cup grated cheddar cheese (you can also use gruyere, provolone, or your favorite hard cheese)

Heat oven to 500F-degrees. Line a baking sheet with parchment paper.

In a large bowl, measure out all the dry ingredients and whisk them to incorporate.  Cut the butter into 1-inch cubes and add to the flour mixture, coating the cubes well.  Using a pastry cutter, blend in the butter.
The mixture should resemble coarse "sand" when it's incorporated.  Make a well in the center and add the buttermilk.  I switched to my dough whisk to mix the dough--only mixing enough to bring the dough together.  Place dough on a lightly floured board and kneading slightly, bring it together.  Using your hands, pat the dough into a 3/4-inch rectangle.  Sprinkle the surface with the grated cheese and fold the right side to the middle, then the left side over the right. 
Using a rolling pin, roll dough to about 1/2-inch thick.  Use a floured round cutter to cut biscuits.  Place on the parchment lined baking sheet.  Melt an additional 2 tablespoons of butter and brush the tops.  Lower the oven to 450F-degrees and Bake 8 minutes.
The biscuits come out nicely golden on top with some of the cheese oozing out--yum, yum.  The combination of the HOT oven and the cold butter (and buttermilk) makes these biscuits so flaky, that you can just lift the top off.
Whether it's out of necessity or a craving, biscuits make an excellent choice for cold mornings...and brings back some fond memories as we come to a close of another year.  From my kitchen to yours, Happy New Year and Happy Baking.  Enjoy!

I have to add another photo that Erin took this morning after making Maddie Cheesey Biscuits--she's actually saying, "Cheese!"


Saturday, December 25, 2010

Holiday Eggnog Pound Cake

Eggnog is enjoyed in the United States and Canada during the holidays, but quite possibly it stems from early England, where warm milk was drank in a wooden mug called a nog.  Every Christmas Eve my Mother would have an open house for the entire family to exchange gifts; she'd do all the cooking and my Dad was in charge of making the eggnog.  Well, not really "making" the eggnog, rather he added his infamous combination of  rum, brandy, and bourbon to store bought.  When I was married, I got to try his eggnog--definitely made me a little tipsy, but tasted oh, so good.

Today, I took the memory of my Dad's eggnog and incorporated it into a pound cake, which is my husband's favorite.  This eggnog can be enjoyed by the whole family since I only used a tablespoon of brandy in the batter and definitely the alcohol burns off in baking, but you could use an imitation brandy flavoring.  I made a glaze with an additional eggnog flavoring in it, but you could just dust the cake with confectioners' sugar.

Eggnog Pound Cake with a Nutmeg Streusel
1 cup (2 sticks) unsalted butter, softened
2 cups granulated sugar
3 large eggs
1 tsp. Vanilla
1 T. Brandy (or brandy flavoring)
2 1/2 cups All-purpose flour
1/2 cup Cake Flour
1/2 tsp. freshly grated nutmeg*
1 tsp. baking powder
1/2 tsp. baking soda
1/2 tsp. salt
1 cup eggnog

Streusel:
1/2 cup All-purpose flour
1/3 cup light brown sugar, firmly packed
1/2 tsp. freshly grated nutmeg
1/8 tsp. salt
3 T unsalted butter, melted

*My new Christmas toy--nutmeg grinder!

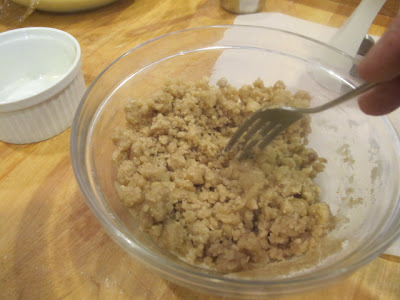
Preheat oven 325F-degrees.  Spray a 12-cup bundt pan with a baking spray.  In a small bowl, make streusel.  Mix all the dry ingredients, then, pour melted butter over it and mix, using a fork.
In the KitchenAid, beat butter and sugar until fluffy, about 5 minutes.  Add eggs, one at a time and beat well after each addition.  Add the flavorings and beat again.  Mix the dry ingredients together in a medium bowl and whisk to combine.  Alternate adding the dry ingredients and the eggnog, starting and ending with dry ingredients. Beat one minute more to full incorporate.
Spoon half of the batter into the prepared bundt pan.  Sprinkle the streusel over the batter, then, top with the remaining batter.
Bake in the preheated oven 55 to 60 minutes--use a wooden skewer to check for doneness.  Let cool about 10-15 minutes before inverted onto the serving plate.  Mix up a glaze of 1 cup confectioners' sugar, 1 tsp. light Karo syrup, and 2 T hot water in a 2-cup glass measuring cup.  Pour glaze over warm cake and let cool before serving.

Even thought there were miles between us, with the help of SKYPE my husband and I enjoyed having dinner with Erin, Michael, Maddie, Matt and Ari.  At the end of meal, Maddie wanted to sit on Ari's lap and give big hugs for a happy day.  As Clement Clarke Moore wrote..."Merry Christmas to All and to All a good night."  Enjoy!

Thursday, December 23, 2010

Buche de Noel Cupcakes

 Buche de Noel or Yule Log is a traditional cake served at Christmas in France, Belgium, Quebec, United Kingdom, and United States.  My mother and I first made this cake when I was in junior high; I remember how excited I was to create such an unique cake.  She made up the sponge cake and baked it in a sheet pan.  When it was done, it was turned out onto a cocoa-dusted dish towel and rolled up, while it was still warm.  That way the cake was formed and when it was unrolled, it was easy to fill and roll up again.  My role was decorating and making the meringue mushrooms.  I made this wonderful ganache and iced the "log," after cutting off an end to create a sawed-off limb on the log.  Traditionally, the last step is to take a fork and run the tines through the icing to create the look of bark.  Mushrooms are placed strategically around the log for that authentic look of finding it in an enchanted forest!

Today, I thought...why not recreate a Buche de Noel in a cupcake?  I made up my favorite chocolate cake recipe, but you could also do a genoise or your favorite vanilla cake.  Instead of one big log, the cupcakes would resemble "little stumps" in the forest--just the perfect size for Ari and Maddie to enjoy after Christmas dinner.

There are a few extra steps to make this dessert, but I promise it is well worth the effort.  In addition, the meringue mushrooms can be made several days ahead and stored in an airtight container.  Why not have the whole family help and make this a tradition for Christmas dessert in your home!

Buche de Noel

Meringue Mushrooms: (from The America's Test Kitchen-Family Baking Book)
1/3 cup granulated sugar
1 tsp. cornstarch
1/8 tsp. salt
2 egg whites
1/4 tsp. vanilla
1/8 tsp. cream of tartar

(1/4 cup chocolate chips, melted for "glue" to assemble mushrooms)
Heat oven to 200F-degrees and line 2 baking sheets with parchment.
1. Combine the sugar, cornstarch, and salt in a small bowl and stir to combine.
2. Use an electric mixer with a whisk attachment to whip the egg whites, vanilla and cream of tartar on medium low speed until foamy, about 1 minute.
3. Increase the mixer speed to medium-high and whip the egg whites to soft, billowy mounds, about 1 minute.  Gradually whip in the sugar mixture, taking about 1 minute to complete.  Continue to whip the whites until they are glossy and form very stiff peaks.  (If you can turn the bowl upside down and they stay in the bowl, you've got perfect meringue!)

4. Fill a pastry bag with a plain tip (#12) and fill the bag with the meringue.  Pipe mushroom stems, holding the bag perpendicular to the pan.  To shape the caps, hold the pastry bag about 1/4-inch above he paper and pipe about 40 rounds.  If "tips" form on the caps, dip a finger into cold water and smooth the top of the caps.

5. Bake in the preheated oven until the meringues are smooth and dry; about 1 hour.  Turn the oven off and let the meringues cool in the oven until completely dry and crisp. (About 1 hour more.)
6. To assemble--use a small paring knife to make an indentation in the bottom of each cap.  Melt chocolate chips in the microwave and dip the end of the stem into the chocolate.  Insert into the indentation of the cap and press lightly.  Allow to dry, upside down.

Chocolate Cake:
1 cup (2 sticks) unsalted butter, softened
2 cups granulated sugar
1 T Vanilla extract
2 large eggs
2 1/2 cups Cake Flour
1 cup Dutch-processed cocoa
2 tsp. baking soda
1/2 tsp. salt
2 1/4 cups buttermilk
Preheat oven 350F-degrees.  Line muffin pans with cupcake papers.
In the KitchenAid, using the paddle attachment, beat butter and sugar until fluffy; about 5 minutes.  Add the vanilla and combine well.  Add the eggs, one at a time, until fully incorporated.  Sift the flour, cocoa, baking soda, and salt.  Add the dry ingredients, alternating with the buttermilk, beginning and ending with the dry ingredients.  Scrape down sides, then, mix 1 minute more.

Use a scoop to divide batter among the lined cupcake pans.  The batter makes 24-28 cupcakes, depending on how full you fill your liners.
Bake for 17-20 minutes, but don't over bake.  (The cupcakes continue to bake even when you remove them from the oven.  Use your fingers to test the tops--they should spring back when lightly touched)
Cool completely.

While the cupcakes are baking, make the chocolate buttercream.

Chocolate Buttercream:
10 oz. chocolate, chopped or use chips
1 cup heavy cream
1/4 cup light corn syrup
1/4 tsp. salt
1 1/2 cups confectioners' sugar
2 tsp. vanilla extract
18 T (2 1/4 sticks) unsalted butter, softened
Place the chocolate in the food processor.  On the stove, in a small saucepan, heat the heavy cream, light corn syrup, and salt to a low boil.  Pour the hot cream mixture over the chocolate and process the mixture until smooth.
Add the sugar and vanilla and pulse several times to combine (about 30 seconds).  With the machine running, add the butter, one tablespoon at a time and combine until smooth and no butter chunks remain.  Transfer frosting to a medium glass bowl and cover with plastic wrap. Refrigerate until thick and spreadable, about 1 to 1 1/2 hours.

Once the cupcakes are out of the oven and cooling.  Make Mocha Buttercream.

Mocha Buttercream:
1 1/4 cups (2 1/2 sticks) unsalted butter, softened
2-4 T heavy cream
1 T Vanilla extract
1/2 tsp. espresso powder
2 T cocoa
3 cups confectioners' sugar

In the KitchenAid, using the paddle attachment, beat the butter until fluffy.  Add one cup of the confectioners' sugar, two tablespoons of the heavy cream and the cocoa.  (If young children will be eating these, leave out the espresso powder, but otherwise, mix it in the vanilla extract before adding that ingredient to the butter/sugar mixture).  Add 2 more cups of confectioners' sugar and more heavy cream to achieve a fluffy buttercream.

Vanilla Cream Cheese Filling: (optional)
6 oz. cream cheese
1 Vanilla bean, scrapped
1/2 cup Heavy cream
In a medium bowl, using an electric mixture, beat the cream cheese until fluffy.  Add the vanilla bean "seeds" and heavy cream.  Beat to incorporate.

To Assemble:
If you're doing the filling, use an apple corer to remove a "plug" of cake from the center of the cupcake.  Place filling in a piping bag with a #12 tip and fill with the Vanilla Cream Cheese.
Place the Mocha and Chocolate Buttercream in separate piping bags. Alternate circles of buttercream, making sure you do the outer circle in the Chocolate Buttercream.

Use a small fork to add the bark features.

Dust the meringue mushrooms with cocoa powder and place on the "stump."
Yes, Virginia, there are a lot of steps, not to mention equipment, to making these wonderful cupcakes.  However, I guarantee they are worth it and your family (and Santa) will be appreciative.   And, if you're wishing for a White Christmas, dust your dessert dish with a little confectioners' sugar. Enjoy!


    Monday, December 20, 2010

    Holiday Give-Away Winner...

    The lucky recipient of this holiday apron is Joanne!  Congratulations and thank you for your participation.  The apron will be mailed tomorrow...in hope it reaches you before Christmas :-D

    Merry Christmas and Happy New Year!  Thank you for all your love and support during this most difficult time in my life.  Kelly asked me to continue this blog and I think she knew I'd need this wonderful connection in my life.  Here's to another year of memories to share.  Love, xoxo

    HOOTCH

    My sister, Barbara shared this recipe with me from a cookbook her husband's Aunt Ev had given her.

    Aunt Ev, or as she was known by the younger generation, Grandma Barr, passed away on December 13th, just two days shy of her ninety-seventh birthday.  She was born in Lanesville, West Virginia, eleventh out of twelve children, but raised her own family in the town of Parsons (where my brother-in-law was also born.)  When I read through her obituary that my sister forwarded to me, I was astounded by her accomplishments; President of the Holly Meadows 4-H and a member of the Farm Women's Club, received credentials to be a substitute teacher in the public schools, a notable tailor/seamstress, and a long standing member of the United Methodist Church, where she was named "Mother of the Year" at the United Methodist Women's Conference.  The little town of Parson's was the center of the Big Flood of 1985 and it was Aunt Ev and Uncle Dale, who opened up their home to five families in need of refuge during that disaster; just one example of her charitable heart to others. 

    I've only met Aunt Ev once when I accompanied my sister and mother to Parsons for a weekend trip.  Before we left to return home she wanted us stop by for what she termed a "snack before we hit the road!"  However, when we arrived at her home, the table was covered with a banquet of food, as if half the town was showing up!  My sister said that's how it always was...she made a little of everything to make sure everyone was happy and filled up.

    This recipe actually is from her dear friend Poke Roy, but Aunt Ev made it all the time and my sister said it was the most amazing candy.  No one is sure where the name Hootch came from.  I have some ideas since it reminds me of a candy I made with my mother called Penuche fudge.

    This fudge is made with brown sugar, but the taste is similar to Hootch and of course, I couldn't help but notice Penuche (pronounce Panooch) and Hootch, sounds familiar.  All I know is that I too am in love with this candy, so don't be frightened off by the ingredients.  I know Kelly would say, "Mom...really a pint of Karo Syrup!"  But, it's Christmas and a little indulgence is allowed.

    Poke Roy's HOOTCH (from Aunt Ev)
    1 1/2 cups (12 oz can) of Evaporated Milk (not Sweetened Condensed!)
    1 cup (2 sticks) of unsalted butter
    2 cups (1 pt.) Light Karo Syrup
    Dash of Salt
    6 cups granulated sugar
    1 cup chopped walnuts
    1 tsp. Vanilla extract

    Equipment: Candy thermometer

    Butter a 9" x 12" baking pan. 
    In a heavy 6-quart saucepan, over medium heat, bring the evaporated milk, butter, Karo syrup and salt to a boil.  Add the sugar and chopped walnuts all at once, stirring to dissolve and return to a boil. 
    Lower the temperature to Low and continue with a "real slow" boil until the mixture reaches Soft Ball Stage on your candy thermometer.   This is the tricky part; on my sister's thermometer (and in Aunt Ev's notes) 230F-degrees is listed, but on my thermometer it reads 240F-degrees.  The first time I made this, I went with the 230F and I had a "peanut butter" consistency instead of fudge.  So, I dumped that mixture and started over adhering to the Soft-Ball Stage.  Also, when I checked my candy recipes for fudge, they all said 240F-degrees was needed, so that's what I went with and had success.
     This "slow boil" is going to take at least 30 minutes (for me it was 45 minutes) so don't go far, but let it cook slowly.  When the temperature is reached, turn off heat and add the vanilla extract.  Stir well.  Pour the mixture into a heat-resistant bowl (I used by large Pyrex glass bowl) to cool.
    When the bowl is cool to touch, use a hand mixture to beat it until it looses it's gloss.  This took about 5-7 minutes.  Spread the Hootch into a buttered, 9 x 12-inch pan and let set.
    As you can see, it looks very much like Penuche, but with the toasted walnut flavor, Hootch is, well, addictive.  I expected it to be so sweet that my teeth would fall out, but it's not and this is one candy that will definitely become part of my holiday treats...and a wonderful memory of Aunt Ev.  Enjoy!

    Sunday, December 19, 2010

    Wishing You All A Very Merry Holiday

    It's been very busy these last few weeks for me.  One of the projects I have been working on is this little cottage...all done in paper.  Rose Cottage (from one of my favorite movies, The Holiday) was done in memory of our Kelly, who loved the look of an English cottage garden--which we tried to replicate at her home these last few years.  The garden was actually in full bloom when she came home in May and I would like to think it was a part of her final happiness.

    I've been a little behind in posting recipes, but I promise to catch up and tomorrow I will announce the lucky winner of the Holiday Give-Away.  I do wish you all the merriest of season with your family and loved ones and keep in mind to make every moment count.  Memories are forever and I have many to look back on while missing our precious daughter this holiday.  Love to all, Susan

    Thursday, December 16, 2010

    Linzer Bars

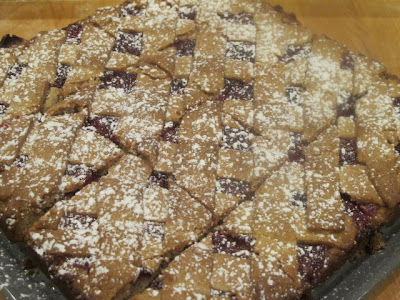
    Linzer Tarts are an Austrian specialty associated with the city of Linz.  A  raspberry jam-filled tart in an almond nut crust, although hazelnuts have also been used.  These bars are reminiscent of that tart, even down to the criss-cross top crust.  I used ground hazelnuts since they are grown locally in Oregon and in place of the raspberry jam I used my Holiday Jam, which consists of raspberries, cranberries, and pears.

    The bars also remind me of the jam bars Kelly would bake.  The last time we did them together was last June for her Neighborhood Yard Sale; it's this memory that inspired me to add Linzer Bars to my Christmas Cookie Bake List this year.

    Linzer Bars (From The Gourmet Cookie Book)

    1/2 cup (1 stick) unsalted butter, softened
    1/2 cup firmly packed light brown sugar
    1/4 cup granulated sugar
    2/3 cup almonds (lightly toasted and ground--I used ground hazelnuts)
    1 egg
    1 1/2 cups all-purpose flour
    3/4 tsp. baking powder
    1/2 tsp. cinnamon
    1/4 tsp. salt

    3/4 cup raspberry jam (I used my Holiday jam)
    1 tsp. grated lemon zest

    Preheat oven to 375F-degrees.  Spray a 8 or 9-inch square pan with baking spray; set aside.

    In the bowl of the KitchenAid, using the paddle attachment, cream together the butter and sugars until the mixture is light and fluffy.  Stir in the almonds (or hazelnuts) and the egg.  Sift together the flour, baking powder, cinnamon, and salt.  Stir the mixture into the almond mixture and combine completely.
    Pat two-thirds of the dough into the pan and spread with the jam. 
    Sprinkle the lemon zest over the jam.  

    Roll out, between two sheets of wax paper, the remaining one-third of the dough.  Chill the dough 15 minutes or until firm, in the freezer.

    I removed the top sheet of the wax paper, then, flipped the dough over so the surface was lying on the pastry board.  Remove the wax paper carefully and cut into 1/2-inch strips.  Arrange the strips, in a diagonal pattern over the jam.
    Bake the Linzer Bars for 20-30 minutes or until golden brown.  (Mine baked in 27 minutes.)  Cut into 16 squares.  Dust the top with confectioners' sugar.


    Bar cookies are quick to make and the luscious red color of the jam is so festive.  I would also try these with apricot, peach, or even strawberry jam the next time I bake them.  Enjoy!

    Sunday, December 12, 2010

    Pear Upside Down Cake with Vanilla Bean Creme Anglaise

    Pears are one of Ari's favorite fruits and I'm sure this dessert would be too.  There's something comforting about upside-down cakes so this combination seemed appropriate for the season.  My mom's pineapple upside down cake was one of my favorites with the sweet pineapple and maraschino cherries caramelized together and I tried to replicate that flavor, but keep in mind a cake more appropriate for the holiday.  This cake is laced with wonderful spices; almost like a gingerbread and the pears have been caramelized in dark rum and sugar, then, a sprinkling of candied ginger that gives a warming touch to the pears.

    I chose to make a vanilla bean creme anglaise, but you could easily do a warm caramel or lemon sauce as an accompaniment and that would be just as nice.  This recipe for Creme Anglaise comes from the NY Times.  I actually cut it out from the food section when we lived in New England and it's been my "go to" creme anglaise because it always comes out perfect. (I particularly love it with a bittersweet chocolate cake!)
    Here's Maddie enjoying decorating her first Christmas tree and I thought this would have been a wonderful tree-trimming dessert, although, like her mommy, she prefers chocolate!

    Pear Upside Down Cake with Vanilla Bean Creme Anglaise

    2-3 Pears, peeled, cored and sliced (I used the Bosc variety)
    I use a melon-baller to scoop out the core.  Place in a bowl and squeeze 1/2 lemon juice over them.  Toss to coat.

    2 T butter
    4 T sugar
    1/4 dark rum, brandy, or apple juice
    1 T. Mini Ginger Chips

    Cake:
    1/2 cup (1 stick) unsalted butter, at room temperature
    1/2 cup granulated sugar
    1/4 cup dark brown sugar, packed
    2 T. unsulphured molasses
    3 large eggs
    1 tsp. ground ginger
    1 tsp. ground cinnamon
    1/2 tsp. ground cardamon
    1/4 tsp. freshly ground nutmeg
    1/4 tsp. ground cloves
    1 cup flour
    1 tsp. baking soda
    1/2 tsp. salt

    Lightly butter a tartin pan or a 9-inch cake pan.
    To caramelize the pears--In a large sauce pan, melt the 2 tablespoons of butter, then, add the sugar.  Lightly brown the pears on both sides and remove to a plate.  Add the rum (brandy or juice) and deglaze the pan.  When the mixture thickens slightly and looks more like syrup, turn off the heat and pour this mixture into the prepared pan.

    Arrange the pears in the syrup and set aside.  Sprinkle with the mini ginger chips, if using.

    Preheat oven to 350F-degrees.
    In a KitchenAid, using the paddle attachment, beat the butter until fluffy.  Add the sugars and molasses and beat well.  Add the eggs, one at a time, beating well after each addition.  Don't worry, the mixture will look "curdled".

    Sift the dry ingredients (flour, spices, baking soda and salt)  Add to the mixture and beat just until the batter has come together.
    Spread the batter over the caramelized pears and use an off-set spatula to smooth it to the edges.
    I place my tartin pan on a baking sheet and placed it in the oven.  Set the timer for 10 minutes.  Without opening the oven door, turn temperature down to 325F-degree and continue baking for 25-30 minutes.  Test after 25 minutes, pressing on the top with your finger tips--it should spring back.  Remove from the oven and let cool for 1 hour before turning right-side up.


    Vanilla Bean Creme Anglaise

    1 cup whole milk
    1 cup heavy cream
    2 Vanilla beans, split and the "bean paste" scraped into the milk
    6 egg yolks
    1/2 cup sugar

    Bring the milk and cream just to a boil with the vanilla beans in it.


    Turn off heat and let steep at least 10 minutes.  In a medium bowl, whisk egg yolks, gradually adding the sugar.  Continue to whisk until a lighter yellow color.  Ladle some of the hot milk mixture into the egg yolk mixture and whisk to combine.  Continue doing this untl almost all the milk mixture has been added, then, remove the vanilla bean pods and pour the remaining milk into the egg mixture.  Return to the stove and cook the mixture over medium heat.  Continue to whisk constantly until the mixture reaches 180F-degrees or when the mixture covers the back of a wooden spoon and you draw your finger across, the line remains.

    Immediately remove from the heat, strain the mixture into a glass bowl and place that bowl inside another bowl that is half filled with ice cubes.  Let the mixture cool, stirring occassionally.  When cool, cover with plastic wrap and chill for several hours.  This mixture can be made the day before.
    *Save the egg whites--I'll show you my chocolate dipped macaroons later this week!

    Invert the cake onto a platter.
    To plate the dessert, spoon the creme anglaise onto the plate and then cut a slice of cake.  The combination was perfect and as I would tell Ari or Maddie..."It's like a little pear island in a vanilla  sea!"  Enjoy!