Wednesday, August 30, 2017

Light Rye Bread

There's nothing better on a cool Autumn day than homemade bread.  Yesterday, I made one of my hubby's favorite loaves--Rye Bread.  The recipe was on the back of Light Rye Blend that I just purchased from King Arthur Flour and it turned out perfect.  Very easy to make and bake and with cool evenings coming up, this proved to be one I'd make over and over again.

Light Rye Bread

2 cups Ryle Flour Blend
1 3/4 cup King Arthur All-purpose flour
2 T potato flour or 3 T instant potato flakes
1/4 cup nonfat dry milk
2 tsp. instant yeast
2 tsp. salt
1 T caraway seeds, optional
2 T vegetable oil (or butter)
1 1/2 cups lukewarm water

In a stand mixer, using the dough hook, mix all the dry ingredients together.  While the mixer is running on med/low, add the oil and water; mix until the dough comes together.  Cover with a towel and allow to rest 10 minutes.

Turn mixture out onto a lightly floured board and lead to form a slightly sticky dough; try not to add additional flour.  Place dough into a lightly oiled large bowl, wrong side down, then turn up and cover with plastic wrap.  Allow to rise about 1 1/2 hours.

Turn dough out onto a lightly floured board once more and gently deflate.  Shape into a loaf and place in a 9" x 5" loaf pan.  I used a Brotform or a Banneton, which is lightly floured, to form the loaf because I wanted to bake it on a stone.
Allow to rise in the loaf pan or form, covered with plastic wrap, for 30-45 minutes. Preheat oven to 375F-degrees.  If you are using a baking stone, preheat with the stone in the oven.

Bake loaf or turn out dough onto the baking stone, for 35 to 40 minutes.  Check interior temperature; should read between 190F-degrees & 200F-degrees.  Remove dough from the oven and allow to cool before transferring it to a rack to cool completely.
The texture was perfect and accompanied a nice bowl of Corn/Potato Chowder to counteract the cool evening.  Enjoy!

Saturday, August 26, 2017

Homemade Pecan Sandies

These were my mother's favorite cookie; my Dad would bring bags from the Commissary home to her every Saturday.  It's fun to come up with a cookie from a memory!

Homemade Pecan Sandies
1 1/2 cups (3 sticks) unsalted butter, melted and browned
1 1/2 cups + 4 T granulated sugar
1/2 cup firmly packed light brown sugar
1 T Vanilla extract
1 1/4 tsp. salt
1/2 tsp. baking powder
2 large egg yolks
2 cups King Arthur all-purpose flour
1 1/2 cups finely chopped pecans, lightly toasted

In a 1-quart saucepan, melt the butter over medium heat.  When it begins to bubble and hiss, stir with a heat-resistant spatula, scraping the edges of the pan as brown bits form.  Continue cooking and stirring until the butter is silent and takes on a golden yellow hue.
Remove from the heat and pour into a medium bowl to cool completely--about 25 minutes in the refrigerator.

Preheat oven to 350F-degrees and line two baking sheets with parchment paper.

Stir the sugars, vanilla, salt and baking soda into the cooled browned butter.  Add the egg yolks, one at a time and stir.  Fold in the pecans and flour to form a sandy dough.
Form about 1 tablespoon of dough into a ball and place on the parchment-lined baking sheets.  Flatten to about 3/4-inch.  Bake until a "sandy brown" about 12-15 minutes.  Cool slightly, then remove to a rack to cool completely.
These cookies will store for up to three weeks...trust me, they won't last that long.  Enjoy! 

Wednesday, August 23, 2017

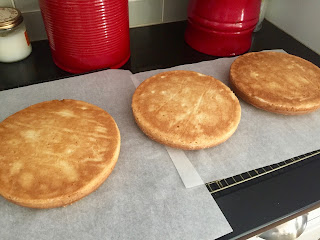
Heavenly Coconut Cake

Coconut, I've discovered, is an acquired taste; you either love it or hate it!  I happen to love it, as did my mom and family.

Coconut cake is a popular Southern dessert, either white or yellow cake, iced with 7-minute Frosting and covered with sweetened, shredded coconut.  It definitely had its beginnings in the United States and along with Red Velvet it's become one of the most asked for in restaurants.

Heavenly Coconut Cake

1 cup (2 sticks) unsalted butter at room temperature + more for the baking pans
2 cups granulated sugar
3 large eggs, separated, plus 2 large egg whites
2 tsp. vanilla extract
1 cup canned coconut milk, shaken well before measuring
3 cups cake flour
2 tsp. baking powder
3/4 tsp. salt
1 1/3 cups shredded, sweetened coconut

Preheat oven to 350F-degrees. Butter three (3) 8-inch round cake pans and line the bottoms with parchment paper.  Butter the parchment paper and lightly dust the pans with flour.

In a stand mixer, using the paddle attachment, cream the butter until light, then, while the mixer is running, slowly add the sugar.  Continue beating until fluffy, about 4 minutes.  Scrape down the sides of the bowl with a rubber spatula.   One at a time, add the egg yolks, beating well after each addition.  Beat in the vanilla.  Mix the dry ingredients together and add them in two equal portions with the coconut milk, mixing after each addition until smooth.  Scrape down the sides of the bowl as needed.  Add the coconut and stir to combine.


In a separate bowl, using a hand-held mixer, beat the 5 egg whites until soft peaks form.
Stir in about one-fourth of the egg whites into the batter to lighten the mixture, and then use a rubber spatula to fold in the remaining whites.  Divide the batter between the three cake pans.
Bake in the preheated oven for 25 to 30 minutes.  My cakes took 22 minutes in a Convection Oven!
Allow to cool for 10 minutes, then invert and untold on a parchment covered wire rack.  Peel off the bottom parchment paper and let cool completely.

Old Fashioned Boiled Icing (7-minute)
1 1/2 cups granulated sugar
1/2 cup water
1/4 tsp. cream of tartar

4 large egg whites
Pinch of salt
1 tsp. vanilla extract
1 1/2 cups shredded, sweetened coconut

In a heavy, medium saucepan, combine the sugar, water and cream of tartar.  Stir, but once on the stove, resist stirring!   Cook without stirring until a candy thermometer reaches 240F-degrees/115C-degrees (soft-ball stage).  Meanwhile, place the egg whites in a stand mixer, fitted with the whisk attachment.  Add the salt and beat until soft peaks form.  Once the sugar mixture has reached 240F-degrees, add to the egg whites, slowly while the mixer is on high speed.  Drizzle the hot syrup into the whites, avoiding the whisk and sides of the bowl.  Whip until stiff peaks form.  Add the vanilla extract.  Frost the layers, about  1 1/2 cups per layer, then frost the entire cake.  Press the coconut around the sides of the cake.

This cake is so moist and it was a delicious dessert.  Are you a coconut lover?  Enjoy!


Tuesday, August 15, 2017

Double Chocolate Fudge Brownies and Grandson visiting

On Saturday, our grandson came for a visit and he wanted to bake...so we made brownies, which is everybody's favorite and goes so well with a scoop of vanilla or strawberry ice cream.

The legend of the brownie dates to back to 1893 in Chicago, Illinois, when a socialite asked the pastry chef to create a "cake-like" dessert that was small enough to fit into a boxed lunch for ladies attending the Columbian Exposition at the World's Fair.  The result was the Palmer House Brownie with walnuts and apricot glaze.  Since that time, brownies have taken on many flavors and pairings of ingredients.  While most people like nuts in their brownies, there are a lot of true chocoholics who like extra chocolate chips for a unique texture.  Which are you?

Double Chocolate Fudge Brownies

3/4 cup + 1 T (13T) unsalted butter, melted
1 cup granulated sugar
1 1/2 tsp. espresso dissolved in 3 T water

Preheat oven to 350F-degrees.  Butter an 8-inch square baking pan and line the bottom with parchment paper.  Butter the parchment paper and lightly dust with flour.
Heat the above ingredients in a medium saucepan over medium heat, stirring often, until the butter is melted.  Pour this mixture over:

10 oz. semisweet chocolate, finely chopped (we used chips!)

Let this mixture stand until the chocolate softens, about 1 minute.
Add:
2 tsp. vanilla extract

Whisk the chocolate and vanilla extract together until smooth.

Add:
3 large eggs, one at time, beating well after each addition.

Add:
1 cup cake flour
1/2 tsp. baking powder
1/4 tsp. sea salt

Stir the dry ingredients into the chocolate mixture until smooth.

Add:
1 1/2 cups semisweet chocolate chips and stir to combine.

Pour the mixture into the square pan.
Bake in the preheated for 30-33 minutes.  A wooden toothpick in the center should come out clean and the top should be shiny.


Let cool completely in the pan, then cut into squares.  The brownies can be stored in an airtight container for up to 5 days...if they last! Enjoy!

Tuesday, August 8, 2017

Uniquely Good Banana Bread

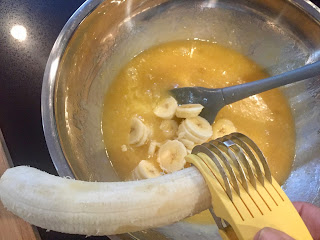
I've made tons of banana bread in my time, but this recipe is uniquely different.  Instead of smashing the bananas, I sliced them.  The interior almost looks like there is chocolate in this recipe, but i assure you there isn't and the taste is really good and moist.  I enjoyed a slice with a cup of tea--my new favorite Twinings "Lady Grey Tea."  It's light and has a hint of citrus.

We finally got some much needed rain and watching the birds and squirrels running around made for a relaxing morning.

Uniquely Good Banana Bread
Makes 2 loaves
1 cup (2 sticks) unsalted butter, melted
2 cups granulated sugar
4 large eggs
4 bananas, sliced
1 T Vanilla extract
3 cups King Arthur all-purpose flour
2 tsp. Baking Soda
1 tsp. Salt
1 cup Sour Cream
1 cup chopped walnuts

Preheat oven to 350F-degrees.  Spray two loaf pans (9" x 5") with baking spray.

In a large bowl, stir together the sugar and melted butter.  Add the eggs, one at a time and stir to incorporate.  Add the vanilla and sliced bananas.
The slices should be about 1/4-inch.  I used a banana slicer, but you can use a paring knife.

Add the dry ingredients, then the sour cream and walnuts and stir until completely incorporated.  Divide batter between the two loaf pans.
Bake in the preheated oven for 55-60 minutes; until golden brown and a tester comes out cleanly from the center of the bread.  Remove pans from the oven and allow to sit for 10 minutes.
Remove bread from the pans and allow to cool completely on a wire rack.

I used my Grandma Gladys' wedding china...almost 100 years old to relax and Enjoy!

Friday, August 4, 2017

Key Lime Pie and August's Give-away Apron

Key Lime Pie is an American dessert made from, yes of course, Key Limes that are naturalized throughout the Florida Keys.  Key Limes are more tart and aromatic than the common "Persian limes" found year-round in grocery stores.  It's juice is a pale yellow and it's the acidic juice mixed with sweetened condensed milk that causes the filling to thicken on its own.  Historically, the pie was not baked, but because consuming raw eggs can be dangerous, especially to small children, the pies are baked for a short period; this recipe I made is baked for 10 minutes.

Although typically only the egg yolks are used in Key Lime Pies and the whites are beaten to a meringue to top it, I prefer whipped cream on top of mine to counterbalance the tartness, so I used the whole egg in this recipe.

I love citrus pies and my mom made a wonderful Lemon Meringue.  Both my girls and now our granddaughter are crazy for Key Lime Pie so this is a favorite around our house.  What's better at the end of a hot day?

KEY LIME PIE

Graham Cracker Crust:
1 1/4 cups graham cracker crumbs
1/4 cup firmly packed light brown sugar
1/2 tsp. salt
4 T unsalted butter, melted

Preheat oven to 360F-degrees. Mix all the ingredients in a bowl.  Using a measuring cup, press the mixture into a bottom and up the sides of a 9-inch pie pan.  (I had an 8-inch and the filling almost overflows...be sure you use a 9-inch)
Bake for 10 minutes.  Remove from the oven and allow to cool completely.

Filling:
3 (14oz) cans Sweetened Condensed Milk (approx 3 1/2 cups)
2 large eggs
1 cup Key Lime juice (I used fresh, but you can use bottled) I used 9 limes for 1 cup!
Zest of 1 lime

In a bowl, whisk together the milk and eggs.  Add the lime juice slowly, whisked to combine.  Finally stir in the zest.  Pour into the prepared crust.


 Bake in the preheated oven for 10 minutes.  Let cool completely, then refrigerate until ready to serve.

Whipped Cream:
1 1/2 cups heavy whipping cream
1/4 cup confectioners' sugar
1 tsp. vanilla extract

Use a hand mixer, fitted with the whisk attachment or as I do, a copper bowl and whisk to beat the ingredients until stiff peaks form.  
 Slice the pie and add a dollop of whipped cream over the pie.  Nothing's better on a hot, humid evening.  Enjoy!


Now, as promised...here is August's Apron.  The blues made me feel cooler; after all, blue is a cool color, and the hydrangeas are always a favorite.  Just leave a comment this month and you could win this beautiful apron.  Good Luck!

Wednesday, August 2, 2017

July's Apron Winner...

The month went by so fast with my granddaughters visiting, but I wanted to get a fresh start and announce the winner is Linda at Linda's Life Journal.  Please email me your address and I will send the Poppy Apron out to you asap!

I'm planning on having August's apron up by tomorrow.  Please forgive me for being so behind:-D