Monday, September 27, 2010

Baseball and Apple Betty Squares

Fall is officially upon us and certainly our weather is reflective of the season with rain over the weekend.  However, that doesn't stop the last week of the baseball season, or the playoffs to come and for sure, not my husband from anxiously maneuvering his teams in his final week of Fantasy Baseball.

My memories of this sport come from my Grandpa Frank who loved the St. Louis Cardinals (his hometown) and my sister, Barbara who was right there in his living room watching the games.  Admittedly, I'm not a die-hard fan, but I loved to have him explain plays to me and see his face when his team played well.  Now, I love watching our grandson, Ari, embrace the sport to the point he asked a waitress to turn the channel so he could watch a game...he's only two:)  Tonight, his daddy posted on Facebook a video of Ari hitting the ball and running the bases and I can't wait to play this American "pastime" with him in the backyard when I fly there this week.

Along with baseball, apple pie is just as American, so today I baked a version that is called Apple Betty Squares.  Apple Brown Betty is a dessert that is thought to date back to colonial times and is similar to a cobbler or bread pudding.  It's a simple dessert, made with fruit (usually apple) with sweetened bread crumbs on top.  Even J.D. Salinger mentioned Brown Betty dessert in his novel, Catcher in the Rye, stating "it's a typical unpleasant boarding school fare."  That's far from being true, and for me, this version made into a bar cookie would even change his mind!

Apple Betty Squares
(This recipe is from Gourmet magazine/September 2000)

3 slices of firm white sandwich bread, torn into quarters
For shorbread base
3/4 c (1 1/2 sticks) cold unsalted butter, cut into 1-inch cubes
2 c all-purpose flour
1/2 c packed light brown sugar
1/2 tsp. salt
For apple filling
1/2 c + 2T (1 1/4 sticks) unsalted butter, melted
2 lb tart apples (I used 4 Granny Smith apples)
2/3 c granulated sugar
2 T all-purpose flour
1 tsp. ground cinnamon
1/2 tsp. ground cardamon

Preheat oven to 350F-degrees
In a food processor, pulse the bread to fine crumbs.  Spread in a shallow baking pan and toast in the middle of the oven, stirring once, until golden, about 5 minutes.

Make the shortbread layer:--Place the flour, brown sugar and salt in a food processor and pulse to mix.  Add the cubed cold butter and process until it begins to form small lumps.  Sprinkle base into a 13 x 9-inch baking pan and press evenly onto bottom.  Bake in middle of oven until golden, about 20 minutes.
Prepare the apple filling while the shortbread is baking:
Peel, quarter and core apples, then, slice quarters crosswise.  In a small bowl, stir together the sugar, flour and spices and set aside.
Assemble the squares:
Sprinkle half of the sugar mixture over the hot shortbread.  Place the apples on top and then sprinkle the remaining sugar over them. 

Top with the toasted bread crumbs, then pour the melted butter over top.


Bake in the oven for 50-55 minutes until golden brown.  (Hint: to keep the bottom of the shortbread from browning too much, place the 9 x 13-inch pan on a sheet pan.)  Cool 20 minutes in the pan on a rack before cutting into squares.

These squares are great on their own, but with a scoop of homemade vanilla ice cream; well, Yum. Enjoy!

Friday, September 24, 2010

Chocolate Swirled Peanut Butter Banana Bread

Once, when I was picking up Erin and Kelly from my parent's house after work, Kelly whispered to me, "Grandma likes chocolate and Cheese Curls!"  I said, "Don't worry, sweetie, you have those freaky genes too and one day you'll eat something that is just as weird :)" 

It's a fact, my mother loved chocolate and so when I was faced with still more ripened bananas, I racked my brain for a banana bread version that she would have loved.  I've had many a banana bread with chocolate chips, but the memory of all the ways my Mom made my peanut butter sandwiches for school also popped in my head. Admittedly, I was born in 1950 and of course, Elvis Presley was the rage in the 50s.  I was too young to be a fan, but I do remember hearing how he loved Peanut Butter & Banana sandwiches and I asked my mother if she would make one for my lunch.  You can imagine my surprise when I found this special sandwich in my brown bag; my Mom loved to do the unexpected.

Today, is the culmination of memories when I decided to subject you all to still another banana bread recipe:)  This may not be my last, but it's definitely one of my favorites.

Chocolate Swirled Peanut Butter Banana Bread

2 large eggs
1 c granulated sugar
1/2 c light brown sugar, packed
1/2 c (1 stick) unsalted butter, melted
3 large bananas, mashed
2/3 cup peanut butter
1/2 tsp. banana flavoring
1/4 tsp. vanilla powder
2 1/2 cups all purpose flour
1 tsp. baking powder
1 tsp. baking soda
3/4 tsp. salt
6 oz. dark chocolate, melted
1 cup broken, lightly toasted walnuts
1/3 c chocolate chips

Preheat oven 350F-degrees. Use a non-stick baking spray and prepare 2 5" x 9" loaf pans.  Place walnuts on a baking pan and lightly toast, 6-8 minutes.  Let cool.  Break into pieces and mix with the 1/3 c of chocolate chips.

In a double boiler, melt chocolate over low heat.  Set aside. 


In the KitchenAid, using a paddle attachment, beat the eggs and sugars, combining thoroughly.  In a medium bowl, mash bananas, then, add vanilla and banana flavoring.  Add to the bowl along with the peanut butter and beat to combine.  Remove paddle attachment and stir in the dry ingredients completely.

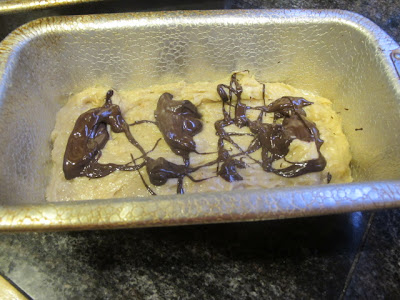
Place some batter in the bottom of both pans.  Use a spoon to place dollops of melted chocolate over the batter.
Continue layering batter and chocolate one more time, ending with batter.  Divide the walnuts/chocolate chips and place on top.
Place in the oven and bake 15 minutes.  Lower oven to 325F-degrees and continue baking another 45-50 minutes, or until a toothpick comes out clean from the center.  Cool in the loaf pan 10 minutes and then remove and cool completely before slicing.
These loaves brought back such good memories of childhood and quirky combinations. Enjoy!

Thursday, September 23, 2010

Elegant Almond Jam Tarts...

I really should be in my studio working on some projects for upcoming classes I'll be teaching in November in 3-D floral, but the autumn, rainy day kept me in my kitchen wanting to try a recipe I had received in an email from King Arthur Flour last week.  I bought the new pan they showed with the recipe from the catalogue and it arrived yesterday, so of course, I had to break it in.

The unique pan is a "Lift & Serve Single Squares" tart pan, by ChicagoMetallic bakeware company, that make this tart, not only elegant, but bite size, which has always fascinated me for some reason.  I loved when my mother made tarts in a mini muffin pan when we were kids because she knew it would feel like they were just for us.  However, now as a adult, I still find this size to be most convenient when it comes to serving or eating.  I guess it goes back to my days in catering;  you could sample more things without wasting a crumb :)

In addition to these sweet tarts, I can see making little quiches or fruit pies for our grandchildren to enjoy when we have our tea parties together or just to have in the freezer when I want a little bite of something.

Elegant Almond Jam Tarts

I made the crust in my food processor because I like the way it makes the mixture crumbly, then, adding the wet ingredients, the dough comes together with a few pulses.
I chilled the dough while I made the filling.  When everything was ready, I divided the dough into 24 pieces and pressed the segments into the bottom and up the sides of the pan.

Assemble the tarts as per the directions from King Arthur Flour (click on title to get to the link), then, do as I did--brew a cup of tea, put a couple on a pretty plate and imagine you're have your own tea party.  Enjoy!

Wednesday, September 22, 2010

Grammy's Blueberry Newtons

A little over a week ago, while I was SKYPING with Ari, I told him I was sending a package and I would make some cookies to go in it.  "What kind would you like?" I asked him.  The King said, "Blueberry!"  I didn't have time to do some experimenting before getting the package out, so I sent him some Spice Cookies and promised I would come up with a blueberry cookie that he would love.

Today, I made, what I'm calling, Blueberry Newtons.  I started with dried blueberries, with their intense, concentrated flavor, added some CheriRaisins and soaked them both for several hours in warmed apple cider to plump them up.  To me, these newtons taste like blueberry pie wrapped in a cookie!

Hopefully, this time next year I'll be living closer to our grandchildren and I won't have to send their goodies in a box.  When our daughters visited my parent's home, my Mom always fixed them a "goodie bag" to go home with; candy, gum, cookies, etc.  They looked forward to these treats and I wouldn't have denied the look on their faces getting their "booty" or my Mom giving it.  As I look back it was more than the treats, it was this special bond that was forming between them.  Kelly told me, when she had Ari, that she would allow me to do the same thing because she believed it was an important rite of passage that grandparents get to do.  I love being a Grammy and I told my husband the other day, "who would have guessed my greatest fan club would be under three feet tall!"

Blueberry Newtons

Filling:

3/4 c apple cider, heated
1 1/4 c dried blueberries
1/2 c  CheriRaisins
1/3 c blueberry jam (preferably homemade)

Dough:

2 1/2 c all-purpose flour
1/2 c whole wheat flour
1/2 c granulated sugar
3 T golden brown sugar, packed
2 1/2 tsp. baking powder
1/2 tsp. salt
3/4 c (1 1/2 sticks) unsalted butter 
2 eggs
1/3 c milk
2 tsp. vanilla

1-2 T milk
1/4 c Turbinado Sugar

In a medium bowl, place the blueberries and CheriRaisins, then pour the warmed cider.  Cover with plastic wrap and let set 2-3 hours (or overnight).

Meanwhile mix up the dough.  In a food processor, place all the dry ingredients and pulse a couple of times to incorporate.  Cut the cold butter into 1-inch pieces.
Place in the bowl of the food processor and pulse until the mixture resembles coarse sand.
Mix the wet ingredients together (eggs, milk and vanilla) and whisk to blend.  Add to the flour/butter mixture and pulse until the dough comes together.  Be careful not to overwork the dough.

Turn out onto a pastry board and knead slightly to form into a ball.  Divide the ball in half into two equal disks.  Wrap with plastic wrap and chill 2-3 hours.
After at least 2-3 hours, strain the blueberry/CheriRaisin mixture and place the fruit in the bowl of a food processor.  Pulse until a paste is formed.  Use a spatula to scrape the paste into a bowl and add the 1/3 cup of blueberry jam.  Stir to combine.

Preheat oven to 400F-degrees.  Line baking sheet with parchment paper.

Lightly flour a pastry board and roll out one disk of dough to a 9" x 11" rectangle.  Use a ruler to get the measurement exact.

Divide the dough in half, horizontally into two 41/2" x 11" strips.  Place one-quarter of the filling down the center of the dough.
Bring the top half over and roll the whole strip towards you, ending with the seam underneath.

Cut the roll in half; continue to cut and divide, getting 8 pieces out of each half.  Brush the tops of the cookies with milk and sprinkle with the Turbinado Sugar.
 Bake for 10-12 minutes or until golden brown.  Let set on parchment-lined baking sheet for 5 minutes before removing to a cooling rack to cool completely.  Repeat with the remaining dough.


One last note.  After Ari opened the package I sent him last week, he climbed into a large basket.  When his Daddy asked him what he was doing, he promptly said, "I go to MiMi's house!"  I love that he gets the concept of shipping something special to ones you love.  Enjoy!

Tuesday, September 21, 2010

As American as...Twinkies?

A dear friend wrote in an email recently that she associated America with Twinkies while growing up in Rhodesia and now living in South Africa, and she longed to taste one of those treats.  The creation came about when James A. Dewar, of the Continental Baking Company in Schiller Park, Illinois, noticed the machines making strawberry shortcakes were not used when strawberries were not in season.  He came up with this "Golden Sponge Cake with Creamy Filling" in the 1930s.  The original Twinkies were filled with a banana cream filling, but with rationing during WWII, the company switched to vanilla cream and never went back to banana.

I remember asking my mother to buy Twinkies for our lunch and occasionally she would, but always felt homemade cookies were better for us.  When I was in junior high, I remember reading that someone had put Twinkies in a time capsule and they were still good!  Surely, a testament to my mother's idea that homemade cookies were better for us!

It was at a Texas State Fair in Dallas that someone decided to take this treat to the next level and deep fry them.  I've never tasted one, nor do I have a craving to taste one, but it does show in America we think anything deep fried is better :)

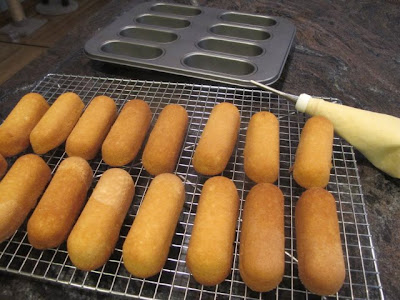
This recipe comes from an April 2009 Family Circle magazine article, entitled, "Double Takes" showing off Twinkies, Ding Dongs, Snowballs, and Cream-filled Cupcakes.  I decided to try the Vanilla Sponge Cake recipe since I have had the "Canoe" cake pan for a few years now.  I bought my at Williams-Sonoma, they don't carry it anymore, but you can find it online at Amazon. It is a fun pan to have and I've made chocolate cakes in it a few times in addition to the yellow sponge cakes to surprise guests.

Vanilla Sponge Cake
1 1/2 cups all-purpose flour
1 1/2 tsp. baking powde
1/4 tsp. salt
5 T unsalted butter
3 large eggs
1 cup plus 2 T granulated sugar

Filling:
6 T unsalted butter, softened
2 cups confectioners' sugar
1 to 2 T milk

Heat oven to 350F-degrees.  Grease and flour Canoe pan or use a baking spray with flour.
Combine the flour, baking powder and salt in a small bowl and whisk to blend.  Heat 1/2 cup water and the butter in a small sauce pan until the water just boils and the butter melts.  Remove from heat.


Beat the eggs with an electric mixer on high for 2 minutes.  Gradually add the sugar and beat until thick and golden, 4 to 5 minutes longer.  

Fold in the flour mixture until just blended.  Add the water and melted butter and stir until just blended.  Divide half of the batter evenly among the prepared pan indents, a scant 1/4 cup per cake.  I used a one-quarter cup scoop to achieve this.


Bake until cakes are just golden and a toothpick inserted in the center comes out clean, about 15-17 minutes.  I baked mine in a Convection oven and it took 13-14 minutes, so watch them and remember that cake continue to cook even when they are removed from the oven.


Cool on a rack while preparing the filling.


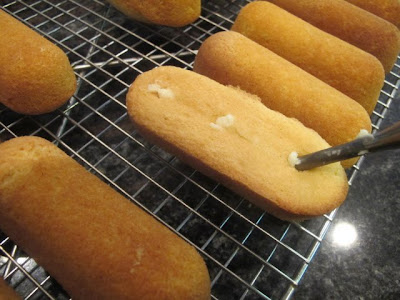
Beat the butter until light and fluffy.  Add the confectioners' sugar and 1 tablespoon of milk and beat 5 minutes longer.  Add additional milk to create a fluffy filling.  I added 2 teaspoons of vanilla extract, even though the recipe didn't originally call for it.  Insert tip of a pastry bag into the center of the flat side of the cakes and squeeze.  (There is actually a tip made for filling cakes.)


Repeat for a total of 3 spots of frosting piped into the base of each cake, resembling the classic cream-filled treats.  Flip over cakes so flat side is down.  Repeat technique with the remaining cakes.

Mom may have not wanted us to have too many Twinkies growing up, but I'm positive she would have approved of these.  Enjoy!

Friday, September 17, 2010

That's Ah Some Meatball!

Okay, I'll tell you right up front, this isn't my idea.  I actually saw it in Hello, Cupcake! by Karen Tack and Alan Richardson.  However, my cupcakes are from scratch and have the added advantage of the most wonderful vanilla flavor due to a surprise package I received yesterday.  A dear friend in California has a friend she's known since their school days and she and her husband, Chico have started an importing business with Tahitian Vanilla.  If anyone has ever tasted the difference between Tahitian and Madagascar...well, this was like winning the lottery when I opened the package.

I call my cupcakes Very Very Vanilla and of course, the buttercream has the same amount.  The meatball is a Ferrero Rocher and the sauce is my strawberry jam.  To add the look of grated parmesan cheese, you finely grate white chocolate.  This makes a wonderful cupcake for kids, but the flavors are complex enough to intrigue any adult to bite into them.

Very Very Vanilla Cupcakes

1 3/4 cups Cake Flour
1 1/3 cups All-purpose Flour
2 cups granulated sugar
1 T baking powder
1/2 tsp. salt
1 cup (2 sticks) unsalted butter, softened
4 large eggs
1/4 tsp. Vanilla powder
1 T Vanilla Crush
1 cup whole milk


Preheat oven 325F-degrees.  Line muffin tins with white papers.


In a KitchenAid, using the paddle attachment, place all the dry ingredients in the bowl, stir to combine.  With the motor running, add the butter, 1 tablespoon at a time.  The mixture should resemble coarse corn meal.  Next, mix the liquid ingredients in a large glass measuring cup.  Whisk to mix thoroughly.  While the mixer is running pour the liquid into the dry ingredients.  Continue beating until well combined.  Scoop batter into prepared muffin tins filling the papers three-quarters full.
Bake in the preheated oven 18-20 minutes.  Remove from oven and cool completely in the tins.


Prepare the Vanilla Vanilla Buttercream:

2 cups (4 sticks) unsalted butter, softened
2 lbs. confectioners' sugar
1 Vanilla Bean, split and the seeds removed
2 tsp. Vanilla Crush
2-3 T Heavy Cream
1-2 drops of Yellow Food Color 


18-24 Ferrero Rocher chocolate candies
Strawberry jam
block of white chocolate


In the KitchenAid, using the paddle, beat the butter until fluffy.  Add half of the confectioners' sugar, the Vanilla Bean and Vanilla Crush.  Beat well to combine.  Add 2 tablespoons of heavy cream and beat well.  Add the remaining confectioner's sugar and beat, add additional cream as needed to make a fluffy buttercream.  Add 1-2 drops of yellow food coloring to get that "pasta" look.


Use a 1/8-inch round decorating tip and a pastry bag.  Hold the bag above the cupcake and let the buttercream ooze out like spaghetti.
When you've finished all the spaghetti.  Place a Ferrero Rocher on top. Spoon out 1-2 teaspoons of strawberry jam over the candy.  As a final touch finely grate white chocolate to simulate parmesan cheese.

My mom would have really gotten a kick out of these; such a great idea and very easy to assemble.  The vanilla flavor is unbelievable and thank you Jean and Chico for importing such a wonderful product.  I'm ecstatic over discovering this website.  Enjoy!

Wednesday, September 15, 2010

Grown-Up's Jam

Nature gives to every season
a Beauty all its own 
~Charles Dickens
The last of the season's strawberries found their way into my kitchen and I decided I'd make another batch of my Strawberry/Jalapeno Jam or like my dear friend, Nicole, calls it...Jam for Grown Ups!  The first batch I made several weeks ago had a mild "kick" of jalapeno in it and everyone I gave the jam to said, "it could be hotter."  I listened...and added more heat!

This was the first summer I've played around with combinations of fruits and spices and I've come up with some good ones.  The first time I made Strawberry/Jalapeno was an idea I had for a jam for our son-in-law, Matt, who eats jam on his eggs.  Apparently, this is a mid-west thing and I'm not one to judge with my quirky combinations, but others I sent it to paired it up with cheese & crackers and my sister used it on panini's!  Today, I sampled the "heat" with a little cream cheese spread on a cracker, but a nice cherve, brie, or even Vermont cheddar would be perfect.

As the nights turn cooler, the leaves change then, fall, it will be nice to cuddle up by a fire (in our case, a gas fire :), pour a glass of wine and enjoy the Beauty of the season.

Strawberry~Jalapeno Jam
4-5 pints of strawberries, washed and hulled
3 Jalapenos
juice from 1/2 lemon
1/2 tsp. unsalted butter
7 cups of granulated sugar
1 box Sure-Jel powdered pectin


Prepare the strawberries and jalapenos.  After washing the strawberries, I use a strawberry huller to remove the stem and core.
I like to remove the hard "core" so I have nothing but sweet berry in my recipes.  Remove the stem from the jalapeno and slice in half.  I removed some of the membrane, but made sure, this time, I put in the seeds from 1 1/2 jalapenos.  The first time I made this jam, I only put in seeds from one-half of a jalapeno!  Place the strawberries and jalapenos in a food processor and pulse until you have a puree.
You need five cups of fruit for this recipe.  Place the fruit, lemon juice, butter, and powdered pectin in a large Dutch oven.  I use a Le Cruset that is an enameled lined cast iron pot.  I've found this provides the most evenly distributed heat to jam making.

On a medium/high heat, bring this mixture to a boil, stirring constantly.  Add the sugar, all at once and stir to combine.  Bring the mixture back to a boil, then set a timer for one minute, stirring constantly.  Turn off the heat and ladle into the hot, sterilized jars.  Seal and turn upside-down.  After 10-15 minutes, turn the jars right-side-up and you should hear them "pop" indicating they have sealed.  

Jam keeps on the shelf for a year, although, between giving it out to friends and family, all the baking I do, and all the peanut butter & jam sandwiches I eat, it never lasts that long.  This is definitely a combination I will make for many years to come.  Enjoy!


Tuesday, September 14, 2010

Owl About Some Spice Cookies...


Last year, when I was in Kentucky during Kelly's start of chemo treatment, we worked on a costume for Ari together.  Ari had announced he wanted to be an OWL and Kelly turned to me to create a handmade costume that we would craft together.  Needless to say, Ari was just tickled with the costume and proudly hit the neighborhood for Trick or Treat with his mama and daddy.
We dressed his daddy like a tree and here are Kelly's boys...Matt holding his little owlet!

I loved making homemade costumes for the girls.  Once, when I was short on time, I bought an orange leotard and tights for Erin, then made a felt leaf collar and stem top--we made her into a pumpkin.  However, when I picked her up at school, she had a frown.  I asked her what was wrong and she replied, "Everyone thought I was a carrot!"  I guess I should have padded my skinny little girl.:)

Now, my Mom only made one costume that I can remember, and it was passed down from one of my older brothers to my youngest sister. It was a clown costume with layers of ruffles at the neck, wrists and ankles.  When we outgrew the clown costume, we chose to be hobos and rummage through the old work clothes, smudged our faces with charcoal and tie a bandanna around our head.

Yesterday, when I was SKYPING with Ari, I promised him I would do some cookies to put in the box I was sending.  When I asked him what kind he wanted, he said, "Blueberry!"  Well, I'm still working on that recipe to surprise him, but I decided to created a spice cookie that I would roll out and cut with a new Owl copper cutter I have.  He still loves owls and I thought they would ship well and be perfect "dippers" which he so loves to do. 

The cookies are very aromatic and filled the kitchen with all those smells associated with the season.  I'm thinking these will also make great gingerbread men for Christmas.  It's a keeper and very easy to make.

Ari's Spice Cookies

14 T (1 3/4 sticks) unsalted butter at room temperature
1 cup + 2T light brown sugar, packed
1 large egg
2/3 cup unsulphured Molasses
1 T grated orange peel
1 T ground ginger
3/4 tsp. ground cinnamon
3/4 tsp. ground allspice
1/2 tsp. ground cardamon
4 cups all-purpose flour
3/4 tsp. baking soda

In a KitchenAid, using the paddle attachment, beat the butter and sugar until fluffy.  Add the egg and beat to combine.  Add the molasses and grated orange peel and beat well.
 In a large bowl, mix the flour, baking powder and all the spices.  Whisk to stir together, then, add slowly to the butter/sugar batter.  Mix to combine thoroughly.  Place dough in plastic wrap and chill for about an hour.  (It will make rolling the dough out easier.)
Preheat oven to 375F-degrees.  Prepare baking sheet(s) with parchment paper or a Silpat.  Roll dough out to approximately 3/8-inch for a crispy cookie, 1/4-inch for a softer cookie.  Place cut-out shapes on the baking sheet.  
I sprinkled the cookies with an Orange Fine Sanding Sugar.  Bake cookies 7-9 minutes.  (If you did the thicker cookies it may be 9-11 minutes, but watch for over browning your first batch.)
These cookies ship well and they last in a sealed container for 7-10 days...that is if your little ones don't find them.  Enjoy! 

Sunday, September 12, 2010

September's Give-Away & The Legend of the Kitchen Witch

Not all witches scheme to give the beautiful girl the poisonous apple!  "For centuries, Norwegians have hung a good witch in their kitchen.  They believe she has the power to keep roasts from burning, pots from boiling over, and sauces from spilling."

There's some discussion over where the first kitchen witch originated; some claim Norway and others say Germany, but the consensus seems to agree it stems from older European customs.

The Kitchen Witch inspires productivity and safety in the home, but at the same time counteracts any ill-will directed to the home.  Years ago, my sister Barbara, needlepointed one for Mom and it hung as a guardian in her kitchen.  In our recollection, my mother never burned anything, but we shared a chuckle that it didn't keep her from adding ground cloves, instead of chili powder, in a pot of chili she cooked for my Dad, brother-in-law, and brother to eat after chopping wood one day!
 Cruella (the good)

So, if you'd like to be in a drawing at the end of the month for the September's Kitchen Witch Apron, all you have to do is comment on the posts for the month of September.  I believe that it's good luck to give a Kitchen Witch (apron) to a friend or family member and I'll be happy to send this along to the lucky recipient.  Enjoy!

Saturday, September 11, 2010

Black Forest Whoopie Pies

The story behind this recipe is in three parts; sharing the combination of chocolate and cherries that inspired me to come up with this creation.

First, on special occasions, my Dad would bring my Mom a box of Whitman's Chocolate-Covered Cherries.  These were her favorite (at least until I introduced her to Godiva :)) and the look on her face  when she opened the box was memorable.  She would share with us and I would bite just half of the confection so I could see the ooze of the creamy filling surrounding the cherry.  I don't particularly like chocolate-covered cherries because I find them very sweet, but I always took one, hoping to discover how they got that creamy, pink liquid around that cherry and not messing up the chocolate.  It was only when I was taking a pastry course that I discovered the secret.

The next story of this creation centers around Erin's first Mountain Day at Mount Holyoke College.  It was the Fall of 1988 and Mountain Day was a special day, that no one knew when it was coming.  It was a surprise occurrence when the bells rang signaling the start of a day off from studies, even if a test was scheduled.  Erin, along with several friends decided to drive up to Vermont and tour the Ben & Jerry's Ice Cream factory.  Tasting the different flavors and deciding on their favorite was the only thing they had to worry about on a beautiful fall day.  Erin fell in love with Cherry Garcia, a mixture of cherry ice cream with chocolate chunks in it.  Today, still one of her favorites.

The last part of the story involves Kelly.  In 1991, I wanted to bake a birthday cake for one of my dear friends I worked with at Kaiser Permanente in Mission Viejo.  Addie loves Black Forest Cake which is a rich chocolate cake, cherry filling and topping that is surrounding by whipped cream.  If you're picturing this...it doesn't make for the most stable cake for transport!  Since we lived less than 15 minutes from the clinic, I begged Kelly to hold the cake and come with me, then I'd take her to school.  We were almost there, taking back roads instead of the freeway, when a car pulled out in front of us.  Kelly quickly grabbed the cake, but with braking, it slid back towards her chest.  In other words, she was wearing Black Forest Cake!  I delivered it and quickly had to take Kelly home to change before dropping her at school.  When I returned, everyone had dug into the "ugliest" cake I ever made, but the taste was so incredible, no one cared.  Kelly would appreciate these "little cakes" and I can hear her saying, "why couldn't you come up with this idea almost 20 years ago!!

Black Forest Whoopie Pies

Chocolate Cookie:
3/4 cup (1 1/2 sticks) unsalted butter, softened
1 1/3 cups light brown sugar, packed
2 large eggs
1 T vanilla extract
1/2 tsp. cherry flavoring 
2 cups all-purpose flour
1 cup Dutch-processed cocoa
1 tsp. baking soda
1/2 tsp. salt
2 cups buttermilk
1 cup mini dark chocolate chunks or Nestle's Mini Chips

In the KitchenAid, using the paddle attachment, beat the butter until fluffy.  Add the brown sugar and beat 1-2 minutes until fully incorporated.  Add the eggs, one at a time, beat to combine.  The dough will look a little bit curdled, but not to worry.  Add the vanilla and cherry flavoring and beat again.  Sift the flour, cocoa, baking soda, and salt.  Add to the batter, alternately with the buttermilk.  Beat until fully incorporated, being careful not to over beat.  Fold in the mini dark chocolate chunks.
Preheat oven to 375F-degrees.  Spray a whoopie pie pan with a non-stick spray or if you're doing a free-form, use a parchment-lined baking sheet.
Use a 2-tablespoon size scoop to measure out dough.
Bake in preheated oven for 8 minutes or until the tops spring back when lightly touched.  Let cool slightly, then, remove to a rack to cool completely.


Mix up the Cherry Filling:
3/4 cup (1 1/2 sticks) unsalted butter, softened
2 T shortening
1 small jar (7 oz) Marshmallow Fluff
5 cups confectioners' sugar
1/2 c chopped maraschino cherries
1 oz Cherry concentrated syrup*


*As an alternative, you could use 1 ounce of the maraschino syrup from the jar; the flavor isn't as intense, but it will add a "boost" of cherry flavor to the filling.


In the KitchenAid, using a paddle attachment, beat the butter and shortening until fluffy.  Add the Marshmallow Fluff and 3 cups of the confectioners' sugar and beat well.  Add the chopped cherries and syrup.


Scrape down the bowl and then add the remaining 2 cups of confectioners' sugar.
Use a 1-tablespoon scoop to measure out the filling.  Top with another half and press together lightly.


To finish off, I melted some semi-sweet chocolate chips in a plastic sandwich bad, snipped the end and piped some chocolate stripes across.  Then sprinkled them with deep pink coarse sugar.

So this is what has inspired me to bake, yet another whoopie pie today.  If you have a story to tell, especially if it involves cherries and chocolate, I would love to hear it.  Food makes the most wonderful memories, especially those surrounding family.  Enjoy!