Saturday, March 30, 2013

Does Anybunny Like Biscuits...

Biscuits were one of my favorite quick breads that my mom made; fluffy and just waiting to be loaded up with butter and/or jam.  My hubby had requested that I make the Amish Breakfast Casserole again this morning and instead of toast, I decided to make biscuits to go along with it.
A biscuit is a baked, floured-based product that has it's origins in Europe, but has a totally different form.  The biscuits, found here in North America, are flaky and have more of a connection to a scone rather than the British version, which we would call a cookie.

My mother always made biscuits with buttermilk, which I also use, but I've changed and use butter rather than the shortening she would cut into the flour and I mix in two cups of grated cheese.  Also, I brush my biscuit tops with a beaten egg and she usually brushed hers with melted butter.  Finally, I leave space between my biscuits because I love that the sides brown too; typically biscuits are set side-by-side in a pan.

This recipe is easy to mix up (less than 15 minutes) and bakes in a hot oven in 13 to 15 minutes, so having a warm bread for breakfast is very do-able!

Cheesy Buttermilk Biscuits
3 1/2 + 1 T King Arthur all-purpose flour
2 T baking powder
1 tsp. sugar
1 1/2 tsp. salt
9 T cold unsalted butter (preferably European for a higher fat content), cut into small pieces
2 cups grated cheese
2 T chives, minced (optional)
1 3/4 buttermilk

1 egg, beaten to brush on top

Preheat oven to 425F-degrees.  Line a baking sheet with parchment paper.

In a stand mixer, using the paddle attachment, mix the dry ingredients together. Add the chives, if using.  While the mixer is running, add the small pieces of butter and mix until incorporated.  You may have small pieces still visible.   Add the cheese and then, while the mixer is running, slowly pour the buttermilk in.  Mix only until incorporated!
 Transfer the dough to a lightly floured bread board--it will look "shaggy."
Lightly dust the top of the dough with flour and knead just until the mixture comes together.
Lightly dust the top again, and roll dough to about 1-inch in thickness.
Now, the trick that my mother taught me and it is what makes beautiful, high biscuits...Lightly flour a biscuit cutter and press into the dough--DO NOT TWIST to release, but rather press and pull-up! I think of it as more a move Jack LaLaine would have done and not Chubby Checker:-D

Yes, that's the secret to high biscuits.  If you twist, it "closes" the dough and keeps it from rising as high as it should!

Place biscuits onto the prepared sheet and brush tops with a beaten egg.  Bake in the preheated oven 13 to 15 minutes, until golden brown.
I add space between my biscuits!

Hmmm, warm flaky biscuits...does anybunny want some? Enjoy!
 

Thursday, March 28, 2013

Cinnamon Breakfast Buns

Cinnamon is a spice that definitely triggers comfort to me.  As children, when we were ill, my mother always made us cinnamon toast with our tea, not to mention, the Snicker doodles she would have baking when we came home from school in the afternoon.  Yes, I love cinnamon.

I remember in the 80s, when we moved to California for my husband's job, my daughters and I were so excited to learn that Swenson's had a Cinnamon Ice Cream.  Do you remember Swenson's?  These ice cream parlors sprung up at about the same time that Haagan Dazs did where unusual ice cream flavors enticed us in to buy their expensive product:-D  Swenson's is only located in five states now--California, Florida, Minnesota, Nevada, and Texas, so I haven't had my beloved ice cream for a long time, unless I make my own.

Cinnamon has a long history of use, dating back to being mentioned in the Hebrew bible where Moses is commanded to use both sweet cinnamon and cassia in the holy anointing oil.  In Greek mythology is was highly prized as a gift fit for monarchs and even for a god.  There is a fine inscription that records a gift of cinnamon and cassia to the temple of Apollo at Miletus.  In 1518, Portuguese traders landed in Ceylon (Sri Lanka) and began exporting this precious spice.  The Dutch East India Company took over the trade and in 1796 the British eventually took it over from them with their occupation of the area.  It's widely used as a spice for desserts--how could you make a apple pie without it--but in some cultures, it's used in savory dishes as well, such as lamb and chicken.  And, if that's not enough information, I found that it has been proposed as a an insect repellent, although not fully tested.

Cinnamon Breakfast Buns
1 cup milk
4 T unsalted butter
In a 2-cup glass measure, microwave the butter and milk for 45 seconds to 1 minute to melt the butter.  Add water to this mixture to equal 2 cups of liquid.

1/2 cup sugar
1 tsp. salt
1 large egg
2 T (or 2 pkg) SAF  Gold Yeast
5-5 1/2 cups King Arthur all-purpose flour
1 tsp. cinnamon
In a stand mixer, using the paddle attachment, mix the sugar, salt and egg together.  While the mixer is running, pour the milk/butter/water liquid into it.  Continue to run mixture on low and sprinkle in the yeast.
Turn off the mixer and remove the paddle attachment; add the dough hook to the stand mixer.  Allow the mixture to set for 5 to 7 minutes until it's "foamy."
Add 3 cups of the flour and the cinnamon and mix on speed #2.  Gradually add the remaining 2 to 2 1/2 cups of flour until the dough is pulling away from the sides.
Transfer to a lightly flour bread board and knead to form a smooth ball.

Place in a large bowl (or dough bucket) that has been brushed with melted butter.  Allow to rise until double, about 1 to 1 1/2 hours.
To check to see if it's risen enough, press your finger into the dough, an impression should remain of your finger.
Cinnamon~Sugar Mixture
1 cup granulated sugar
1/3 cup ground cinnamon
1/2 tsp. Vanilla powder (I found this product at Williams-Sonoma)


Mix together and set aside.  Meanwhile, melt 4 T butter with 2 T maple syrup in a small saucepan.  Remove from the stove when the butter is melted.

To assemble buns:
1. Roll dough to a 12" x 18" rectangle.
 2. Brush with the melted butter/maple syrup mixture, then heavily sprinkle with over half of the cinnamon/sugar mixture.


3.  Starting at the side, away from you, tightly roll up the dough towards you.  Pinch the seam to seal.
4. Use a serrated knife to cut the dough in half, then each half into 6 pieces--this recipe makes a dozen.
5. Butter the wells of two jumbo muffin pans.
6.  Keeping one hand as your "dirty hand," pick up one of the buns and brush additional butter/maple syrup around the sides and on top.
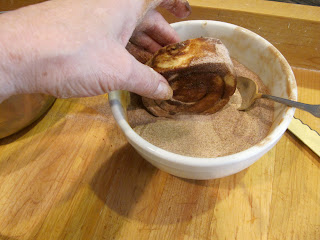
 7. Take the bun over to the cinnamon/sugar bowl and sprinkle additional mixture around the sides and on top before setting it into a muffin well.

8. Cover the muffin pans with plastic wrap and allow to rise again...about 30 to 40 minutes.  Meanwhile, preheat the oven to 375F-degrees.

9. When buns have risen, brush some additional butter on top and sprinkle with more cinnamon/sugar.  Bake in the preheated oven for 18 minutes.
10.  When done, allow to set in the pan about 10 minutes, before removing to a wire rack to cool completely.

In addition to your home smelling heavenly, these buns were delicious and those memories of childhood came back with my mom making me toast and tea...sitting by my bedside and telling me it would make me feel better.  Enjoy!


Tuesday, March 26, 2013

Easter Fruit Bread

Baking for Easter, in our family, takes on a traditional note.  Yes, like my mother I always make Hot Cross Buns on Good Friday and wonderful yeast breads for Easter Sunday's dinner, but moreover, I started to notice how her baking flavors and ingredients had a noticeable difference from what we baked during the Christmas holiday and I wanted to bring those flavors to this bread.

This fruit bread honors her baking for the season and becomes a lighter (Spring-like) version of those traditional fruit cakes at Christmas that many cringe when seeing them on the dessert table.  In fact, one could call this more a "tea bread" and rightfully so, it would be great with a cup on these chilly nights.

Fruit breads were predominantly found in  Eastern European countries, but also some Asian countries; Panettone from Italy,  Barmbrack from Ireland, Kulich from Russia, Kolach from Czechoslovakia,  and Babka from Ukraine to name a few.  For Easter, the concept of eating a fruited bread or sweetened communion bread dates by to Byzantium and the Orthodox Christian Church.  I always felt like the breads my mother made for Easter reflected the "renewal" after forty days of Lent and enjoying the sweetness of forgiveness by our Savior.

Easter Fruit Bread
1/3 cup fruit juice (I used apple, but orange would work too)
1 3/4 cups of assorted dried fruits--I used 1/2 cup dried cranberries, 1/2 cup dried blueberries, and 3/4 cup dried cherries
zest of 1 orange--or, I used 1/3 cup diced European candied orange peel

Measure the juice into a small sauce pan, bring to a simmer on top of the stove, add the fruit, and remove from the heat.  Allow to sit until cool, about 15 minutes.

1 1/2 cup unsalted butter, at room temperature
2/3 cup granulated sugar
3 large eggs
1 vanilla bean split and scraped or 2 tsp. vanilla extract
1/2 tsp. almond flavoring
2 cups King Arthur all-purpose flour
1 tsp. baking powder
1/2 tsp. baking soda
1/2 tsp. salt
1/2 tsp. ground cardamon
1/2 cup sour cream

Preheat oven to 325F-degrees.  Butter a "Pullman" loaf pan, then add a strip of parchment paper or wax paper to the bottom and butter that.  **You could also bake this in a small bundt cake pan (10cup), mini bundt pan, or muffins.  Adjust time for baking.


In a stand mixer, using the paddle attachment, cream the butter and sugar together thoroughly, Scrape down the sides with a rubber spatula, as needed.  Add eggs, one at a time, beat well after each addition.  Add the vanilla and almond extract and mix well.

Sift the dry ingredients together and add along with the sour cream to the mixture.  Mix on medium, just until combined.  Stir in the dry fruit mixture.
Spoon mixture into the prepared pan and smooth the top.
I baked the Pullman loaf pan for 65-70 minutes.  The bread should be golden brown and when a wooden skewer is inserted in the center, it comes out cleanly.  Remove from the oven and allow to cool for 15 minutes.

Glaze
1 1/2 cup confectioners' sugar
1 T light Karo Syrup
2 - 3 T very warm water
1/2 tsp. vanilla, or lemon, or almond flavorings

Mix ingredients together to make a smooth glaze. 

Invert cake onto a serving platter or transfer to a lined cooling rack.  When cool, pour glaze over the top.
 This recipe is a wonderful addition to your breakfast table for Easter celebration or as a tea cake to enjoy with friends.  What recipes do you hold dear for this season? Enjoy!


Wednesday, March 20, 2013

PB Chippers


The plate's pattern is called "My Spring Garden" by Lynn Gertenbach and it was a gift.
Happy Spring...hopefully, you are feeling like it's not far behind.  It's rainy and gloomy here in the Pacific Northwest, with just a hint of sunshine, so baking cookies seems like a good idea.

The cookies I created today were inspired by my daughters...in a way and by the fact that I literally lived on peanut butter growing up (and still do)!  First, my girls loved crushing potato chips and putting them on their sandwiches, particularly, tuna fish sandwiches.  I've never been a tuna fish fan, so my choice was crushing them for my peanut butter sandwich and, on top of that, we all loved anything salty dipped in chocolate, so, Ta Da! I made a peanut butter cookie with crushed potato chips and mini chocolate chips.

I'm pretty sure we got our "strange sense of taste gene" from my mother.  She was the Queen of unusual combinations; snacking on such things as Cheetos and Marshmallow Fluff or eating Ketchup Sandwiches.  She definitely was the one who got me hooked on peanut butter and pickle sandwiches, which, by the way, made my peers in school cringe:-))

PB Chippers
1 cup (2 sticks) unsalted butter, at room temperature
1 1 /4 cups firmly packed light brown sugar
3/4 cup granulated sugar
1 T vanilla extract
1 cup peanut butter (smooth or crunchy)
2 large eggs
3 cups King Arthur all-purpose flour
1 3/4 tsp. baking soda
1/4 tsp. baking powder
1/2 tsp. salt
1 cup crushed potato chips (regular not Kettle-cooked)
1 cup mini Semi-sweet Chocolate Chips

Preheat oven to 350F-degrees.  Line two baking sheets with parchment.
In a stand mixer, using the paddle attachment, cream the butter and sugars together thoroughly.  Add the vanilla and peanut butter.
I used crunchy! 
Add the eggs, one at a time, beating well after each addition.  Scrape down the sides of the bowl as needed.   Add the dry ingredients and the potato chips to the mixture and combine.

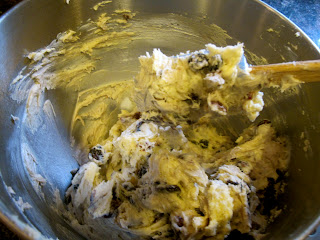
   Finally, add the mini chocolate chips and stir to combine.
Use a 1/4 cup scoop to measure dough onto the prepared baking sheets.
You can use a fork to do a "criss-cross" pattern, or as I did, and use a meat mallet to press down the dough mounds.

It also makes a pretty pattern in the cookie.
Place the cookie sheet in the preheated oven and bake 13 to 15 minutes until golden brown.  Remove from the oven and allow to cool on the sheet about ten minutes before transferring them to a rack to cool completely.
This recipe makes 2 1/2 dozen+ of 3-inch cookies.  If you don't tell anyone about the potato chips they'll keep wondering what that salty crunch is!

Do you have any unusual food combinations...that you'll admit too? Happy Spring and Enjoy!


Tuesday, March 19, 2013

Vermont Breakfast Cake

My inspiration for this recipe today was from a dear blog friend, A Haven for Vee, whose "Mosaic Monday Post" showed a photo of her neighbor's maple pails hanging from the trunks. It brought back memories of our trip to Vermont, before moving to the west coast in 2001 and going to a maple syrup manufacturing farm to learn the process.

Some very interesting facts I would like to share about Vermont maple syrup:
  1. Vermont ranks #1 in the United States for maple syrup production.
  2. On an average, 1,000,000 gallons are produced each year.
  3. It takes 40 years for the maple tree to mature before it can produce sap.
  4. A healthy maple tree can produce sap for 150 years!
  5. There are 5 weeks in the year that a maple produces sap; it flows in the early spring due to warm days and cold nights.
  6. There are 4 grades--Vermont Fancy, Grade A~Medium Amber, Grade A~Dark Amber, and Grade B.
  7. Vermont Law requires that state-produced maple syrup to be free of preservatives, coloring, or additives.
  8. Fresh trapped syrup is crystal clear with a sugar percentage of 1.5-3%.  After the boiling process, the water evaporates and the concentration of sugar in the syrup caramelizes to an amber color with a sugar content of at least 66.9%!
This Breakfast Cake is just that...cake for breakfast, which our moms would have never allowed:-D  However, with the combination of oatmeal, buttermilk, and maple syrup, it tastes just like a baked oatmeal pancake and who could resist that!

Vermont Breakfast Cake
2 cups Old Fashioned Oats
2 cups buttermilk
Stir the oats into the buttermilk in a medium bowl and let sit for at least 1 hour.
1/2 cup (1 stick) unsalted butter, at room temperature
1 cup firmly packed brown sugar
4 large eggs
2 tsp. vanilla
2 1/2 cups King Arthur all-purpose flour
1 1/2 tsp. baking powder
3/4 tsp. baking soda
1/2 tsp. salt

Preheat oven to 350F-degrees.  Spray a 9-inch baking pan with a baking spray.
In a stand mixer, using the paddle attachment, cream the butter and brown sugar together thoroughly.  Add the eggs, one at a time, beating well after each addition and scraping the sides of the bowl with a rubber spatula as needed.  Add the vanilla and mix again.

Whisk together the dry ingredients and add to the wet, mixing on low just until combined.  Finally, add the oatmeal/buttermilk mixture and stir to combine.

Spoon batter into the prepared pan and smooth the top.

Bake in the preheated oven 35 to 45 minutes.  Cake should be golden brown and a wooden skewer inserted in the center comes out cleanly. Allow to cool in the pan at least 15 minutes.  I used my springform pan; the sides come off and it's easy to cut later.
Meanwhile, make the Maple Glaze:

1 1/2 cups confectioners' sugar
1/2 to 2/3 cup Grade A amber or Grade B maple syrup
I used a Canadian Maple Syrup, Grade A Amber (Hey, I live in the Pacific Northwest!!)
Whisk together the confectioners' sugar and syrup, adding more syrup as needed to make a drizzling glaze.
Cut the cake in the desired size sections.  I transferred the pieces to a parchment-lined rack and slightly separated them so the glaze could drizzle down the sides.

Glaze as much as you like, but remember this cake isn't very sweet without glaze!
As promised, I am sharing with you what I have been sewing.  I found this fabric a few years ago at Pacific Fabrics; it's where I buy a lot of the fabrics I use for the aprons I make.
It was a cute print that reminded me of a Beatrix Potter story!  This year, I decided to make coiled fabric bowls for my grands using the directions from a great book It's a Wrap.  Using cotton clothes line, fabric that is cut in 1/2" or 3/4" wide strips, and some fabric glue.  Unwind the clothes line and start wrapping as directed; you will use a dab of fabric glue every 5 to 6 inches.  Sew a straight line down the center of the wrapped line about 5".

Next, make a coil about 1 1/4" wide and sew an "X" to hold in place.
Changing to a zig-zag stitch as directed, catch the fabric-wrap clothes line and create a base about 4 1/2 inches wide.  From there, you will "tilt" your fabric up as you continue to zig-zag so the bowl will form.
Before you know it...

Voila! 
One down, one more to go! I love the colors that were created with the wrapped fabric; hints of orange, browns, purple, and the many shades of green!  Happy Spring to all. Enjoy!