Sunday, October 31, 2010

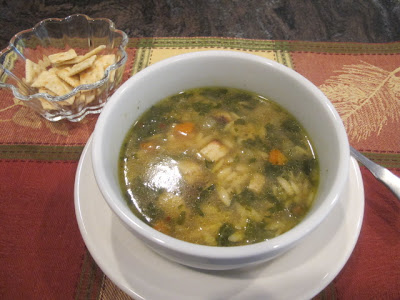
Almost Mom's Chicken Noodle Soup

My mother believed in the benefits of chicken soup...what mother or grandmother doesn't!  Her chicken noodle soup had a hefty measurement of red pepper flakes; an ingredient she said, "it opens up your head and warms your stomach."

I thought of this recipe today to share with all of you who have little ones heading out to Trick or Treat tonight.  A lot of the country's weather is going to be cool, including here in the Pacific Northwest, although the rain is holding off until later, and having warm little bellies might keep the chill off.  I guess it's no secret I'm a vegetarian, but I know there are a lot of families who do at least one or two meatless meals per week and this soup will certainly satisfy and maybe keep a few cold bugs away. 

One product I discovered is by a company called Quorn (pronounce corn) and the "Chicken Tenders" I used in this soup would be hard to tell they weren't the real thing.
You can find them, of course, in Whole Foods, but several supermarkets also carry them in their "Natural Cases" in the frozen food section.  Everything else is pretty much how Mom made the soup, although I add noodles or as I did today, Orzo and she ladled the soup over a bowl of rice. I know my Dad swore by her soup when he started with a cold and this version is so quick to make that you can have a satisfying dinner in less than an hour.

Almost Mom's Chicken Noodle Soup

1 small yellow onion, diced
2 large carrots, peeled and diced (about 3/4-1 cup)
2 ribs of celery, diced (about 1 cup)
1  12 oz. pkg. Quorn Tenders
1/4-1/2 tsp. Red Pepper Flakes
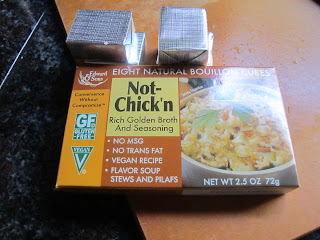
8 cups vegetable broth (or I used 4 "Not Chick'n" Bouillon Cubes and water)
1 cup (uncooked) noodles, Orzo, or other small pasta
1/2 pkg frozen spinach
1/4 cup finely chopped parsley
Salt & Pepper to taste


In a large sauce pan, heat 2-3 tablespoons of olive oil and saute the onion, carrots, and celery on Medium heat. Turn heat down and place a lid on to "sweat" the trilogy of vegetables. Meanwhile, in a medium saute pan over Medium heat, add 2 tablespoons of olive oil and the contents of one 12 ounce bag of Tenders. Saute 5-10 minutes, stirring frequently to lightly brown the "meatless" chicken.  Add to the vegetables along with the broth or water and bouillon cubes.  Place lid back on and cook while you prepare the noodles or Orzo.


I pre-boil my pasta so it doesn't absorb the broth and one of the best things I came across to cook pasta is called a Fasta Pasta maker.  
I placed 1-cup of pasta in the container, added water up to the "4th level" and placed it in the microwave while my soup was cooking.  In 15 minutes (or less, depending on your microwave) the pasta is cooked perfectly to al dente.  It comes with a lid for draining, then, I added the pasta to the soup.  At this time I added the spinach and parsley and tasted for seasonings.
Cook another 15-20 minutes and serve.  I bought some mini crackers that I knew the kids would like, but this soup could be a complete meal with a salad and a hearty bread.


Like Mom said, "...warms the stomach" and like I add, "...and the heart." Enjoy!
 

Saturday, October 30, 2010

Autumn Fruit & Nut Bundt Cake...and an Autumn Give-Away


I just get so excited when I see the first cranberries (one of the three indigenous fruits from American...blueberries and concord grapes are the other two) hit the supermarket!

I know it's truly Fall and I also know that Thanksgiving is just around the corner.  Admittedly, I purchased several bags of the well-known brand of cranberries, but in a few weeks, I know local cranberries from Oregon will arrived in the market and those are the ones I will make my whole-berry cranberry sauce for our Thanksgiving dinner, in addition to freezing more for baking when the fresh ones are gone.

When we lived in New England, back in the 90s, my husband and I took a trip to Nantucket in late October; it was a belated anniversary get away since he had relocated to New York at a new credit union and I was still in Massachusetts waiting to sell our home.  Anyway, we were there during the flooding of the bogs and their Annual Cranberry Festival.  Now, I've been to Gilroy, CA and seen all the recipes they do with garlic, but I'll have to say, Nantucket's Cranberry Festival had a few surprises with cranberries, I tasted, that left me speechless.  Cranberry ketchup (sorry Erin, some of us like ketchup!), cranberry butters, chocolate covered cranberries (my favorite) to name a few.  Our first Thanksgiving in Massachusetts, I made a cranberry pie and could have eaten the whole thing :)

In addition to cranberries in this bejeweled bundt cake, I used two more ingredients we have in the Pacific Northwest to enhance the flavors--dried tart cherries and hazelnuts.  However, feel free to experiment with fruits and nuts you find in your area of the country (or world).  I can imagine all sorts of combinations and would love to hear about them.

And, lastly, I know I'm behind in my give-away, so here is the latest apron in beautiful leaves.

I will do the drawing the week before Thanksgiving and I'm counting in all the postings from the month of October to November 20th in the drawing.  As a bonus, for being so patient with me during this busy time, I will put in a slip with your name on it every time you post; so, if you've posted, for example, 20 times during that period, you will have a greater chance to come up a winner.  There will also be a surprise bonus to go with the apron, but you'll have to wait until the 20th to find out what that is.  It's my way of giving thanks to all of you that follow the blog; I can't express enough what your friendship has meant during this difficult year, but know you are appreciated.

Autumn Fruit & Nut Bundt Cake

1 cup (2 sticks) unsalted butter, at room temperature
1 1/2 cups granulated sugar
2 large eggs
1 tsp. Vanilla extract
1 tsp. ground cinnamon
1/2 tsp. ground cardamon
1/2 tsp. ground ginger
1 tsp. baking powder
1/2 tsp. baking soda
1/2 tsp. salt
2 1/2 cups all-purpose flour
1/2 cup ground hazelnuts 
1 cup apple cider
1 1/2 cups fresh cranberries,  dried on paper toweling and halved

1 cup dried tart cherries

Preheat oven 350F-degrees.  Spray a 12-cup bundt pan with a non-stick baking spray

In the KitchenAid, using the paddle attachment, beat the butter and sugar until fluffy.  Add the eggs, one at a time, beating well after each addition.  Beat in the vanilla and spices.


Mix the flour and ground hazelnuts in a bowl and whisk by hand to blend.  Add the dry ingredients, alternatively with the apple cider to the batter, mixing to incorporate all the ingredients.  Be careful not to over mix.  


Stir in the fresh cranberries and dried tart cherries.  Spoon mixture into the prepared bundt pan.

Bake in preheated oven for 45 minutes.  I lowered the temperature to 325F-degrees after 20 minutes.  Test cake for doneness, by pressing your finger tips on the surface--the cake should spring back.  (You can also insert a skewer in the center and it should come out clean).  Let cake cool 5-10 minutes in the pan before turning out onto a platter.

You can simply dust the top with confectioners' sugar or as I chose today, mix up a glaze and pour over the top, letting it drip down over the sides.

Glaze:

1 cup confectioners' sugar
1 tsp. Karo syrup
1 - 2 T hot water


Mix everything together, stirring thoroughly to blend.


As a final decoration, I dredge some additional cranberries in powdered meringue mixed with water, then, rolled them in sugar.  Let the cranberries dry on a rack and place around the cake .  

Thanksgiving has so many memories for me.  It was a holiday of baking, helping my mother with every detail and setting the table with her good china.  I loved being a part of it.  I had just turned seven one Thanksgiving when my mother let me make up the yeast rolls for dinner.  I was so proud of those rolls and it was my beginning of a love affair with yeast dough! 
 
This bundt cake reminds me of a dessert my mother would have served, along with pumpkin, mince, and apple pie.  It's going to be part of our dessert list.  Enjoy!
 

Friday, October 29, 2010

A Little Pie, Please

Pecan Tassies have been a favorite in our household for many years.  It's just that perfect little bite of buttery pecan filling that one can indulge in without feeling guilty from the calories that usually accompanies a slice of pecan pie.  Of course, in this size, one is apt to gobble up enough to equal two slices!

Last Halloween Eve, Kelly and I made these up so she could take them into the nurses in the chemo lab on Halloween.  She was bummed she had to have a treatment that day, but knew, at least, she would haven't any side effects for a day or two and she'd be able to take Ari out in his Owl costume for Trick or Treat.  The recipe we had always made called for dark Karo syrup and since Kelly was eliminating high fructose corn syrup from her diet, we substituted brown rice syrup.  They came out beautifully and no one suspected the exchange.

Well, I bought a new cookbook!  The Gourmet Cookie Book--The Single Best Recipe from Each Year, 1941-2009.  I have had a subscription with Gourmet magazine since the 70s, but sadly, this year the magazine stopped publishing.  Every year, I looked forward to the November issue with the lineup of Christmas cookies to bake, but now I have the best of those recipes in this cookbook.  Under the 1980s, Pecan Tassies appear and Kelly would have been happy to know that it does not call for Karo syrup, but instead, brown sugar.  I know this would have become a favorite to bake for her; it's so easy and you can satisfy that pecan pie craving in about 30 minutes, including baking time!

I will be posting over the next weeks, cookie recipes I have developed, some I've made with my mother, and ones I have found in books to really be easy, but spectacular.   The holiday season, is by far, holds the fondest memories I have of baking with my mother and my daughters.  I would love to hear from you all what favorite cookie recipes you make for the holidays for your family that you make.

Pecan Tassies

1/2 cup (1 stick) unsalted butter, softened slightly
3 oz. cream cheese, room temperature
1 cup all-purpose flour
In the KitchenAid, using the paddle attachment, beat the butter and cream cheese until fully incorporated.  Add the flour and mix until the dough comes together.

Preheat oven 350F-degrees.  Lightly spray two mini muffin pans with a non-stick spray.

Divide the dough into 24 pieces.  I do this by dividing the dough in half, then, in half again, and then, one more time.  You should have 8 equal pieces.  Now, divide each of those pieces into thirds and you will have 24 pieces.  Roll into a ball and use a tamper, dipped into flour, and push down on the ball and do a roll and stir to form the tart.
In a small mixing bowl, stir together the following ingredients:
3/4 cup firmly packed light brown sugar
1/2 cup chopped pecans
1 large egg
1/8 tsp. Vanilla extract (I actually increased this to 1/2 tsp.--I like Vanilla!)


Use a spoon to mix everything together.
Measure about 1/2 tsp. into each Tassie, You will use all of the filling.
Place the two mini muffin pans into the preheated oven and bake 20-25 minutes or until golden brown.
Cool a few minutes in the pan and then, use an off-set spatula to remove to a rack and cool completely.  These are so good; they pack and freeze well, so you can make them up ahead of time for your holiday parties;  "they look splendid sitting on a try."  And, if you like a few different desserts for your holiday meal, this recipe would be the perfect addition for those who love just a taste.


Bake up some memories and Enjoy!
 

Thursday, October 28, 2010

Ari's Vanilla~Pear Jam

Last year, when I was in Kentucky during Kelly's chemo, I introduced Ari to pears.  It was lunchtime and I gave him a whole pear to eat.
He was fascinated with the stem and I explained to him that it was what attached the pear to the tree.  I said, "the tree holds on to the little pear until it's ready for you to eat...just like you hold your mommy's hand because you're little." 

His love for pears continue and it was a pear he snacked on when he went on a hike with his Mom and Dad in April before Kelly passed away.
So, our sweet little boy, Mimi created this jam for you today to have on your sandwich and think of happy memories of your mama, like I'm doing.

Ari's Vanilla-Pear Jam

About 3 lbs. of pears, I used Bosc (5 pears)
1 pkg. Sure-Jell
1 Tahitian Vanilla Bean, split and the seeds scraped into the pear mixture
5 cups granulated sugar
6 sterilized jars (8 oz.)

Peel and core pears.  I used a pear slicer I actually got from the Pear's Grower Association a few years ago.
I placed the pears in a food processor and pulse it until the mixture was in small pieces (don't puree!) I used a small knife to split the vanilla bean and scrape the seeds into the pears.


Place the pears, Sure-Jell, and the vanilla in a large Dutch Oven.
Bring the mixture to a boil on medium heat.  Remove the vanilla bean pod and stir in the granulated sugar.  Bring the mixture back to a boil and boil hard, stirring constantly for 1 minute.  Turn off heat and ladle into sterilized jars.  Place the lid on and then, screw the ring tightly.  Turn the jar upside down and cover with a towel.  Let sit for 10 minutes, then turn right side up.  You should hear a popping sound if the jars seal.


Pears are not indigenous to the United States; they were brought here by Europeans.  Ari just knows they're good and I can't wait until he tastes this jam. I had mine on the Malted Wheat Flake Bread-- Enjoy!
 

Wednesday, October 27, 2010

A Bread for the Season

One of my favorite web sites is King Arthur Flour and last week I received this recipe that intrigued me.  Malted Wheat Flake Bread intrigued me with the mention of a new ingredient I had never heard of--Malted Wheat Flakes, an important ingredient in Great Britain's granary bread.  In addition, the recipe calls for 9-Grain Flour blend, which can also be bought through King Arthur, and provides a hearty texture that would go great with soup or stew on these cold, rainy nights.  Just click on the title and it will take you to the recipe!

Malted Wheat Flake Bread

For anyone who might steer away from yeast bread, let me assure you how easy this was to prepare.  First of all, you put all the ingredients in the bowl, at once!
I use the KitchenAid with the dough hook attachment.  When the dough came together, I transferred the mixture to a plastic tub, or use a large bowl, that has been sprayed with a non-stock spray.
If it wasn't already easy--no kneading required.  Let it rest, covered, 8-16 hours; overnight is good.  It will become bubbly and double in size, so make sure your container is large enough.

I had a covered stone loaf pan and sprayed it with a nonstick pan.  I turned the dough out onto a floured bread board and shaped the dough into a long loaf.  I placed it in the covered bakeware and put the top on so it could double in size, about an hour.  Place the covered stone load pan in a cold oven and turn the temperature 450F-degrees.  Let bake 45 to 50 minutes.  Remove the lid and bake for another 5 to 15 minutes until the loaf is a deep brown.  Use an instant-read thermometer, inserted in the center, to make sure the temperature reads about 205F-degree.
This is a perfect bread and it's unique texture and flavor is sure to sway you to bake it over and over again.  Don't be intimidated by the list of ingredients; it was well worth ordering them to make a bread your family will love.  Mine did.  Enjoy!

Tuesday, October 26, 2010

Caramel Apple Oatmeal Cookies


When I was first married, I loved having family and friends over for Halloween.  I always made homemade doughnuts and caramel apples, in addition to the numerous hors d'oeuvres and hot mulled apple cider.  Not to get off track, but one year my mother lent me my grandmother's cut-glass punch bowl but failed to mention to place a silver spoon in the bowl before I poured the hot cider into it.  My heart sank as I heard that distinctive sound of cracking glass!  I dreaded calling and telling Mom I had cracked my grandmother's punch bowl.  However, typical of my Mom, she took the blame for forgetting to tell me that trick.  Aren't moms wonderful:)

So today, I wanted to replicate the memory of those first Halloweens of married life, with wonderful caramel apples, in a cookie.  Oatmeal just came to mind to hold up to the addition of grated apples, giving a "pie-like" texture with the soft cookie.  The caramel is from scratch, but certainly no one will know any different if you use a bag of Kraft caramels; just add 2 tablespoons of water to thin the mixture.

Caramel Apple Oatmeal Cookies

Homemade Caramel:
1 1/2 cups granulated sugar
1 cup Light Karo Syrup
4 T unsalted butter, room temperature
1 cup Heavy Cream
1 tsp. Sea Salt
1 tsp. Vanilla Extract

In a heavy saucepan, measure the sugar, Karo syrup, and salt and stir together.  Place the mixture on a low heat and cover the pan.  (Until you add the cream, butter and vanilla do not stir or swirl the pan!) 
Cook over low heat until the sugar has dissolved.  Remove the lid and raise the heat to medium.  Continue to cook the mixture until the color changes to a golden brown.
This will take approximately 7 minutes.  Carefully, using a mitt on your stirring hand, add the butter, then, the heavy cream because the steam released can burn you.  Stir the mixture to incorporate the cream and butter.  Remove from the heat and add the vanilla.  Let the mixture cool to room temperature before drizzling it over the cookies.  Stir occasionally to enhance the cooling.
The mixture will thicken as it cools.

Preheat oven 350F-degrees and line cookie sheet with parchment or use a Silpat.

Apple Oatmeal Cookies

1 cup (2 sticks) unsalted butter, room temperature
1 cup light brown sugar, packed
1/2 cup granulated sugar
2 large eggs
1 cup grated apple (peel apple first) approximately 2 medium apples
1/2 tsp. Apple flavoring
1 tsp. Vanilla extract
1 1/2 cups all-purpose flour
1 tsp. baking powder
3/4 tsp. salt
3 1/2 cups Old-Fashioned Oatmeal


In the KitchenAid, using the paddle attachment, beat the butter and sugars together completely.  Add the eggs, one at a time, and beat well.  Add the grated apple, flavoring and Vanilla extract and mix well.
Add the flour, baking soda, and salt and mix to combine.  Stir in the oatmeal.


Use a 1/4 cup scoop to measure out the cookie dough onto the prepare baking sheets.


  Press down tops slightly.  Bake in the preheated oven 12 minutes or until golden brown.  Cool on a rack completely.  When all the cookies are finished baking, pour the caramel into a plastic squirt bottle or you can drizzle using a spoon.  Drizzle the caramel over the cookies.  Let set.
Now, heat some apple cider and have a treat before all the little tricksters come to your door.  Enjoy!

Monday, October 25, 2010

Wicked Good Pumpkin Cheesecake Swirled Brownies


Awhile ago, I posted a chocolate chip pumpkin bread and discovered there were other gourmets, besides myself, who loved the combination of chocolate and pumpkin.  Halloween is just around the corner and wouldn't this be a wonderful treat for your little tricksters?

I remember my first brownie...as if it were yesterday.  My mother baked the most wonderful brownies and the aroma filled the house so much so that all us kids couldn't wait until they cooled so we could bite into this treat, washed down with a cold glass of milk.  I would stare at the shiny surface of the brownie, anticipating the gooey richness of chocolate as I took my first bite, closing my eyes as I let the chocolate confection melt in my mouth.  Of course, my brothers, gobbled theirs in two bites, grabbing for another one before I had even gotten done with my first bite.

In 1993, my best friend (and a co-baker), Eric, introduced me to his fabulous Pumpkin cheesecake that he had baked for our Thanksgiving dinner.  In addition to anything chocolate, cheesecake is my next favorite dessert and Eric's cheesecake did not disappoint!  This morning, I wanted to combine these two memories from people I love and admire and create a brownie that Kelly would have loved.  This has, undoubtedly been a hard month for me to get through, but memories keep me grounded, having family and friends to share with. 

When did you discover brownies and are you a purest with just chocolate, or do you love a combination?  I would love to hear about your memories while you make some new ones with this recipe!

Wicked Good Pumpkin Cheesecake Swirled Brownies

Preheat oven 350F-degrees.  Butter, then line and butter again, a 9"x13" baking pan.
 

Pumpkin Cheesecake:
1 pkg. (8oz) cream cheese
1/2 cup granulated sugar
1/2 cup pumpkin puree (not pie filling)
1 large egg
1 T Pumpkin Pie spice
1 tsp. Vanilla extract
1 T all-purpose flour
1/4 tsp. salt

In a medium bowl, using a hand mixer, beat cream cheese.  Gradually add the sugar and beat to combine.  Beat in the egg.  Add the remaining ingredients and beat to combine.  Set aside while you make the brownie layer.

Brownies:

4 large eggs
1 cup unsalted butter, melted
1 cup granulated sugar
1 T Vanilla extract
2 1/2 cups semi-sweet chocolate chips, melted
1 tsp. baking powder
1/2 tsp. salt
1/2 cup all-purpose flour

In the KitchenAid, using a paddle attachment, beat the eggs and sugar for 3-4 minutes until light in color.  Melt the chocolate chips in the microwave or as I did in a double boiler.
Add the melted butter to the egg/sugar mixture, while the machine is running.  Stop the machine and use a spatula to scrape down sides.  Add the melted chocolate and beat thoroughly to combine.  Add the vanilla, salt and baking powder and beat again.  Add the flour, beating just to combine.  Pour mixture into the prepared pan.  Smooth to completely cover.

Pour or spoon the pumpkin cheesecake over the brownie layer.
Then, take a knife or a spatula and "swirl" the pumpkin cheesecake through the brownie mixture.
Bake for 25 minutes or until a toothpick comes out cleanly.  Turn oven off and with the door of the oven open, let the pan cool for 20 minutes in the oven.  Remove and let cool completely.
If you happen to have a springform rectangle pan, remove the sides to cool.  Refrigerate for 1 hour or more before cutting into squares.

Our oldest daughter, Erin, eats brownies using a knife and fork, but I just like to pick up the square, take a bite, and let it melt in my mouth.  However you eat your brownie, pour a cold glass of milk and Enjoy!

Sunday, October 24, 2010

Hearty Mushroom Barley Soup

Brrrrrrrrrrrrrrrrrrr!  It's rainy and windy outside; the leaves are falling and I've decided to take the chill off by making a pot of soup.  My mother taught me this trick by making pots of her vegetable soup, bean soup, or maybe a chicken noodle when the weather turned and it worked every time.

My choice for this chilly Fall evening is a Mushroom Barley Soup.  Mushrooms are a good source of dietary fiber, protein, vitamins (thiamine, riboflavin, niacin, biotin, cobalamins) and ascorbic acid.  In case you're interested, China is the world's largest edible mushroom producer and consumer of this fascinating fungus.  Along with the barley, which is also a good source of dietary fiber, you have a satisfying, healthy soup to ward off flu bugs and as my Irish father would say, "warm the cockles of your heart."

Making soup is one of those things that the whole family can get involved with and it's an inexpensive way to provide a hearty, healthy meal.  I'd love to hear about a favorite soup you make; a family recipe or twist on old standard.  Cold nights = Bowl of Soup!

Hearty Mushroom Barley Soup

1/4 cup  (1/2 stick) unsalted butter
1 lb. while button mushrooms, cleaned and cut into 1/2"-1" pieces
1/2 lb Crimini mushrooms (or your favorite) cleaned and cut into 1/2"-1" pieces
2 carrots, peeled and chopped into small pieces
2 stalks of celery, chopped into small pieces
1 large yellow onion, chopped
1/2 cup Pearl Barley, rinsed
2 T all-purpose flour
8 cups Vegetable broth
salt & pepper to taste
1/4 cup fresh parsley
1 T fresh dill or 1 tsp. dried dill

In a large Dutch oven or sauce pan, melt butter.  Add the onions, carrots and celery and saute for 5-7 minutes.  Add all the mushrooms and barley and continue to cook, stirring occasionally until the mushrooms have released all their liquid and the vegetables start to brown.  About 20 minutes.

Sprinkle the flour over the mixture and stir to combine.  Gradually add the broth and bring the soup to a boil, stirring frequently.
Reduce heat and cover the sauce pan.  Simmer until the barley is tender, about 40 minutes.  Before serving, add the parsley and the dill and stir.  Taste for seasoning and add salt and pepper to taste.  I combined this soup with a "melt-in-your-mouth Parkerhouse roll and a salad.  The soup warmed me up and even with the rain falling and the wind howling, I closed my eyes and was in my mother's kitchen again--Enjoy!

Friday, October 22, 2010

My Mom's Favorite Gingerbread

Recently, when I was in Kentucky, I came across more recipes from my mother and grandmother that  Kelly had "borrowed."  I was delighted to see the gingerbread recipe my Mom had made for us and since the day was cool and blustery, I thought it would be a good one for me to make too.

Gingerbread was brought to Europe by an Armenian.  English gingerbread is a soft treacly (molasses) cake, usually baked in a square pan. My Mom baked this gingerbread in a square pan, but I decided to do it today in a ring.  Now, mind you, gingerbread by itself is good, but Mom would make this warm lemon sauce that enhanced the gingerbread even more.  This was one of my Dad's absolute favorites.  He liked molasses so much that when Mom made pancakes or waffles, Dad would pour molasses over them instead of maple syrup.

Gingerbread is definitely one of those flavors I associate with Fall, right along with pumpkin and apples.  I'm not sure where this recipe came from, but it was one that my Mom made over and over again.  I have updated her version with just a few changes, but I know she would love it.  It was her favorite!

My Mom's Favorite Gingerbread

1/2 cup (1 stick) unsalted butter, at room temperature
1/4 cup dark brown sugar, packed
1 cup unsulphured molasses
1 large egg
1 tsp. vanilla
1 1/2 tsp. ground ginger
1 tsp. ground cinnamon
1/4 tsp. ground cloves
1/4 tsp. ground allspice
1/2 tsp. ground cardamon
1/8 tsp. black pepper
2 1/2 cups cake flour
1 tsp. baking soda
1 tsp. salt
1 cup buttermilk
Preheat oven 350F-degrees.  Use a non-stick spray on your preferred pan: 9-inch square, 8-cup bundt pan, or mini Bundt pans

In the bowl of the KitchenAid, using the paddle attachment, beat butter and brown sugar completely.  Add the molasses and beat again.  Add the egg and beat to incorporate well.  Add the vanilla and spices and beat to combine.  Sift the flour, baking soda and salt.  Add alternately with the buttermilk, beginning and ending with the flour mixture.  Pour batter into prepared pan.
  I used this paper ring mold and place it onto a baking sheet before putting it in the oven for 40-45 minutes.  Bake square pan 35-40 minutes, bundt cake pan 40-45 minutes and mini bundt pans 25-28 minutes.

Lemon-Ginger sauce:
1 cup granulated sugar
2T cornstarch
1 cup water
1/4 cup unsalted butter
juice of 1 lemon
zest of 1 lemon
1/2 tsp. ginger extract

In a small saucepan, mix the sugar and cornstarch together.  Gradully add the water, whisking to combine.  Cook over medium heat until the mixture boils and starts to thicken.  Add the butter, one  tablespoon, mixing well.  Add the juice and zest and stir well.  Take the mixture off the heat and add 1/2 tsp. ginger extract.  Serve warm sauce over the gingerbread.  Enjoy!

Wednesday, October 20, 2010

Vanilla Chai Applesauce Pound Cake

It's Fall; the nights are cool and the days are sunny, but crisp.  In many areas, the foliage color has peaked, but here in Seattle, our deciduous trees are finally showing their beautiful reds, yellows, and oranges.

About twelve years ago, in Connecticut, we had this beautiful Fall and I couldn't resist collecting leaves to press and then, wanting to make a keepsake, I created this serving tray.  Simply encase the pressed leaves between two pieces of glass, which were cut to fit this frame, and finally add handles on each end. Tonight, it came in handy to show off this unusual pound cake--Chai Tea, fragrant vanilla, and fall apples.  Kelly introduced me to Chai tea; something she had started drinking while working at Rizolli bookstore in Santa Monica, California.  The spices involved in Chai are my favorites and, if you don't want to use tea bags, you could substitute with cinnamon, cardamon, cloves, and nutmeg.

I remember one early Fall going apple picking with my Mom and my oldest brother's first wife, Jeanne, to her family vacation home in the mountains of Frederick, Maryland.  It was a glorious day; wading in the creek near their cabin and picking apples at an orchard near by.  Admittedly, we got a little over zealous with the bounty of apples and came back with a couple of bushels:)  The next day we made applesauce, cake and, of course, pies.  One of my keepsakes from my mother and of memories of that day, is this "food mill" with the handmade wooden plunger by my Grandpa Frank.
I've made a lot of applesauce with this and, because I can leave the peel on to cook my apples, I know it's healthier.  Inspirations come in the most unusual packages!  I'd love to hear about your memories of Fall and what traditions you still do.  Now, I'm imagining my Dad putting on his 40-cup coffee urn to accompany the pies or cakes we made after picking...the house smells wonderful.

Vanilla Chai Applesauce Pound Cake

Chunky applesauce:
3-4 apples (I used a variety of Granny Smith and Honey Crisp)
2 Chai Tea bags
3/4 cup apple cider
1 T Vanilla extract or 1/4 tsp. Vanilla powder

Peel, core, slice, then, cut into 1/2-1 inch chunks the apples.  In a medium saucepan, measure the cider and place the tea bags in it.  Bring to a boil, then, lower the heat and simmer about 10 minutes.  Add the cut-up apples and place the lid on the pan.  Cook another 10-15 minutes and remove the lid.  

Continue to cook until most of the liquid has reduced and the apples are "starting to fall apart".  You can use a potato masher to press down on the apples, but leave it somewhat chunky.  Transfer the chunky applesauce, tea bags and all, to a glass bowl.  Add 1 tablespoon of vanilla or as I did, 1/4 tsp. of Vanilla powder.  Let cool completely.  (The applesauce can be made the day before and chilled in the refrigerator.)

Cake:
1 cup (2 sticks) unsalted butter, room temperature
1 1/2 cups granulated sugar
2/3 cup light brown sugar, packed
4 eggs
2 cups Vanilla Chai Chunky Applesauce
3 cups All-purpose flour
3/4 tsp. baking powder
1 tsp. salt

Preheat oven 325F-degrees.  Spray a 12-cup Bundt pan with a nonstick baking spray with flour.
In the KitchenAid, using the paddle attachment, beat the butter and sugars for 5 minutes until light and fluffy.
 
Add the eggs, one at a time, beating well after each addition.  Add the chunky applesauce and mix only to combine.  Measure the dry ingredients in a glass bowl and use a whisk to combine.   Add to the batter and mix to combine.  Spoon batter into the prepared pan.

Place on the middle rack of the oven and bake 55-60 minutes, or until a toothpick comes out clean when tested in the center of the cake.  Let cool about 10 minutes in the pan before turning it out onto a serving plate.  Meanwhile make the glaze.
Glaze: 
1 cup confectioner's sugar
2 1/2 T warmed apple cider
1 tsp. light Karo syrup

Mix the ingredients in a small bowl and while the cake is cooling, pour over cake.
My dear friend, Nicole, from the Gardenmama blog, made a leaf press last week on her blog.  She inspired me to share with you all one way you can turn your beautiful keepsake leaves into a lasting project.  Here are a few more photos of the tray I made from my pressed Connecticut leaves.


After creating one, bake up this scrumptious pound cake and serve to your family and friends.  Enjoy!