Showing posts with label CUPCAKE. Show all posts

Friday, June 15, 2012

I'll Have S'Mores Cupcakes

Today, I was invited to an impromptu lunch for a friend who is relocating to Texas and I thought, what I could bring as a dessert that would be meaningful. I have recipes for Texas Sheet Cake, but I imagine she'll get that a lot once she moves, so I decided on taking a classic, that brought back memories for me.  S'mores are those wonderful treats that we've all done around campfires, where we take graham crackers, a Hershey's chocolate bar, and toasted marshmallows and put them together to create an ooey-gooey dessert that brings a smile.  While we were eating these wonderful creations and licking our fingers, we would tell stories, catch up on "gossip" and just reminisce about the day. Great Memory!

S'mores (from the phrase "some more") dates back to a publication "Tramping & Trailing with the Girl Scouts in 1927.  It's not clear if they were they ones who invented this campfire treat, but certainly the first to publicize it.  To be exact, Loretta Scott Crew was the first one to make them by the campfire for the Girl Scouts.  I know I've eaten my share!

S'mores Cupcakes
Graham Cracker Layer:
1 1/2 cups crushed graham crackers
3 T unsalted butter, melted

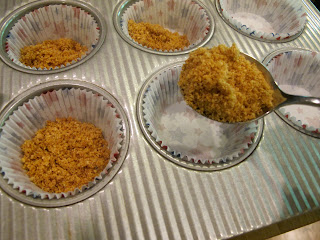
Pour the melted butter over the graham crackers and use a fork to mix.

Measure a hefty tablespoon full and place in the bottom of a 24 paper-lined muffin pan(s).  I used a pastry tamper to press it down, but if you don't have one, use a small juice glass.

 Set aside.  Preheat oven to 350F-degrees and mix up the chocolate batter for the cupcakes.


Chocolate Batter:
10 T unsalted butter, at room temperature
1 1/2 cups light brown sugar, packed
3 large eggs
1/2 cup sour cream
1 1/2 tsp. vanilla extract
In a stand mixer, using the paddle attachment, cream the butter and brown sugar together until fluffy, about 5 to 6 minutes.  Add the eggs, one at a time, beating well after each addition, scraping down the sides of the bowl as needed.  Add the sour cream and the vanilla and beat to combine.

1 1/4 cups boiling water
4 oz. bittersweet chocolate chips
1/2 cup Dutch-processed cocoa
1 tsp. espresso powder

In a medium bowl, add the chocolate chips, cocoa and espresso powder.  Slowly add the boiling water and stir to combine until the chips are melted.

 1 1/2 cups King Arthur all-purpose flour
1 tsp. baking soda
1/2 tsp. baking powder
1/2 tsp. Kosher salt

In another bowl, mix the dry ingredients and use a whisk to combine.  Add to the batter, alternately with the chocolate mixture.  Beat well and scrape down sides as needed.
Measure out the batter onto the graham cracker layer, filling up to almost the top of the paper.
Bake in preheated oven for 18 to 20 minutes until the tops spring back when touched lightly.  Don't over bake.  Remove from the oven and cool in the pan(s) for about 10 minutes, then remove to a cooling rack to cool completely.

Chocolate Frosting:
1 1/2 cup bittersweet chocolate chips (about 10 oz.)
1 cup heavy cream
1/4 light Karo syrup
1 1/2 cups confectioners' sugar
18 T (2 1/4 sticks) unsalted butter, at room temperature

Marshmallow Filling:
about 1/2 bag of regular size marshmallows, melted over low heat 


Garnish:
3 or 4 graham crackers, cut into strips
48 miniature marshmallows, toasted

In a small sauce pan, heat the heavy cream and Karo syrup until bubbles appear around the edges.  Place the chocolate chips in a food processor and while the machine is running, pour the heated heavy cream/Karo syrup through the feed tube and run the machine until the chocolate has melted.  Add the confectioners' sugar and pulse a few times to incorporate, then, while the machine is running add the butter in pieces and continue to run until completely combined.  I scraped the mixture into another bowl, put some plastic wrap over it and refrigerate about an hour to chill.  It will thicken.


 While that is chilling, make the garnishes.  I sliced graham crackers into long strips by using a serrated knife and with a "sawing" motion.

I wanted to fill the centers, so I melted some marshmallows and scooped the mixture into the cupcakes that I had made a hole for with an apple corer.


I placed the cupcake "plug" over the filling, then piped the frosting with #804 tip.
I placed a graham cracker "stick" on top and then, using a small kitchen torch, roasting miniature marshmallows on a toothpick and placed them near it.

(Don't try to toast the marshmallows once they're on the frosting or you will melt your frosting!)

It's always hard to say good bye to friends when they're moving, but somehow, the closeness we shared today didn't make it as sad.  Enjoy!


Monday, June 4, 2012

Lemon~Raspberry Mascarpone Cupcakes

It's Monday, it's raining, and it's been a rough last two years, so as Dale Carnegie said, "When life gives you lemons, make lemonade," hit home today and I made lemon cupcakes:-D!
Now, my mother always told me I was her "Rock of Gibraltar" and for years that has kept me determined that whatever life threw at me, I could handle.  I have to say, it's not been easy, but I'm here and trying to figure out what's next.

I think cupcakes are always a good idea and when I had friends coming for lunch today, even better.  I love the concept of filling the center of the cupcakes; something that had never occurred to anyone, other than Hostess Cupcakes, when I was growing up.  We had chocolate or vanilla cupcakes with usually an American buttercream icing.  When I went to the CIA, I discovered Swiss and Italian buttercream and knew my baking would change.  I know my mother would have loved these and the raspberry mascarpone filling even more.

Lemon~Raspberry Mascarpone Cupcakes
1/2 cup (1 stick) unsalted butter, at room temperature
1 cup granulated sugar
Zest of one lemon
1/2 tsp. lemon extract
3/4 cup lemon bits
1 tsp. vanilla extract
2 large eggs
1 1/2 cups King Arthur all-purpose flour
1 1/4 tsp. baking powder
1/2 tsp. Kosher salt
2/3 cup milk

Preheat oven to 350F-degrees.  Line a 12-cup muffin pan with paper liners.

In the bowl of a stand mixer, using a paddle attachment, cream the butter until fluffy, about 4 minutes.  Add the sugar and beat to combine.  Add the extracts and zest and mix on medium speed to combine.  Add the eggs, one at a time, beating well after each addition and scrape down the sides of the bowl in between.

Add the dry ingredients, alternately with the milk, starting and ending with the dry ingredients.  Scrape down the sides and stir in the lemon bits.
Divide the batter among the 12 cups.
 Bake for 18 to 20 minutes, until a toothpick in the center comes out clean and the cupcakes are a golden brown.
Cool in the pan about 10 minutes, then, transfer to a rack to cool completely.


Raspberry Mascarpone Filling
1 pint of fresh raspberries
8 oz. mascarpone cheese
juice of 1/2 lemon
2 T granulated sugar
Wash raspberries and drain on a paper towels.  Rough chop the raspberries and sprinkle with the sugar and lemon juice.  Add the mascapone cheese and stir to combine.

Use an apple corer to remove the center of the cupcake.  Fill a pastry bag with the raspberry filling and pipe into the cavity.


 Lemon Swiss Buttercream
4 egg whites, at room temperature
1 cup granulated sugar
3/4 tsp. lemon extract
2 cups (4 sticks) unsalted butter, cut into cubes and softened to room temperature.
3-4 drops of Yellow Food dye
Lemon Candy Slice


In a heat-proof bowl, over a sauce pan with 2 inches of water heated to a gentle boil, whisk the egg whites and sugar.  Continue to whisk, until the temperature reaches 140F-degrees.  Remove from the heat and place on the stand mixer.  Using the whisk attachment, beat on high speed until a glossy meringue stage.  Lower the speed to medium/high and slowly add the cubes butter.  Don't be concerned if the meringue looks curdled because it  changes in an instant!  Once all the butter is incorporated, add the extract, and beat on high once more.

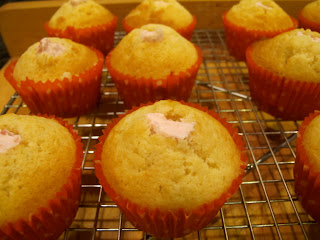
Use a #804 tip (or your choice) and pipe the Swiss buttercream on top of the cupcakes.  Add a lemon candy slice as a garnish.

Baking is definitely a sweeter part of my life and I'm happy to share it with all of you. Enjoy!


Sunday, March 11, 2012

Happy 100th Anniversary to the Girl Scouts

This week marks the 100 Anniversary of the Girl Scouts!  The first troop consisted of 18 girls with their founder, Juliette Gordon Low, proclaiming, "I've got something for the girls of Savannah, and all of America, and the world, and we're going to start it tonight."

I was a Girl Scout and my girls were Brownies and I can tell you it's a wonderful organization that listens to girls and gives them a sense of self-esteem.  Today's membership is over 3.2 million!

In honor of this all-important anniversary, I have baked my version of a "Thin Mint" Cupcake.  A chocolaty-minty cake with a dark chocolate coating under a minty-green buttercream then topped with a piece of a real Thin Mint.  Today, I picked up several boxes to support one of our local troops, who are also encouraging buyers to buy cookies to support our armed-forces troops.
The enthusiasm is contagious and these brave girls (and their Mom's) are out selling cookies in the rain to put a smile on your face!
Thin Mint Cupcakes
12 T ( 1 1/2 sticks) unsalted butter, room temperature
1 1/2 cups granulated sugar
2 large eggs
2 vanilla beans, split and scraped (or 1 T vanilla extract)
1 12oz pkg. Dark & Mint Chips, melted and slightly cooled
 2 1/2 cups Queen Guinevere Cake Flour
1/3 cup cocoa (not Dutch-processed)
1 1/2 tsp. baking soda
1 tsp. baking powder
1 tsp. Kosher salt
2 cups buttermilk

Preheat oven 350F-degrees.  Line two 12-cup muffin pans with cupcake liners

In a stand mixer, using the paddle attachment, cream the butter and sugar thoroughly.  Scrape the sides of the bowl, as necessary.  Add the eggs, one at a time, beating well after each addition.  Add the melted mint/chocolate chips and beat to combine.  In a separate bowl, mix the dry ingredients and whisk together.  Add to the batter, alternatively with the buttermilk, starting and ending with the dry ingredients.

Scoop batter into the liners.  I used oversized liners and was able to get 22 cupcakes; with regular liners, you can easily get 2 dozen.
If you don't fill another pan, add water to the empty openings to ensure proper baking.
Bake the cupcakes 18 to 20 minutes.  Remove from the oven and allow to cool slightly.  Transfer to a wire rack to cool completely. 
Glaze:
Melt a 12 oz bag of bittersweet chocolate over a double boiler.  Leave out some of the chips to add to the melted chocolate to "temper" it.  You will get a shinier glaze.
Dip cupcakes tops into the melted chocolate.

While the chocolate sets on the cupcakes, start making the Minty Buttercream.

Minty Buttercream
4 eggs whites (1/2 cup)--I used a product called All Whites so I wouldn't have egg yolks to store
1 cup granulated sugar
pinch of Kosher salt
2 cups (4 sticks) unsalted butter, softened at room temperature

In the bowl of a stand mixer, combine the egg whites, sugar and salt.  Place a sauce pan, with about 2 inches of water on the stove and heat on medium.  Place the bowl over the pan and whisk.  Use an instant thermometer to check temperature.  When the mixture reaches 140F-degrees, remove from the pan and place bowl on the mixer. 

Using the whisk attachment, beat the egg white/sugar mixture until stiff peaks, on high speed.  Lower the speed to med/high and start adding the softened butter, about 1 tablespoon at a time until all the butter has been incorporated.  Don't be alarmed if the mixture looks curdled when half the butter has been added; it will come together, promise.
I added a couple of drops of green food coloring and 1/2 tsp. peppermint flavoring.  Fill a piping bag with your favorite tip and top each of the cupcakes with a swirly dollop.  As a garnish, of course, add a quarter of a Thin Mint.

Today, over 200 million boxes of cookies are sold annually in nearly a dozen varieties.  My favorite is still the Thin Mints, although this year, in honor of their anniversary, they introduced a new cookie called Savannah Smiles.

Happy 100th, Girl Scouts!!
Enjoy!


Sunday, February 5, 2012

Familiar~Favorite Chocolate Cupcakes


My mother was a great cook and baker; something that I've share with you all for the last 2 1/2 years with my blog.  However, I have to admit, when I was in elementary school, I had a dessert envy of those kids that brought Twinkies, HoHo's, Ding Dongs, Snowballs, and yes, Hostess Cupcakes.  I realize, now, it was the "packaging" that intrigued me more or as much as the treat itself.

Over the years, my love of baking has helped me create my own treats (Twinkies) to surprise my family and friends and today, I decided to replicate another familiar and favorite treat that I yearned for--Hostess Cupcakes.  These snack cakes were the inspiration of D.R. (Doc) Rice, who, in 1950 added the vanilla cream filling and the seven (7) squiggles on top of the chocolate icing to the existing chocolate cupcake from 1919.  Their slogan was, "you get a big delight in every bite!"  So, I had a challenge before me when I set out to create my own cupcakes that would satisfy even the most skeptical believers.

Deep chocolate cake, a stabilized vanilla whip cream, a deep chocolate ganache, and the familiar royal icing squiggles is my version.  A little more decadent to make up for the packaging! LOL!!

Dark Chocolate~Vanilla Cream Cupcakes with Dark Chocolate Ganache
12 T (1 1/2 sticks) unsalted butter, at room temperature
1 1/2 cups granulated sugar
2 large eggs
2 Vanilla beans, split and scraped (or 1 T Vanilla extract)
1 tsp. espresso (optional, but enhances the chocolate flavor)*
2 1/2 cups Queen Guinevere Cake Flour
2/3 cups Dark Dutch Cocoa 
1 1/2 tsp. baking soda
1 tsp. Kosher salt
1 3/4 cups buttermilk
*For my friend, Ellen, at the Bake It With Booze blog, you could substitute 2 T Kaluha for a grown-up version)

Preheat oven to 350F-degrees.  Line two 12-cup muffin pans with paper liners and set aside.

In the bowl of a stand mixer, using the paddle attachment, cream the softened butter and sugar until fluffy.  Add the scraped vanilla beans (or extract) and beat once again.  Add the eggs, one at a time, until fully incorporated.  On medium speed, continue to beat 3 to 5 minutes, until the mixture is light and fluffy.

Either sift the dry ingredients or place them in a bowl and use a hand whisk to combine.  Add the the dry ingredients alternatively with the buttermilk, starting and stopping with the flour mixture.  Turn the mixture to medium/high and beat for 1 minute until fully combined.


Use a scoop to place the batter into the paper-lined pans.  I filled the papers almost to the top and was able to get 20 cupcakes.  If you want to fill the pans with the usual recommended two-thirds full, you will get an even 2 dozen--your choice.  Bake for 18 to 20 minutes, being careful not to over bake, which is easy to do with chocolate batters.  Also, if you don't fill two pans with the cupcakes, add water to the muffin openings so you ensure even baking.


Vanilla Cream Filling
1 1/2 cups heavy cream
3 T Whipped Cream Stabilizer

2 T granulated sugar
2 Vanilla beans, split and scraped


Mix the stabilizer with the granulated sugar.  In a bowl, using a whisk attachment or as I do, in a copper bowl, start whisking the heavy cream, sprinkling the stabilizer/sugar mixer over it.  Continue to whisk until thicken.  Add the vanilla bean "paste" and whisk to combine.  Set aside.

Dark Chocolate Ganache 
3/4 cup heavy cream
8 oz. bittersweet chocolate chips

In a small sauce pan, over medium heat, heat the heavy cream until bubbles appear around the outer edges.  Remove from heat--don't let it boil.  Pour over the bittersweet chocolate chips and let set a minute or two.  Slowly whisk the mixture to combine.  Set aside.


Royal Icing
1 cup confectioners' sugar
1 T meringue powder
2-3 tsp. cold water
Mix the meringue powder into the cold water, then, add it to the confectioners' sugar.  Whisk to combine.

Assembly:
Once the cupcakes have completely cooled, use an apple corer to remove the center--save the cupcake pieces.  Place the stabilized whipped cream into a bag with a #7 tip and pipe the Vanilla Cream into the center.  Use just the top (the outer baked part) of the cupcake "plug" and place on top of the cream to cover it before dipping into the ganache.


You can either use an offset spatula to frost the cupcake, or as I did, dip the cupcake into the ganache, then, smooth it with the offset spatula.  


When you finish with the ganache step.  Fill a small bag with a #3 or 4 tip and pipe the squiggles over the ganache frosting.  Let the cupcakes set for an hour or more before serving or packing up to give.

The moist, dark chocolate cupcake, with the vanilla cream and ganache frosting was just what I envision to be my version of this favorite lunch time snack.  And, just like the snack cakes I envied my classmates having, these also have a "big delight in every bite." Enjoy!