Showing posts with label MAPLE. Show all posts

Monday, October 9, 2017

Maple Creme Brûlée and October's Give-Away Apron

First, let me wish all my friends in Canada...Happy Thanksgiving!  A day dedicated to family and the harvest, the Canadian Thanksgiving has been celebrated since 1879 when Parliament passed a law designating it as a national holiday occurring on the second Monday in October.

There are many references of giving thanks by settlers to this region called New France, dating back to 1578, but sporadic.  Interestingly, after The American Revolution, loyal refugees to the Crown of England took with them the celebration foods that they had come to know--turkey, squash, and pumpkin to Canada, in addition to foods that had become a tradition there. The theme of Canada's Thanksgiving has changed each year, focusing on an important event they are thankful for; which I find nice.

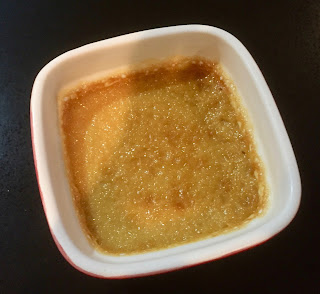
So, in honor of my friends to the North, I made Maple Creme Brûlée.


One of my favorite desserts and perfect with it's creamy maple flavoring after you break through the crunchy sugar topping.  Very easy to make and would be a lovely ending to a family celebration.

Maple Creme Brûlée
2 cups heavy cream
5 large egg yolks
1/2 cup Maple Syrup (I used Grade A)
1 tsp. Maple Extract

Sugar in the Raw

Preheat oven to 325F-degrees.

In a medium saucepan, heat the heavy cream just until bubbles appear around the edges...don't boil!

In a large bowl, preferably with a spout, whisk the egg yolks, maple syrup, and maple extract together.  Slowly add a bit of the heavy cream, whisking after each addition.  (This is called tempering.)
Place 6 ramekins in a casserole dish.
Once all the cream mixture has been incorporated into the egg yolk mixture, pour through a fine sieve into the ramekins.  This catches any "eggy bits" that might have occurred!
Place casserole dish in the preheated oven and pour boiling water around the ramekins, coming about half-way up the sides.

Bake 40-45 minutes.  The centers should be a bit jiggly, but set.  Don't be concerned that the tops may have browned a bit; that's due to the maple sugar.
Remove ramekins from the water bath and allow to cool on a rack until room temperature.  Place in the refrigerator for two hours.

When you're ready to serve dessert, heat your broiler and place the ramekins on a sheet pan. Sprinkle tops with Sugar in the Raw and set pan under the broiler.  If you own a Mini Torch, which I prefer to do, heat the individual ramekins after you've sprinkled the sugar on top.

Serve with fresh berries or alone as I served these.  My hubby said he could have licked the bowl clean it was that good! Enjoy!

October's Give-Away Apron has special meaning for me with the Sunflowers.  Yesterday, would have been our daughter,'s 45th birthday--a day that is just as hard for me as her passing.  She loved sunflowers and collected several prints by Van Gogh to frame and hang on her walls.  She also had me sew her a sunflower dress when she was a senior in high school--I still have that dress.

If you would like to win this apron...simply comment on the posts this month and this could be yours.  Good Luck!

Saturday, July 9, 2016

Iced Maple~Molasses Cookies & July's Give-Away Apron

It's so hot here (95-degrees with a heat index of 102) that my baking transported me to cooler days and I created a recipe reminiscent of Autumn!  These cookies are scented with ginger, cinnamon, cloves and the tastes of molasses and maple--a cookie I would normally bake for the holidays.

Not to make light of disasters, but on January 15, 1919, in the North End of Boston, a molasses storage tank burst and the streets were flooded with this thick, sticky substance.  It flowed through the streets at 35 miles per hour and killed 21 and injured 150 people.  For several decades, there was a folklore that on hot summer days, the area smelled of molasses!  Well, that's how my kitchen smelled yesterday:-D

Iced Maple~Molasses Cookies
1 cup (2 sticks) unsalted butter, at room temperature
1/2 cup Grade B Maple Syrup
1/2 cup Molasses
2 large eggs
1 tsp. vanilla extract
4 3/4 + 3T cups King Arthur All-Purpose Flour
1/2 tsp. baking soda
1/4 tsp. salt
1 T ground Ginger
2 tsp. ground Cinnamon
1/2 tsp. ground Cloves
1/2 tsp. ground Cardamon
1 cup finely chopped almonds

Preheat oven to 350F-degrees.  Line two baking sheets with parchment paper.

Cream the butter thoroughly.  Add the maple syrup and molasses and beat together, scrapping down the sides of the bowl with a rubber spatula.  Add the eggs, one at a time--the mixture will appear "curdled."  Add the vanilla and mix well.

Add the remaining ingredients and mix on low to incorporate.  The dough will be somewhat stiff.
Form the dough into balls the size of a large walnut or ping-pong ball;-)  Place the balls on the parchment paper and using a cookie stamp, lightly dipped into flour, press a design in the cookies.  The cookie should be about 3-inches in diameter.

Alternatively, you could use a fork to cross-hatch a design (like peanut butter cookies).  Place the cookies in the preheated oven and bake for 12 minutes.  Remove from the oven and transfer to a rack to cool.
 Icing:
1 1/2 cups confectioners' sugar (icing sugar)
1 T light Karo syrup
1-2 T very hot water
1/4 tsp. almond extract

While the cookies are warm, use an off-set spatula to spread the icing on top of the cookies.


These cookies were so good with a glass of Iced Tea or, as my hubby had, a tall glass of Lemonade.  Enjoy!

Now, the new apron that will be given away at the end of the month also reflects how hot it is here.  This fabric just jumped out at me in one of my favorite quilt shops!
My Kelly loved the color orange and I think she would approve of my choice.  If you would like to win this apron, just comment on any of the posts this month.  Good Luck!

To put a smile on your face, here's a photo of a squirrel relaxing on one of the Adirondack chairs on the deck.  Since I don't bake with preservatives, the wildlife around here eat pretty good.  This guy has a chunk of bread while stretched out--what a life!

Tuesday, July 9, 2013

French Toast Scones

In addition to going through all the junk treasures I've accumulated over the last twelve years, cleaning out the refrigerators/freezers is part of my chores today too.  You might remember I made a recipe in March, Maple Sugar Bars, using Grade B maple syrup, that were very, very good. I still had the bottle in the refrigerator, but not enough to make them again...but maybe something else.
I'm not really a breakfast-kind-of-person, but I do love scones and that was my focus today to create.  I thought, "why not bake a scone that would remind someone of eating French Toast?"  Why not, indeed!

When I do make French Toast, I like to use, almost stale, cinnamon swirl raisin bread, Challah, or brioche dipped into a rich egg/cream mixture, speckled with additional ground cinnamon.  We always had French Toast at my mom's when the bread was getting stale and especially homemade bread that didn't have any preservatives in it!  These scones remind me of those days, only I can pick them up without the fear of syrup dripping down on me:-D

French Toast Scones
4 1/3 cups King Arthur all-purpose flour
2 T baking powder
1/2 tsp. salt
1/2 cup (1 stick) cold, unsalted butter, grated

In a 2-cup liquid measure add:
1 egg + 1 egg yolk
1/4 cup heavy cream
Maple syrup (enough to come up to the 1-cup line)
Milk (enough to bring the liquid measure up to 1 3/4 cups)

Filling:
2 T softened unsalted butter
1/4 cup firmly packed, light brown sugar
1 T ground cinnamon

Maple Frosting:
1 cup confectioners' sugar
2 T softened butter
1/4 cup Grade B maple syrup

Preheat oven to 375F-degrees.  Line a rimmed baking sheet with parchment paper and set aside.

In the bowl of a stand mixer, using the paddle attachment, mix the dry ingredients.  Add the butter and mix, just until incorporated.

While the mixer is running, slowly add the 1 3/4 cups of liquid.  Stop the mixer when the dough comes together (don't over mix!)
Turn the shaggy dough out onto a lightly floured bread board and knead just until smooth.  Roll dough out to a 12" x 16" rectangle.
 Spread the dough with the 2 tablespoons of softened butter.  
Sprinkle the brown sugar/cinnamon mixture over the butter and roll up the dough, beginning with the edge further from you.  Slice the roll in half, then into quarters, then thirds to get 12 scones.
Press the scones down slightly and brush with an egg wash (1 large egg + 1T milk) 
Bake in the preheated over for 18 minutes.  Remove and allow to cool while you mix up the Maple Frosting. 
The frosting should be thick enough to hold its shape.

Spread the still warm scones with about 1 tablespoon of frosting.  
Golden layers of cinnamon, with a maple syrup taste!

Eat while warm and then on to a day's work...for me it's packing. Enjoy!
 

Thursday, March 1, 2012

Maple Sugar Bars

Maple Sugar Bars or as some would call them, Maple Brownies, is a recipe I came across in my recent issue "Early Spring 2012" of The Baking Sheet by King Arthur Flour Company.  It is published six times a year and is filled with just wonderfully, tested recipes that have inspired me for years.

It's been twelve years since my husband and I took a trip to Norwich, Vermont, mostly to visit the King Arthur Flour Company and see where I had been spending all my money! LOL!!  However, in the few days we were there, we also explored the surrounding areas and visited a maple farm (also called a Sugar bush or Sugar wood) and a dairy farm, where heavenly cheese was being made.  Our trip home was quite pleasant with our bounty of bread from King Arthur's Bakery, fresh cheddar cheese, and maple candy!

I admit, I was quite intrigued with the whole maple syrup process and want to share with you some interesting facts so you too can better appreciate this product.
  • The three types of trees tapped to collect the sap to make syrup are the Sugar Maple, Black Maple and Red Maple.
  • A syrup must be made entirely of maple sap to be labelled maple!
  • Vermont is the largest producer with 5.5% of the global supply.
  • Maple trees can begin being tapped between the ages of 30 to 40 years old and up to over 100 years old.
  • Usually the tapping begins in late winter to early spring and can can for 4 to 8 weeks depending on the weather (cooler is the best for the collection).
  • It takes 20 to 50 litres (depending on the concentration) to get 1 litre of syrup!
  • The syrup can be heated longer to create maple sugar, maple butter or cream, and maple candy.
  • Whereas, trees are tapped by boring holes in the trunk, modern Sugar Farms use a series of tubing to speed up the collection.
Beatrice Vaughan is the author of this recipe I am sharing with you today.  As she says, "it isn't a low budget treat" because of the price of the maple sugar, "but the maple wallop it packs, and the fact that the cookies stay moist and chewy for days makes it worth it."  I certainly agree and the cool weather we're having, in addition to the incredible aroma in my kitchen, brings me back to our trip and makes me long for a visit to this area again.

Maple Sugar Bars
I doubled the recipe to bake in a 13" x 9" pan.  However, you can easily divide the ingredients in half for a smaller version done in an 8" pan.
12 T unsalted butter ( 1 1/2 sticks) softened to room temperature
2 cups maple sugar 
2 large eggs
1/2 tsp. maple flavoring (I did not double this ingredient for the larger amount)
1/2 tsp. vanilla extract (I used Vanilla-Butternut flavoring)
2 cups King Arthur all-purpose flour
2 tsp. baking powder
1 tsp. salt
2 cups broken walnut meats, toasted in preheated oven for 6 minutes


Preheat oven to 350F-degrees.  Lightly spray a 13"x9" baking pan with a baking spray and set aside.

In a stand mixer, using the paddle attachment, cream the butter and maple sugar together.  Scrape down sides as needed.  Add eggs, one at a time, beating well between each addition, then, add the flavorings.  Whisk the dry ingredients and STIR into the batter to combine.  Stir in the broken walnut pieces. 
Spread the mixture into the greased pan.  I used an off-set spatula to assist the spreading.

 Bake in preheated oven for 25 minutes until the edges are a golden brown and just begin to pull away from the pan.  Remove from the oven and cool on a rack.
I discovered using my "pizza slicer" is a perfect tool for getting nice straight lines when cutting cookies into bars.
 I was able to get 24 (2" x 2") bars from this recipe.

These bars are moist and chewy and each bite I am reminded of watching the large vats of sap being heated to create such wonderful products.  Enjoy!

Sunday, January 16, 2011

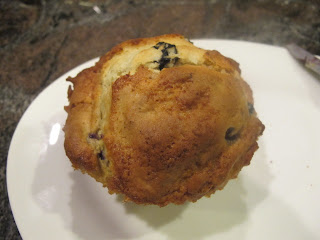
Jumbo Buttermilk Blueberry Pancake...Muffins


As Gru would say from "Despicable Me"...LIGHT BULB!  The idea for this recipe came about from Ari's love of blueberry pancakes, but with the ease of eating a muffin, which is what Maddie (and Ari) really love. 
Maddie eating Mimi's Pumpkin Muffins that her Mommy made yesterday!

Less messy (toddler-wise) with the maple syrup incorporated into and on top of the muffin.  The texture is light, like a pancake and the maple flavor, combined with the blueberries makes this muffin hard to resist.  I also had a jar of Pure Maple Cream by Stonewall Kitchen to slather on the muffin, but you could make your own by mixing soften butter with maple syrup. 

I used Jumbo Silicone Muffin Cups (a Christmas gift from a dear friend) but I also baked them in regular muffin papers to test the baking time.

The inspiration of the maple syrup, also a gift, reminded me of our trip to Vermont before moving to Seattle.  Watching how the trees are tapped, sap collected, and the extensive process of making syrup, gave us a real appreciation for this wonderful product. 
Buttermilk Blueberry Pancake Muffins
 4 cups King Arthur All-purpose Flour
1/2 cup Queen Guinevere Cake Flour
3/4 cup granulated sugar
2 1/4 tsp. (1 pkg.) Instant Yeast
2 1/2 tsp. baking powder
1 tsp. baking soda
1/3 cup Pure Maple Syrup
1 cup (2 sticks) unsalted butter, melted
1 1/2 cups buttermilk
3 large eggs
1 cup fresh or frozen blueberries
1/2 cup dried blueberries
1/2 cup Maple Fav-R bites
1 tsp. vanilla extract


Addition Maple Syrup for drizzling


Preheat oven 400F-degrees.  Line muffin pan with papers or use Silcone muffin cups.
In a large bowl, add all the dry ingredients and whisk to incorporate.  In a large glass measuring cup, measure the buttermilk, then, add the eggs.  Use a fork to whisk together.  To that mixture, add the Pure Maple Syrup and vanilla.  Make a well in the dry ingredients and add the liquid ingredients (including the melted butter), all at once.
Stir to combine.  Fold in the blueberries (frozen and dried) and the Maple Flav-R bites (if using).  Scoop into the muffin cups.  If you're using the Silicone Muffin Cups, make sure you place them on a baking sheet--never directly on the rack of the oven!
Drizzle an addition tablespoon of Pure Maple Syrup on top of the batter.  Bake for 5 minutes, then, lower oven temperature to 350F-degrees and continue to bake another 20 minutes or until golden brown.

Let muffins cool about 5-10 minutes before removing from the cups.  The regular sized muffins baked an additional 15-20 minutes after lowering the temperature, as well.


Remembering pancake breakfasts that my mother would fix on the weekend came back with the first bite.
And I know Ari and Maddie will just love these the next time Mimi comes to visit.  Enjoy!