Wednesday, April 28, 2010
Away...
Most of you who follow my blog have known that our daughter, Kelly,was diagnosed with breast cancer last year. In the last few weeks, Kelly's liver has been failing and we have traveled to Kentucky to be with her. Last night, she was transferred to Norton Hospital in Louisville, KY, where we hope for a miracle. She is in good spirits and remains positive throughout this ordeal. Please forgive my absense in not providing any new recipes and ideas, I will begin again when Kelly is home. Love to all, Susan
Thursday, April 22, 2010
Simple Vanilla Cake with Strawberry/Rhubarb Compote

Simple Vanilla Cake with Strawberry/Rhubarb Compote
1 1/2 cups cake flour
1 1/2 tsp. baking powder
1/4 tsp. salt
1/2 cup (1 stick) unsalted butter, softened
1 cup sugar
2 large eggs, room temperature
1/2 tsp. vanilla extract
1 6 oz. container Greek Gods-Greek Yogurt/Honey flavored
Preheat oven to 400F-degrees
Lightly coat an 8-inch cake pan with butter, then, dust with flour. Sift the cake flour, baking powder and salt and pour into the mixing bowl of your KitchenAid. Using the paddle attachment, beat in butter, about 1/2 tsp. at a time, until mixture resembles coarse sand.


Cool cake in the pan for five minutes. Unmold and cool completely. This cake is wonderful by itself, but there so many options. You can split it in half and add your favorite jam, then, just dust the top with confectioners' sugar. Or fill the center with pastry cream and make a chocolate glaze and you have a Boston Cream Pie. Of course, like I did, use fruit that is in season to make a delicious compote.
Strawberry/Rhubarb Compote
3 cups rhubarb, trimmed and cut into 1 inch pieces
3 cups strawberries, cut in half, or in quarters if really large
3/4 cup sugar
1/4 cup water
1 1/2 T cornstarch
Place prepared fruit in a sauce pan. Add sugar and water and stir together. Heat on medium heat until mixture comes to a boil. Lower temperature to a simmer and cover. Cook 7-10 minutes or until rhubarb is tender. Remove lid and ladle out about 1/4 cup of the juice. Whisk in the cornstarch until blended. Add back to the fruit mixture and stir to combine. Cook 5 minutes longer or until slightly thickened. Remove from heat and pour into a bowl.
To serve dessert, place a wedge of the cake on a plate, add a scoop of really good vanilla ice cream, and ladle the compote over the cake. Enjoy!

Think Green for Earth Day

It started off cloudy this morning and cooler, so I decided to make some soup. This Broccoli~Cheddar Soup is quick to make and the beautiful green color should remind us to care for this Earth for our generation and those to come.
Broccoli~ Cheddar Soup
12 oz. Broccoli florets
1 small yellow onion or 1 bunch of scallions, chopped
2-3 T olive oil
2-3 cloves of garlic minced
4 cups of vegetable broth (or chicken broth)
2 cans of Cream of Mushroom soup
1 cup cheddar cheese


Lower heat to med/low and place the cover over the sauce pan. Cook until the tip of a knife easily pierces the broccoli.


Add the two cans of Cream of Mushroom Soup and whisk to combine. Cook 5-7 minutes on medium heat, then, lower heat to a simmer and add the cheddar cheese and the green parts of the scallion. Ladle soup into a bowl and add homemade croutons, if desired.

Wednesday, April 21, 2010
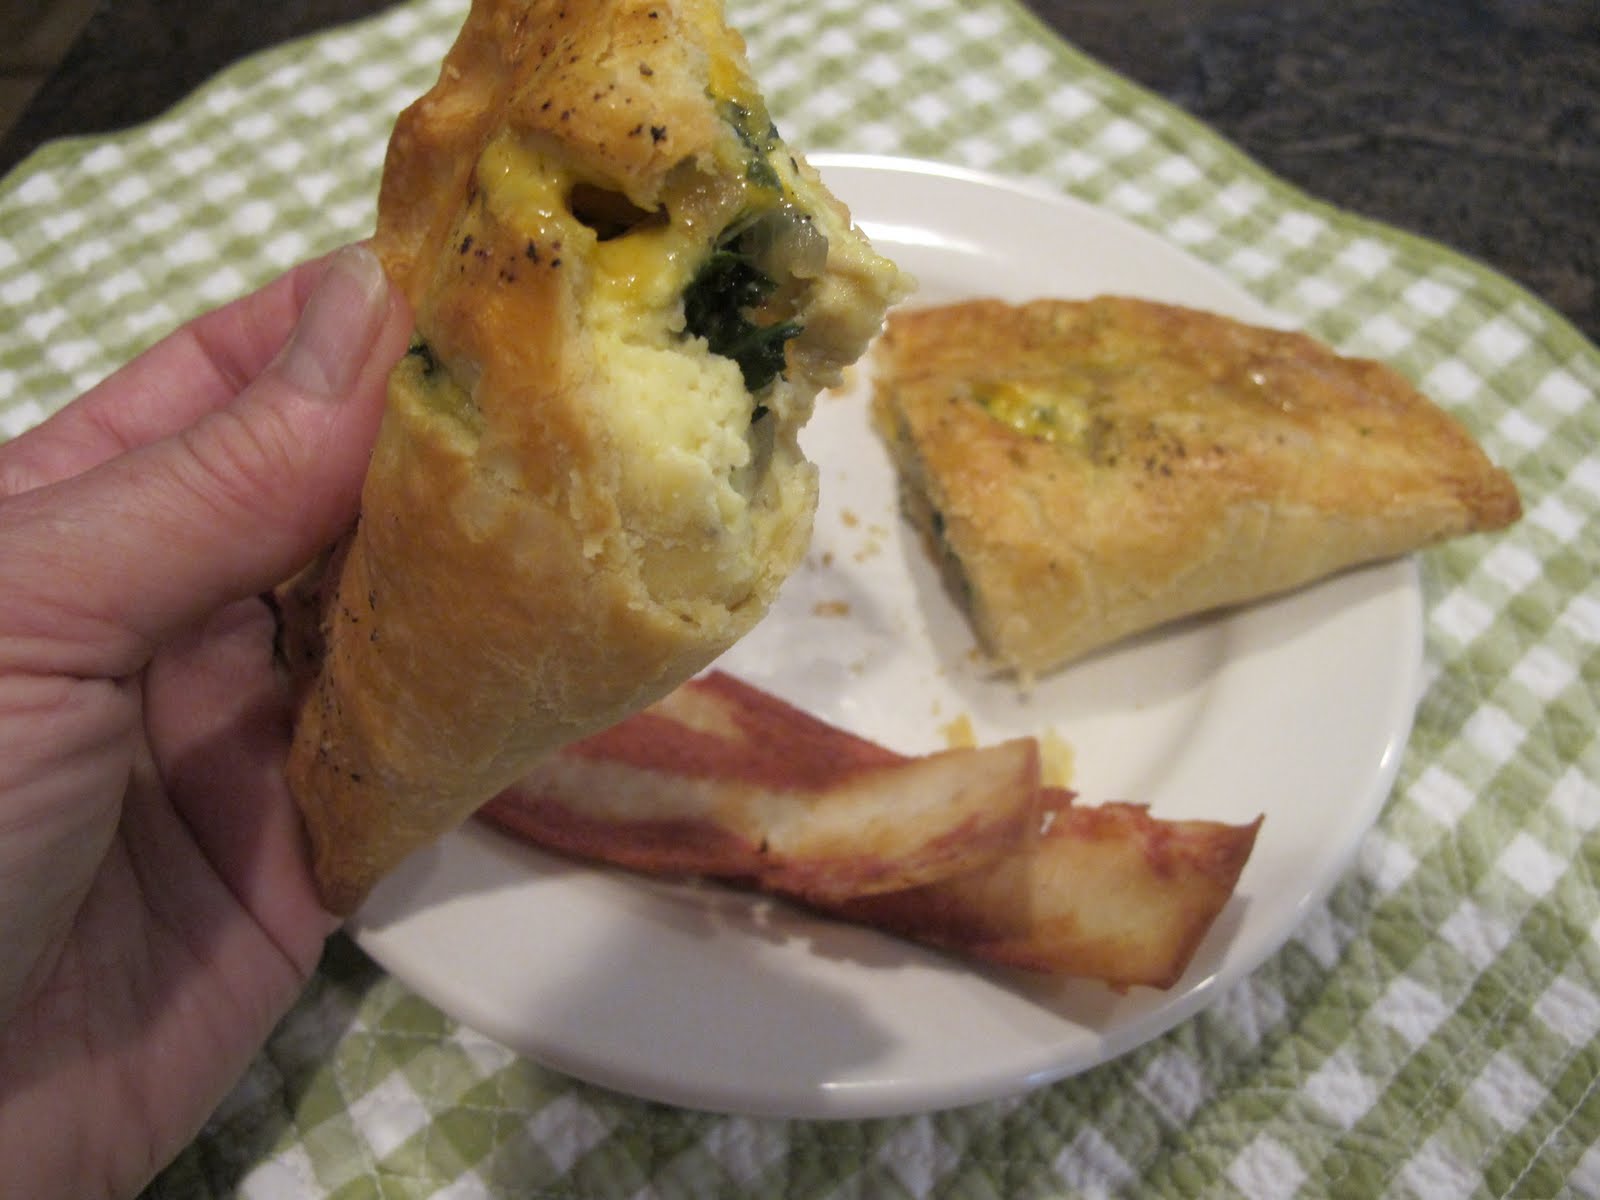
Quiche Pockets

Quiche Pockets
Pie dough
4 cups all purpose flour
1 tsp. baking powder
1 tsp. salt
1 tsp. sugar
1 3/4 cup Crisco butter-flavored shortening
1/2 cup cold water
1 egg
1 tsp. cider vinegar
In the KitchenAid, mix all the dry ingredients. Add the shortening, cut into pieces, while the mixer is running. The dough will be crumbly. Whisk the egg, water and vinegar together. Turn the mixer on and add all at once to the dough. Mix just until combined. Turn dough out on your board and knead slightly. Divide into 4 pieces and form into round disks. Wrap in plastic wrap and refrigerate. At this point, you can put the wrapped disks into a freezer bag and freeze up to 6 months.
Filling(s)
3 cups fresh spinach, rough chopped
8-10 mushrooms (I used button, but you could use crimini, shitaki, etc) sliced
2 cups approximate, Cheese (I used Colby/Jack and a Smoked Cheddar)
1-2 shallots, minced
1-2 scallions, cut
chives
parsley
6 eggs
1/3 cup light whipping cream
salt & pepper
1 egg (beaten with 1 T milk for sealing pastry and brushing tops)

Whisk eggs and cream. Heat saute pan on medium heat and add 1 tablespoon of unsalted butter. When melted, add the egg mixture. Use a spatula to bring the edges towards the center as the egg cooks. Important - You just want to set the eggs, not cook them to a "scramble".

Take the dough out of the refrigerator and roll out to a little more than 1/8-inch thick. Cut out 8-inch rounds (I used a small plate as a template). Brush the edges with the beaten egg/milk mixture.


egg - mushroom - Smoked cheddar - chives - parsley

Make 3 slits in the top with a sharp paring knife. Brush with additional egg wash and sprinkle freshly ground pepper on top. Repeat with remaining dough and filling. I was able to get eight, 8-inch pastries.

Bake 20-25 minutes or until golden brown. (If you want to freeze these pastries, bake for 15 minutes to under cook slightly. Then, if you want to heat them in the oven later, bake frozen pastries for 10 minutes.)

I prepared a couple of slices of vegetarian bacon to go with my Quiche Pocket and guarantee these pastries will be a hit. Enjoy!
Nostalgia...and Cookies
It was just last week when I was talking to my sister about some of the creative games our grandfather made us from wood. Unfortunately, the game he made me, is no where to be found. I suppose my mother passed it on; after all, eight kids in a 3 bedroom home can only hold so much! Nonetheless, the games kept us busy and unbeknown to us kids, taught lessons in math, strategy, and creativity.
It must be fate, but while I was shopping at Whole Foods today, I came across a replica of the game my grandfather had made for me. It's by Melissa & Doug from their "Past-Tyme Classics" and it's called Mancala. I can't wait until my grandchildren are old enough to play it; I still remember all the good times I had challenging my siblings.
 Turn off the television and put away the Nintendo. Bake some cookies and have an old-fashioned Game Night. I came across this recipe in Classic Southern Desserts by Southern Living magazine. Yes, it's a shortbread recipe, but a few tricks turns this cookie into something even the Scots would find magical.
Browned Butter-Pecan Shortbread
1 1/2 cups butter, cut into pieces
3/4 cup firmly packed brown sugar
3/4 cup confectioners' sugar
1/2 tsp. Vanilla Butter Nut flavoring
3 cups all-purpose flour
1 1/2 cups finely chopped toasted pecans (Toast pecans at 350F-degrees for 7-8 minutes. Measure after chopping)
1. Cook butter in a large skillet over medium heat, stirring constantly, 6 to 8 minutes or until butter begins to turn a golden brown. Remove pan from heat immediately and pour butter into a shallow dish. Do not cover. Chill 1 hour or until butter is cool and begins to solidify.
2. Beat butter at medium speed with an electric mixer (or KitchenAid) until creamy. Gradually, add sugars, beating until smooth. Add flavoring and mix again. Add flour, beating at low speed until blended. Stir in pecans.
3. Shape dough into 4 (8-inch) logs. Wrap logs tightly in plastic wrap and chill 4 hours or until firm.
4. Preheat oven to 350F-degrees. Cut logs into 1/4-inch thick rounds and place on a baking sheet with parchment paper. Bake for 8 to 10 minutes or until lightly browned. Remove to wire rack and cool completely.
The rich flavor of the browned butter, topped with the infusion of toasted pecans makes this a winner. Enjoy!
It must be fate, but while I was shopping at Whole Foods today, I came across a replica of the game my grandfather had made for me. It's by Melissa & Doug from their "Past-Tyme Classics" and it's called Mancala. I can't wait until my grandchildren are old enough to play it; I still remember all the good times I had challenging my siblings.
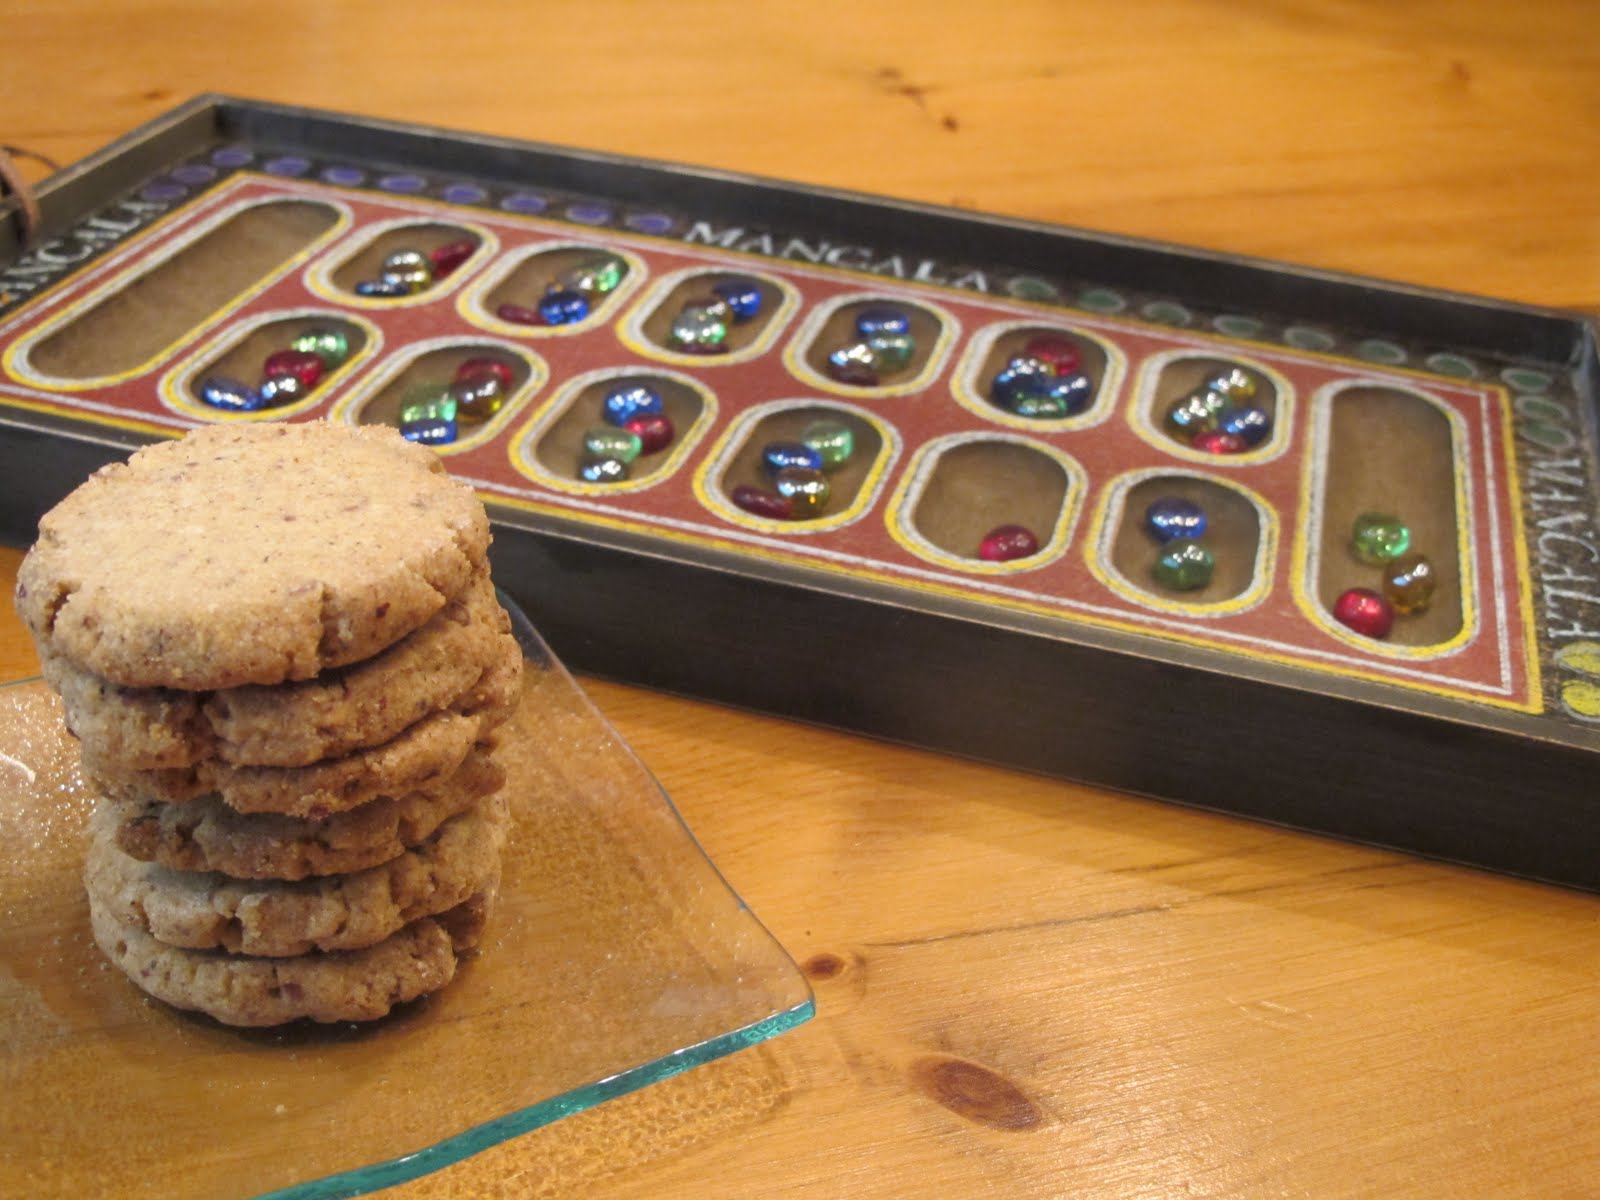
Browned Butter-Pecan Shortbread
1 1/2 cups butter, cut into pieces
3/4 cup firmly packed brown sugar
3/4 cup confectioners' sugar
1/2 tsp. Vanilla Butter Nut flavoring
3 cups all-purpose flour
1 1/2 cups finely chopped toasted pecans (Toast pecans at 350F-degrees for 7-8 minutes. Measure after chopping)
1. Cook butter in a large skillet over medium heat, stirring constantly, 6 to 8 minutes or until butter begins to turn a golden brown. Remove pan from heat immediately and pour butter into a shallow dish. Do not cover. Chill 1 hour or until butter is cool and begins to solidify.
2. Beat butter at medium speed with an electric mixer (or KitchenAid) until creamy. Gradually, add sugars, beating until smooth. Add flavoring and mix again. Add flour, beating at low speed until blended. Stir in pecans.
3. Shape dough into 4 (8-inch) logs. Wrap logs tightly in plastic wrap and chill 4 hours or until firm.
4. Preheat oven to 350F-degrees. Cut logs into 1/4-inch thick rounds and place on a baking sheet with parchment paper. Bake for 8 to 10 minutes or until lightly browned. Remove to wire rack and cool completely.
The rich flavor of the browned butter, topped with the infusion of toasted pecans makes this a winner. Enjoy!
Monday, April 19, 2010
Rx-Chocolate
"Take Chocolate, so that the most unpleasant company seems good to you"
~Marquise de Sevigne

I didn't experience bad company this past weekend, but I did have a stressful few days; Kelly's illness and selling our home. However, chocolate has a magical element and even in medieval times it was believed to exist a Sorcerer's Stone. Even the Aztecs and the Mayans used the cacao pods to produce a drink that was revered for it's richness, but bitter compared to what we have today. Cortez brought this drink to Spain, but it was the Swiss, Belgians, and French that began to produce the chocolate that we associate with decadent confections and desserts we crave.
These chocolate cookies will be the Rx for what's bothering you...or as an aphrodisiac! You choose.
Fudgy Brownie Drops
9.7 oz. Scharffen Berger Bittersweet Chocolate, finely chopped
5 T unsalted butter
1 1/4 cup granualted sugar
4 large eggs
1 tsp. espresso powder
2 tsp. vanilla extract
1 1/4 cup All-Purpose Flour
1/2 tsp. baking powder
1/4 tsp. salt
1 cup chocolate chips
E. Guittard Bittersweet, Semi-Sweet or White Chocolate Wafters, or Hershey Kisses, or nonpareils
Melt together the chocolate and butter in a microwave-safe bowl. (I did 40 secs on HIGH, stirred the chocolate, then, 20 secs more. In the KitchenAid (or use a large bowl and a hand mixer), beat the sugar and eggs on Med-High until thick and lemony-colored. Add the melted chocolate mixture, then add the espresso powder and vanilla extract and mix to combine. Remove the paddle attachment and stir in the dry ingredients. Finally add the cup of chocolate chips and stir again.
Place mixture in the refrigerator to firm up. Meanwhile, preheat oven to 325F-degrees while dough is chilling. In about 15 minutes, the dough should be stiff enough to scoop up.

Allow about 2 inches between each cookie on the baking sheet.

Bake 10-11 minutes. The cookies should be shiny and cracked on top.

Place a wafer, a Kiss, or a nopareil in the center of each cookie. Let cool on the baking sheet about 5 minutes before removing to wire rack to cool completely.

Fix yourself a plate of cookies, sit down, prop your feet up, take a bite, close your eyes, and imagine all your troubles be gone. Enjoy!
Saturday, April 17, 2010
Lemon Poppy Seed...Cake or Cookies

Note: I used a combination of Meyer lemons and large lemons in both the zest and juice.
Lemon Poppy Seed Cookies
5 cups all-purpose flour
1 1/2 tsp. baking powder
1/2 tsp. salt
1 cup unsalted butter, softened
1 1/3 cups granulated sugar
2 large eggs
1 T lemon zest (from one lemon)
4 T lemon juice
1/2 tsp. lemon extract
1/4 cup poppy seeds
In a bowl, whisk the dry ingredients together. In the bowl of the KitchenAid, beat butter and sugar at high speed until fluffy. Beat in eggs, one at a time. Add zest, juice, and extract and mix to combine. Add the flour mixture, one cup at a time and beat to incorporate. Divide dough into half. Form dough into 2 1/2-inch logs, wrap in plastic wrap and refrigerate at least 2 hours. (You can also double wrap them and place them in the freezer for up to 3 months.)

Heat oven to 350F-degrees. Line baking sheets with parchment paper or use a Silpat. Slice cookies into 1/4-inch slices and place on prepared baking sheet, about an inch apart. Alternatively, you could roll out the dough and cut into 2 1/2-inch scalloped shapes, but slice & bake is definitely quicker!
Bake 8 to 10 minutes, or until edges are a golden brown. Remove to a cooling rack and let cool. Makes about 5 to 6 dozen.
Now the cake...
Lemon Poppy Seed Cake
1 1/2 cups granulated sugar
2 large eggs
1 cup (2 sticks) unsalted butter, melted and cooled
1/2 cup milk
2/3 cup sour cream
1/4 cup lemon juice
1 tsp. lemon extract
1 tsp. vanilla extract
2 T lemon zest
3 cups all-purpose flour
1 1/2 tsp. baking powder
1 tsp. baking soda
1/2 tsp. salt
1/3 cup poppy seeds
Preheat oven to 350F-degrees. Use a oil/flour spray to coat bundt pan.
Combine sugar and eggs in the KitchenAid and beat until very light and fluffy. Slowly add the cool, melted butter, lemon juice and zest. Mix the milk, sour cream, and extracts together and set aside. Whisk the dry ingredients together in a bowl. Add the dry ingredients alternatively with the milk mixture to the butter/egg mixture. Beat at medium/high speed for 1 minute.

Scrape batter into the prepared bundt cake. Bake for 40 to 45 minutes or until a toothpick comes out clean.
While the cake is baking, prepare the lemon glaze.
In a small saucepan, stir together: 1/2 cup granulated sugar, 1/4 cup lemon juice, 1/4 cup water, 1 T lemon zest. Stir together and place on the stove over medium heat. Bring to a boil, without stirring. Boil one minute, then, turn down flame to low and continue to cook, 5 minutes more. Remove from the stove and set aside.
When the cake is done, cool for 10 minutes in the pan. Turn out onto a serving plate and use a toothpick to poke holes throughout the cake. Brush the lemon glaze over cake until all used up.

Mix up the icing glaze: 1 cup confectioners' sugar and 1-2 T lemon juice are mixed together, then poured over the cake.

Both these desserts are guaranteed to make you pucker then, smile and think of Spring! Enjoy!
As an alternative to the bundt pan, try some other pans and adjust the cooking time to 20-25 minutes.

Fill the cakelets with strawberries (see Strawberry Shortcake) then whip some heavy cream, about 2 cups. Fold in 1/2 cup of lemon curd and serve over top of the strawberries.
Friday, April 16, 2010
Hmmmm...Strawberry Jam

Strawberry Jam
5 cups crushed strawberries
7 cups sugar
1 pkg. Sure Jell powdered fruit pectin
1 T. lemon juice
1/2 tsp. butter
Start by preparing the jars. I put my jars and lids in hot sudsy water. Run your finger around the rim of the glass jar to make sure there aren't any nicks. That would prevent the lid from sealing.


1) Place the fruit in a 6 quart pan. I like to use my Le Creuset because it's cast iron with an enamel finish and it's a nice heavy pan to make jams.
2) Add one package of Sure Jell, the lemon juice, and butter.
3) Bring mixture to a full rolling boil (a boil that doesn't stop bubbling when stirred) on high heat.
4) Stir in sugar quickly. Return to full rolling boil and boil exactly 1 minute, stirring constantly. remove from heat. You shouldn't have any foam due to the butter, but if you do, skim off.

5) Ladle into the jars, use a damp paper towel to wipe the rims, and use tongs to place a lid, then the rim on the jar. Tighten and turn upside down.


Cover the jars with a kitchen towel and set timer for 15 minutes.


...and Popovers

I guess I was longing for those days today...our youngest daughter, Kelly, is in the hospital with complications from metastatic liver cancer. It's very hard to see her go through all this, but I know we will get through this "bump" as Kelly as put it, and have good times again. Until then, enjoy these popovers with your family and make some memories.
Popovers
This recipe is from King Arthur Flour. It's easy to mix up and the results were perfect.
4 large eggs, warmed in a cup of hot water for 10 minutes before cracking
1 1/2 cups milk (skim, low-fat, or full-fat), lukewarm
1/2 tsp. salt
1 1/2 cups King Arthur All-purpose flour
3 T melted butter
1) Preheat the oven to 450F-degrees. Position a ack on a lower shelf. The top of the fully risen popovers should be about midway up the oven.
2) Use a standard 12-cup metal muffin tin or popover pan . Grease the pan thoroughly, covering the area between the cups as well as the cups themselves. Make sure the oven is up to temperature before you begin to make the popover batter.

4) Add the flour, all at once and beat with a wire whisk till frothy; there shouldn't be any large lumps in the batter, but smaller lumps are okay.
5) Stir in the melted butter, combining quickly.
6) Pour the batter into the muffin cups, filling them about 2/3 to 3/4 full.

7) Make absolutely certain your oven is at 450F-degrees. Place the pan on a lower shelf of the oven.
8) Bake the popovers for 20 minutes without opening the oven door. Reduce the heat to 350F-degrees (again, without opening the door) and bake for an additional 10 to 15 minutes, until they're a deep, golden brown. If the popovers seem to be browning too quickly, position an oven rack at the very top of the oven, and put a cookie sheet on it, to shield the popovers' top s from direct heat.
9) If you plan on serving the popovers immediately, remove them from the oven, and stick the tip of a knife into the top of each, to release steam and help prevent sogginess. Slip them out of the pan, and serve.
Popovers are so easy to make, just resist opening the oven and you'll have perfect popovers. Enjoy!
Sharing...

This week, Maddie's daycare had an"all about the kids week." That meant assignments for her mom, Erin to provide a brunch treat for the class. She decided to make the Toaster Tarts and I love how she decorated them for the toddlers. Thank you for sharing.
.jpg)
Tuesday, April 13, 2010
A Mystery and a mystery ingredient
I would like to add, I've made many cakes with strange ingredients. Some of the ones that stand out are; tomato soup, mayonnaise, sauerkraut and even a very rich chocolate cake made moist with julienne beets! So, you see, I'm up for trying anything.

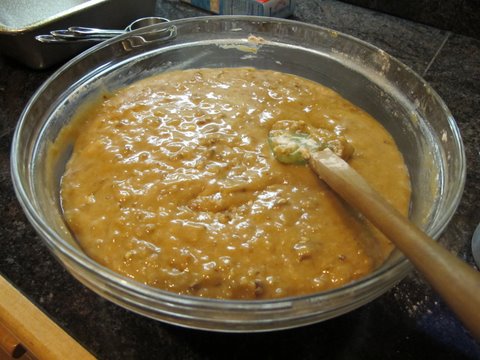
Pork and Beans Bread
15 or 16-ounce can of pork and beans (Joanne used VanCamp's, however, I'm a vegetarian, so I used Bush's Vegetarian beans)
4 large eggs
1 cup vegetable oil (not canola or olive oil)
1 tsp. vanilla extract
2 cups granulated sugar
1 tsp. baking soda
1/2 tsp. baking powder
1/2 tsp. salt
1 1/2 tsps. cinnamon
1 cup chopped pecan or walnuts (measure after chopping--I used pecans)
3 cups all-purpose flour (pack it down in the cup when you measure it)
Prepare two 9"x5"x3" loaf pans with a nonstick cooking spray. Preheat oven 350F-degrees.
Don't drain the pork and beans. Pour them in a food processor or blender--I used the blender.

Process them until they're pureed smooth with no lumps.
Place the eggs in a large mixing bowl and whisk. Stir in the pureed pork and beans and mix well. Add the oil and vanilla extract. Mix well again. Add the sugar and stir to mix. Then add the baking soda, baking powder, salt and cinnamon. Stir to incorporate. Stir in the nuts. Add the flour in one-cup increments, stirring after each addition.
Bake for 50 to 60 minutes. Test the center with a long food pick for doneness. Remove from oven and place on a wire rack to cool for 20 minutes. Wrap the cooled bread in plastic wrap. You can freeze the bread in a freezer bag for up to 3 months.
Hannah & Lisa's (her partner) note: If you don't tell anyone the name of this bread, they probably won't ever guess it's made with pork and beans.
I loved it! It reminded me a little of zucchini bread, but had a more, golden color like pumpkin. Just think about all the protein you're having with a wonderful treat. In fact, I ate two pieces while continuing with my murder mystery! Enjoy!
Subscribe to:
Posts (Atom)