Showing posts with label JAM. Show all posts

Wednesday, April 18, 2012

Bakewell Tart (tarta Bakewell)


The Bakewell Tart is a traditional English dessert native to the town of Bakewell, Derbyshire.  One of the earliest accounts of this dessert is in a book called Mrs. Beeton's Cookbook (aka Mrs. Beeton's Book of Household Mangement) from 1861.  Typically, the tart consists of a shortcrust pastry (masa), a layer of jam (mermelada de fresa), and a sponge-like filling from ground almonds (relleno), known as frangipane.

I love making this tart, first, because it's easy and secondly, you can be creative with the jam and/or nuts you choose to use.  Since I had just made a fresh batch of strawberry jam, that's what I used, but I could have easily substituted raspberry, blackberry, blueberry, etc. and this tart would have been just as scrumptious.

This isn't a tart that my mother ever made, although, if she had known about it, I know she would have.  However, we certainly picked a lot of strawberries together and made jam, so partly this does bring back memories in her kitchen.  Also, my son-in-law, Matt, who is in Madrid for the year on a Fulbright Scholarship, gave me a wonderful new cookbook for Christmas and tarta Bakewell was one of the recipes in Postres~Las Mas Irressistibles Recetas.  As you might have guessed from my first paragraph, the book is in Spanish and I'm excited to relate something I know to the language both he and now my grandson, Ari speaks.

The Spanish version of tarta Bakewell did influence my recipe by incorporating some of the uniqueness of it.  I used a combination of both granulated sugar (azucar de lustre) and brown sugar (azucar de moreno) in addition to substituting the all-purpose flour for a one-third cup of rice flour (harina de arroz).  Fingers crossed it looks and smells great baking. 

Bakewell Tart
Perfect Pie Dough
1" x 8" removable bottom tart pan

1/3 cup Strawberry Jam (or your favorite)
14T (1 3/4 sticks) unsalted butter, room temperature
1 cup granulated sugar
1/3 cup brown sugar, packed
2 large eggs
2 tsp. Almond extract
1 cup finely ground almonds (or almond flour)
1/3 cup rice flour

 About 1/2 cup Sliced almonds for the topping

Preheat oven to 400F-degrees.  Place on a baking sheet and blind-bake the tart shell for 10 minutes.

Prick the surface with a fork...

...or line the bottom of the tart with wax paper and use pie weights.
Remove from the oven and allow to cool while you mix up the almond filling.  Lower oven temperature to 350F-degrees.

In a stand mixer, using the paddle attachment, cream the butter and sugars completely.  Add eggs, one at a time, fully incorporating them into the butter/sugar mixture.  Add the almond extract and mix to blend.  Add the ground almonds and rice flour  and mix just until incorporated.

Spread the strawberry jam on the bottom of the pre-baked tart, spreading it with an off-set spatula to cover completely.

Spoon dollops of the almond mixture onto the strawberry jam and use an off-set spatula to spread over it, covering the jam layer.


Sprinkle 1/2 cup of sliced almonds on top and bake (keeping tart on a baking sheet) for 30 to 35 minutes until it's a lovely golden brown on top.

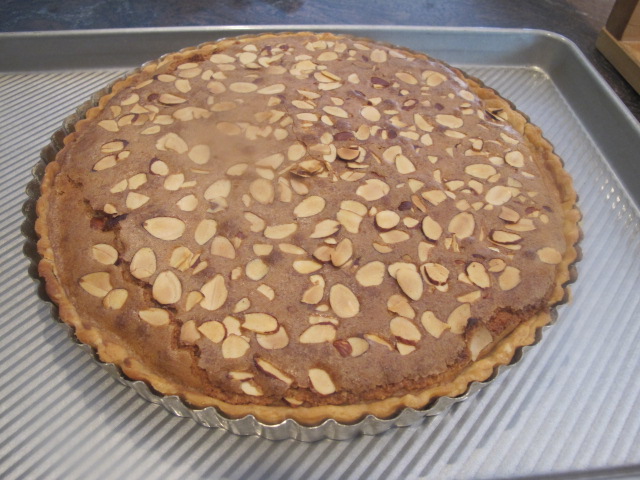
Dust with confectioners' sugar before serving.

I can't help thinking, while I was creating my version of this Bakewell Tart, with the influence of the Spanish recipe from this treasured cookbook, that maybe through baking we could have a peaceful co-existance among all cultures--it's a thought ;-D! Enjoy!


Sunday, August 14, 2011

August's Give-Away and a Special Jam Combination

It's mid-August and in spite of painting a cottage, erecting furniture, creating gifts for the Leo's in our family, and working on my 3-D flower projects, I manage to find the perfect summer-time fabric to sew an apron for this month's Give-Away.

Fresh berries are abundant in our Farmer's Markets--raspberries, blueberries, cherries, and of course strawberries,  so when I saw this fabric I knew it said summer.  The kind of summers I spent in my grandparent's garden picking strawberries and blueberries, but also a large variety of veggies.  Knowing I had been part of the harvest made me feel good and oh, did everything taste wonderful; both fresh and canned for the winter months.

The lucky recipient's name (at least I hope they feel lucky, LOL!) will be drawn from the names that leave comments during the month.  This handmade apron will be sent to you with love!

Now, for the jam.  This is not an idea I had for a recipe, but rather, a "request" from a dear friend...who said to me the other day, "You know what kind of jam I'd like to see you make?  Cherry~Cranberry!"  Well, now that's a challenge because these two fruits are abundant in very different seasons and I always like to make jam from fresh fruits.  However, living in the Pacific Northwest, this wasn't as impossible as I discovered it would be.
Our cherries are coming to an end, but the big, sweet Bing are still in season and so that was the easy fruit to get. However, for the cranberries, I had to rely on frozen. Our neighbor to the south, Oregon, produces this "bouncy" fruit (as does Massachusetts and Michigan) and I'm proud that I was able to answer this request and will be sending off several jars to my dear friend tomorrow!

Cherry~Cranberry~Vanilla Jam
1 10oz bag of frozen cranberries
1 1/2 - 2 lbs. fresh cherries, stemmed and pitted
1 box of Sure-Jel powdered pectin
2 Vanilla Beans, split and scraped (optional, but really makes the jam)
1/2 tsp. butter
5 cups granulated sugar

Wash and sterilize six 8 oz. size jars, lids and rings.  After washing the jars, I fill 3/4 full with water and microwave 3 at a time for 3 minutes 45 seconds.  Use jar tongs to remove from the microwave, dump the water and turn upside down on a paper-toweled line baking sheet.  In a medium sauce pan, cover rings with water and bring to a boil, reduce heat to low and had the lids.

Place the cranberries in a strainer and rinse them under hot water briefly, then, place drained cranberries in the food processor with the knife blade.  Next, stem and pit the cherries and place them in the food processor.
Pulse several times until the mixture is finely chopped, not pureed!  You should have about 4 or 4 1/2 cups of fruit.
Add the fruit, pectin, and butter to a large Dutch oven.  Split and scrape two vanilla beans and place the "seeds" into the fruit mixture.  Toss in the beans in the pot to extract added flavor.
Bring mixture to a boil, stirring occasionally.  When the mixture comes to a "hard" boil, remove the vanilla bean pods and add the sugar.  Bring the mixture to a rolling boil, stirring constantly, and boil for 1 minute.  Turn off he heat.  Skim off the "foam" before ladling into the sterilized jars.
Ladle the hot jam into the jars, wipe around the edges, then use tongs to place a lid then, screw on a ring tightly.  Turn filled jar upside down for 10 minutes so the lids will seal tightly.  You should hear a popping noise when they do.  Cover with a towel while you're waiting.
Jam is not only one of my favorite things to make, but it's one of my favorite "condiments."  I love to bake with it, but mostly I just love to spread it on homemade biscuits, warm bread, or as my grandson likes...dipping a cookie in it!
Thank you my dear friend for the challenge--this jam is really good and will certainly be added to my repertoire.  Enjoy!

Sunday, March 27, 2011

PB & J Pound Cake


My mother once said to me..."if it wasn't for peanut butter and jelly (or jam), you probably would have starved!"  This is true.  I took PB & J, PB & pickle, PB & marshmallow Fluff and other more unusual accompaniments to peanut butter in my lunch box almost every day of my school life because I loved peanut butter--thank goodness I didn't have an allergy to peanuts:-D...and, it probably explains my obsession with making jams!!

I even remember in 6th grade choosing to do an essay on George Washington Carver.  We had been studying him in history for his contribution to agriculture in the Reconstruction South showing farmers that peanuts could be an alternative crop to cotton, which repleted the soil.  Of course, it wasn't his only contribution to history, but I certainly appreciated his research in this area.

To create the peanut butter ribbons through the pound cake, I've taken my idea from the Mint Stracciatelli Pound Cake to melt Reece's Peanut Butter chips and spread them on a parchment-lined baking sheet.  This way I have luscious layers of peanut butter to compliment the "jam".  Speaking of the jam, I didn't use one of the jams I preserved, but, rather I pureed dried blueberries (that I soaked overnight) with some fresh blueberries to make a jam that would hold up in the cake.  The cake is topped off with a brown butter glaze, sprinkle with chopped roasted peanuts, but it could easily have just a dusting of confectioners' sugar.

PB & J Pound Cake
1 pkg. (10 oz.) Reese's peanut butter chips, melted and spread on a parchment-lined baking sheet. Refrigerate for 10 minutes or until set.

Jam:
1 cup dried blueberries
1/2 cup water
Bring to a boil, then add 1/2 cup fresh (or frozen) blueberries, turn off the heat and place a lid on top.  Let set several hours or overnight.  Transfer blueberry mixture to a mini food processor, add 1/2 cup of granulated sugar and puree until smooth.
Break the set peanut butter into shards.

Batter:
1 1/2 (2 1/4 sticks) unsalted butter, at room temperature
1 pkg. (8oz) cream cheese
1 1/2 cups granulated sugar
1 cup light brown sugar, packed
6 large eggs
1/2 tsp. Peanut Butter flavoring (optional)
1 tsp. Vanilla extract
1/2 tsp. ground cinnamon
1/4 tsp. ground cardamon
1/2 tsp. salt
3 1/3 cups all-purpose flour


Preheat oven to 325F-degrees.  Spray a 12-cup Bundt pan with a non-stick baking spray and set aside.
In the KitchenAid, using a paddle attachment, cream the butter and cream cheese thoroughly.  Add the sugars and beat for 5 minutes until fluffy.  On medium speed, add the eggs, one at a time and beat well after each addition.  Add the flavoring and extract and mix together.  Add the dry ingredients all at once and beat on low until incorporated, then, put the speed to medium and mix for 1 minute.  Stir in the peanut butter shards and pour into the prepared bundt pan.
Start with a layer of batter, then add several spoonfuls of the blueberry puree.  Repeat with a another layer and more puree, then, finally, add the remaining batter on top.
Bake 55 to 60 minutes or until the cake pulls away from the sides of the pan and the top is firm to the touch.  You won't be able to use a skewer to test for doneness because you may be sticking into a melted peanut butter layer and think the center is not set.  You'll have to use your senses!
Let the cake cool at least 15 minutes in the pan before inverting it onto a serving plate.  Let cool completely and then ice with the brown butter glaze if desired.

Brown-Butter Glaze
1/4 cup (1 1/4 sticks) unsalted butter
2 cups confectioners' sugar
1 tsp. Vanilla extract
1 T Karo Syrup
1-2 T heavy cream
dry roasted peanuts-chopped (optional)
In a small sauce pan on medium low heat, brown the butter.  Transfer butter to a glass bowl and using a hand mixer, beat in the confectioners' sugar, 1 cup at a time.  Add the extract and the Karo syrup and beat on low.  Add 1 to 2 tablespoons of heavy cream to create a glaze.  Use an off-set spatula to spread the icing, then, sprinkle with chopped peanuts.

When you serve a slice, you will notice ribbons of peanut butter through the golden pound cake, with hints of blueberry jam to compliment it.  Pour a glass of cold milk and share with your family your favorite lunch box meal. Enjoy!

Tuesday, March 22, 2011

Jelly Doughnut...Muffins

Today feels like Spring...at least spring here in the Pacific Northwest.  The sun is shining, I heard the geese, honking while landing on the lake behind us, and our deciduous trees are all in bud.  I feel renewed by the awakening of nature.

My spring fever was short-lived when our daughter, Erin, telephoned this morning to tell me she had received an email from the editor of Brain, Child magazine and Kelly's essay, "This Sucks," which appeared in the Spring 2010 issue has won a Pushcart Prize, a very prestigious award in the literary world.  As proud we all are that she has receive this award, it saddens us to know she's not here to tell us herself.  Although, maybe with this glorious day in front of me, she is.

I made these muffins this morning because baking grounds me and trying to come up with a recipe that would have been celebratory for Kelly kept my mind off losing her, as she would put it, sucks.  Jelly doughnuts, to me, represent springtime and it reminds me of a Polish dessert called Paczki (pronounced Poonshkee).  These jelly doughnut-like pastries are typically made for Shrove Thursday...the Thursday before Ash Wednesday, but in Chicago, where there is a large Polish population, you can also find them on Shrove (or Fat) Tuesday.  The pastries, like doughnuts, are filled with fruit or creme and can be glazed or covered with granulated sugar or confectioners' sugar as I did mine this morning.  A very dear friend sent me some Paczki from a bakery in her town and they were delicious--light, airy and filled with fruit fillings.  I tried to make these light, but still able to be baked rather than fried and filled them with some homemade jam...raspberry, which was Kelly's favorite.  However, when I make them for her son, Ari, I know he's going to say, "Mimi, I want blueberry!"

Jelly Doughnut...Muffins
1/2 cup (1 stick) unsalted butter, softened
1 cup granulated sugar
2 large eggs
1 cup sour cream
1 tsp. Buttery Sweet Dough Emulsion
2 tsp. Vanilla Extract
1 1/2 cups Cake Flour
1 1/2 cups All-purpose Flour
1 T baking powder
1/2 tsp. baking soda
1/2 salt
1/2 cup Evaporated milk


3/4 to 1 cup unsalted butter, melted
1/2 favorite jam or jelly
1 1/2 cups confectioners' sugar or Glazing Sugar (like confectioners' sugar without the cornstarch)


Preheat oven 375F-degrees (Convection) and prepare a standard 12-cup muffin pan by brushing melted butter in the cups.


In a large mixing bowl of a stand mixer, using a paddle attachment, cream the butter and sugar until fluffy.  Add the eggs, one at a time, beating well after each addition.  Add the sour cream, vanilla, and Buttery Sweet Dough emulsion, if using, and beat well.  Combine the dry ingredients, then, add them to the batter, alternately with the evaporated milk, ending with the dry ingredients.  Mix on low until ingredients are incorporated, then raise the speed to medium for one minute.
Use a large scoop and divide the batter among the muffin cups.

Bake the muffins for 20-24 minutes, if using convection heat.  Let cool for 10 minutes in the pan while you melt the additional butter.
Transfer the melted butter to a glass bowl.  Dip the top and then the bottom of the muffin in the butter and place on a cooling rack.  

When all of the muffins have been thoroughly dipped.  Prepare a pastry bag, using Tip #230 for piping the jam (or jelly) into the center of the muffin.  This tip is also used to fill cream puffs and eclairs!

Let the butter set a 5 minutes and prepare a dish with the confectioners' sugar (or Glazing Sugar).  Use a spoon to dust the sugar over the doughnut muffins.
Last week, I saw on Facebook, a comment by a Buddist monk, Thich Nhat Hanh on the tsunami that had occurred in Japan.  Today, a dear friend of Kelly's and now, mine, reminded me of his words...
"An event such as this reminds us of the impermanent nature of our lives.  It helps us remember that what's most important is to love each other, to be there for each other, and to treasure each moment we have that we are alive.  This is the best that we can do for those who have died: we can live in such a way that they continue beautifully, in us."  

What powerful words to live by and cherish as I re-read Kelly's essay and had a bite of spring.  Enjoy!
 

Wednesday, January 26, 2011

Pineapple~Mango~Strawberry (PMS) Jam

I've been thinking a lot lately of about making a jam with pineapple.  It's one of my favorite fruits, just like my mom, and I often buy fresh pineapple to accompanied meals.  Keep in mind, though, even though I used fresh mango and strawberries in the jam, you have to use canned pineapple because of an enzyme in fresh that would prevent the jam from setting.

I thought PMS jam might just give you all a little chuckle, but honestly, it's blend of flavors, not to mention the beautiful rosy pink color will make any snow bound inhabitants cheery!  It's so simple to make and the recipe easily makes 8 half-pint jars, which should last you through this long, cold winter.

Pineapple~Mango~Strawberry (PMS) Jam
1 quart Strawberries
1 Mango
1 can (20 oz) Crushed Pineapple in natural juice
1/2 tsp. unsalted butter
1 box SureJell powdered pectin
5 1/2 cups granulated sugar
8 half-pint jars with lids and seals

Prepare jars as previously directed. 

In a food processor, place washed and drained strawberries and one mango.  Pulse several time until pureed.  Pour into a large Dutch Oven and add the crushed pineapple, including the juice.  Stir in the box of powdered pectin and add 1/2 tsp. unsalted butter (it keeps the jam mixture from producing too much foam).
Bring the mixture to a low boil, stirring constantly.  Add the sugar all at once and bring back to a boil.
When the mixture comes to a boil, set the timer for one minute.  Stirring constantly, boil mixture.  Turn off the heat.  Ladle into sterilized jars, wipe the edges with a damp cloth, then, place a seal and a ring over opening.  Turn to seal tightly and turn upside down.  Once all the jars are filled and turned upside down, set timer for 10 minutes and cover the jars with a towel.  After the time is up, you should hear the "popping" of sealed jars.  If any of the jars don't seal the first time, turn upside down again for another 10 minutes.

Jam keeps one year, if it lasts that long.  I have a little buddy who loves my jam and I'm sure he's going to love a jar or two of this PMS Jam.  Enjoy!