I hear, all the time from my daughter and friends, "I don't have enough time to bake...especially during the week." I know all too well the demands of a family, especially when both parents, or even single parents work outside the home. I've tried through the years to pass on any quick techniques to my girls, in baking and cooking, and now I'm going to let you in on some secrets and recipes, over the next few posts, that can be made in a large quantity, frozen and baked another day.
Today, I'm sharing one of my "best" cookie recipes I've come up with, which if you'd bake up all the dough at one time, you'd have 7-8 dozen cookies--easily enough to divide the dough to freeze for another day of baking. At first glance, you'll say this is just another chocolate chip cookie, but with a few changes, it may just fool you. I've up the ratio of butter to sugars and lowered the amount of chocolate chips (which by the way, I prefer the bittersweet variety) and toasted the pecans.
If you're not a pecan fan, try walnuts, macadamia, or even pistachios. Moreover, if an allergy prevents you from adding nuts, try Heath bits to give a crunch. Surprisingly, you'll find these cookies chewy and filled with flavor.
If I've learned anything from Kelly's illness over the last few years, we have to be aware of what we are eating (and being exposed to). I'm tired of reading ingredients on labels that I can't even pronounce and knowing their "shelf-life" is 3 to 6 months!
My Best Chocolate Chip Cookies
1 1/2 cups (3 sticks) unsalted butter, at room temperature
2 1/2 cups Dark brown sugar, packed
1 cup granulated sugar
1 T. Vanilla extract
1/4 tsp. Vanilla powder (optional, but really boosts the flavor)
4 large eggs
3 1/2 cups King Arthur all-purpose flour
1 tsp. baking soda
3/4 tsp. Kosher salt
2 1/2 cups pecans, toasted and coarse chopped
2 cups Bittersweet Chocolate Chips
Preheat oven to 350F-degrees. Measure the pecans and place on a baking sheet. Bake for 6 minutes. Remove from the oven and allow to cool. Chopped cooled nuts. Turn off the oven for now because this dough will need to chill for 1 hour.
In the bowl of a stand mixer, using the paddle attachment, cream the butter until smooth. Add the sugars and vanilla extract (and powder, if using). Beat thoroughly, scraping down the bowl occasionally. Add the eggs, one at a time, beating thoroughly between additions and scraping down the bowl. Measure the flour, baking soda and salt and add to the dough. Beat on medium speed just until the flour is combined. Remove paddle attachment and stir in the nuts then, the chocolate chips.
You will notice how light and fluffy the dough is before you stir in the nuts and chocolate bits.
Cover the bowl with aluminum foil and place in the refrigerator for 1 hour or more. (I actually had a Skype call with our 3 year old grandson for almost 1 1/2 hours before I could go on to the next step.)
Preheat oven to 350F-degrees. Place several spoonfuls of the dough on parchment paper--probably about 2-3 cups.
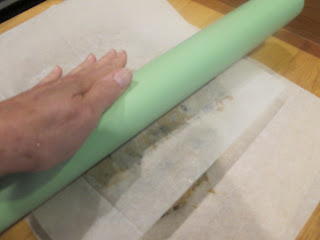
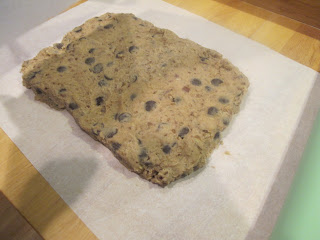
Place a second sheet of parchment or wax paper over the dough and roll it to a rectangle about 3/4-inch thick and a width and length that will easily slide into a gallon-size freezer bad. Alternatively, you can place the dough in a large plastic tub, squeezing out the air to seal.
I wrapped up the sides of the parchment and slid it into a bag and labeled it with the contents and added the date.
Typically, I like to bake the dough within 3 months, but you can go as long as 6 months.
When you remove the dough from the freezer, it's already flat so you can just cut it into 1 1/2-inch squares to bake on parchment-lined baking sheets.
Bake for 8-9 minutes. Remove from the oven and let cool on the baking sheet 5 minutes, before transferring to a rack to cool completely.
Prep time is about 30 minutes. Chilling-1 hour and baking time 8-9 minutes. Certainly that's doable for homemade goodness.
I've always baked from "scratch" because my mother did...I've just learned to do some short cuts to make it easier without sacrificing what I was taught. Enjoy!


The Snickerdoodles are all gone, so your recipe comes very handy!
ReplyDeleteYou know, I am missing a print button for your recipes. They are so handy.
What a great idea!! I can't wait to see the next post!
ReplyDeleteI agree on the shelf-life and list of ingredients...oy.
Kirsten~Thank you for the suggest. My wonderful BFF IT person added it for you. Aren't friends great!! XOXO
ReplyDeleteThank you for the "goody box"!! The chocolate chip cookies are ever sooooo good! I really like the tip of rolling out the dough, putting in bags (I have a "Seal-a-Meal") and freezing flat. Homemade goodness in minutes---now you can't beat that!!! Hugs, Barb
ReplyDeleteLove the idea of freezing the dough to use as needed! With just 2 of us here, I know if I bake a whole batch of cookies, I end up eating most of them!
ReplyDeleteDeniseB